
DrummerUp User Guide
This guide walks through how every feature works. If you're new, read "Connecting MIDI" → "Editing grooves" → "Scoring Mode" → "Reading the report" in that order. For an overview of what DrummerUp can do, see the product tour.
Button names follow the English interface. Switch the app language from the gear menu at the top right; the Chinese guide follows the Chinese interface.
Contents
0Screen tour
The main screen has four areas. The rest of this guide refers to them by these names.
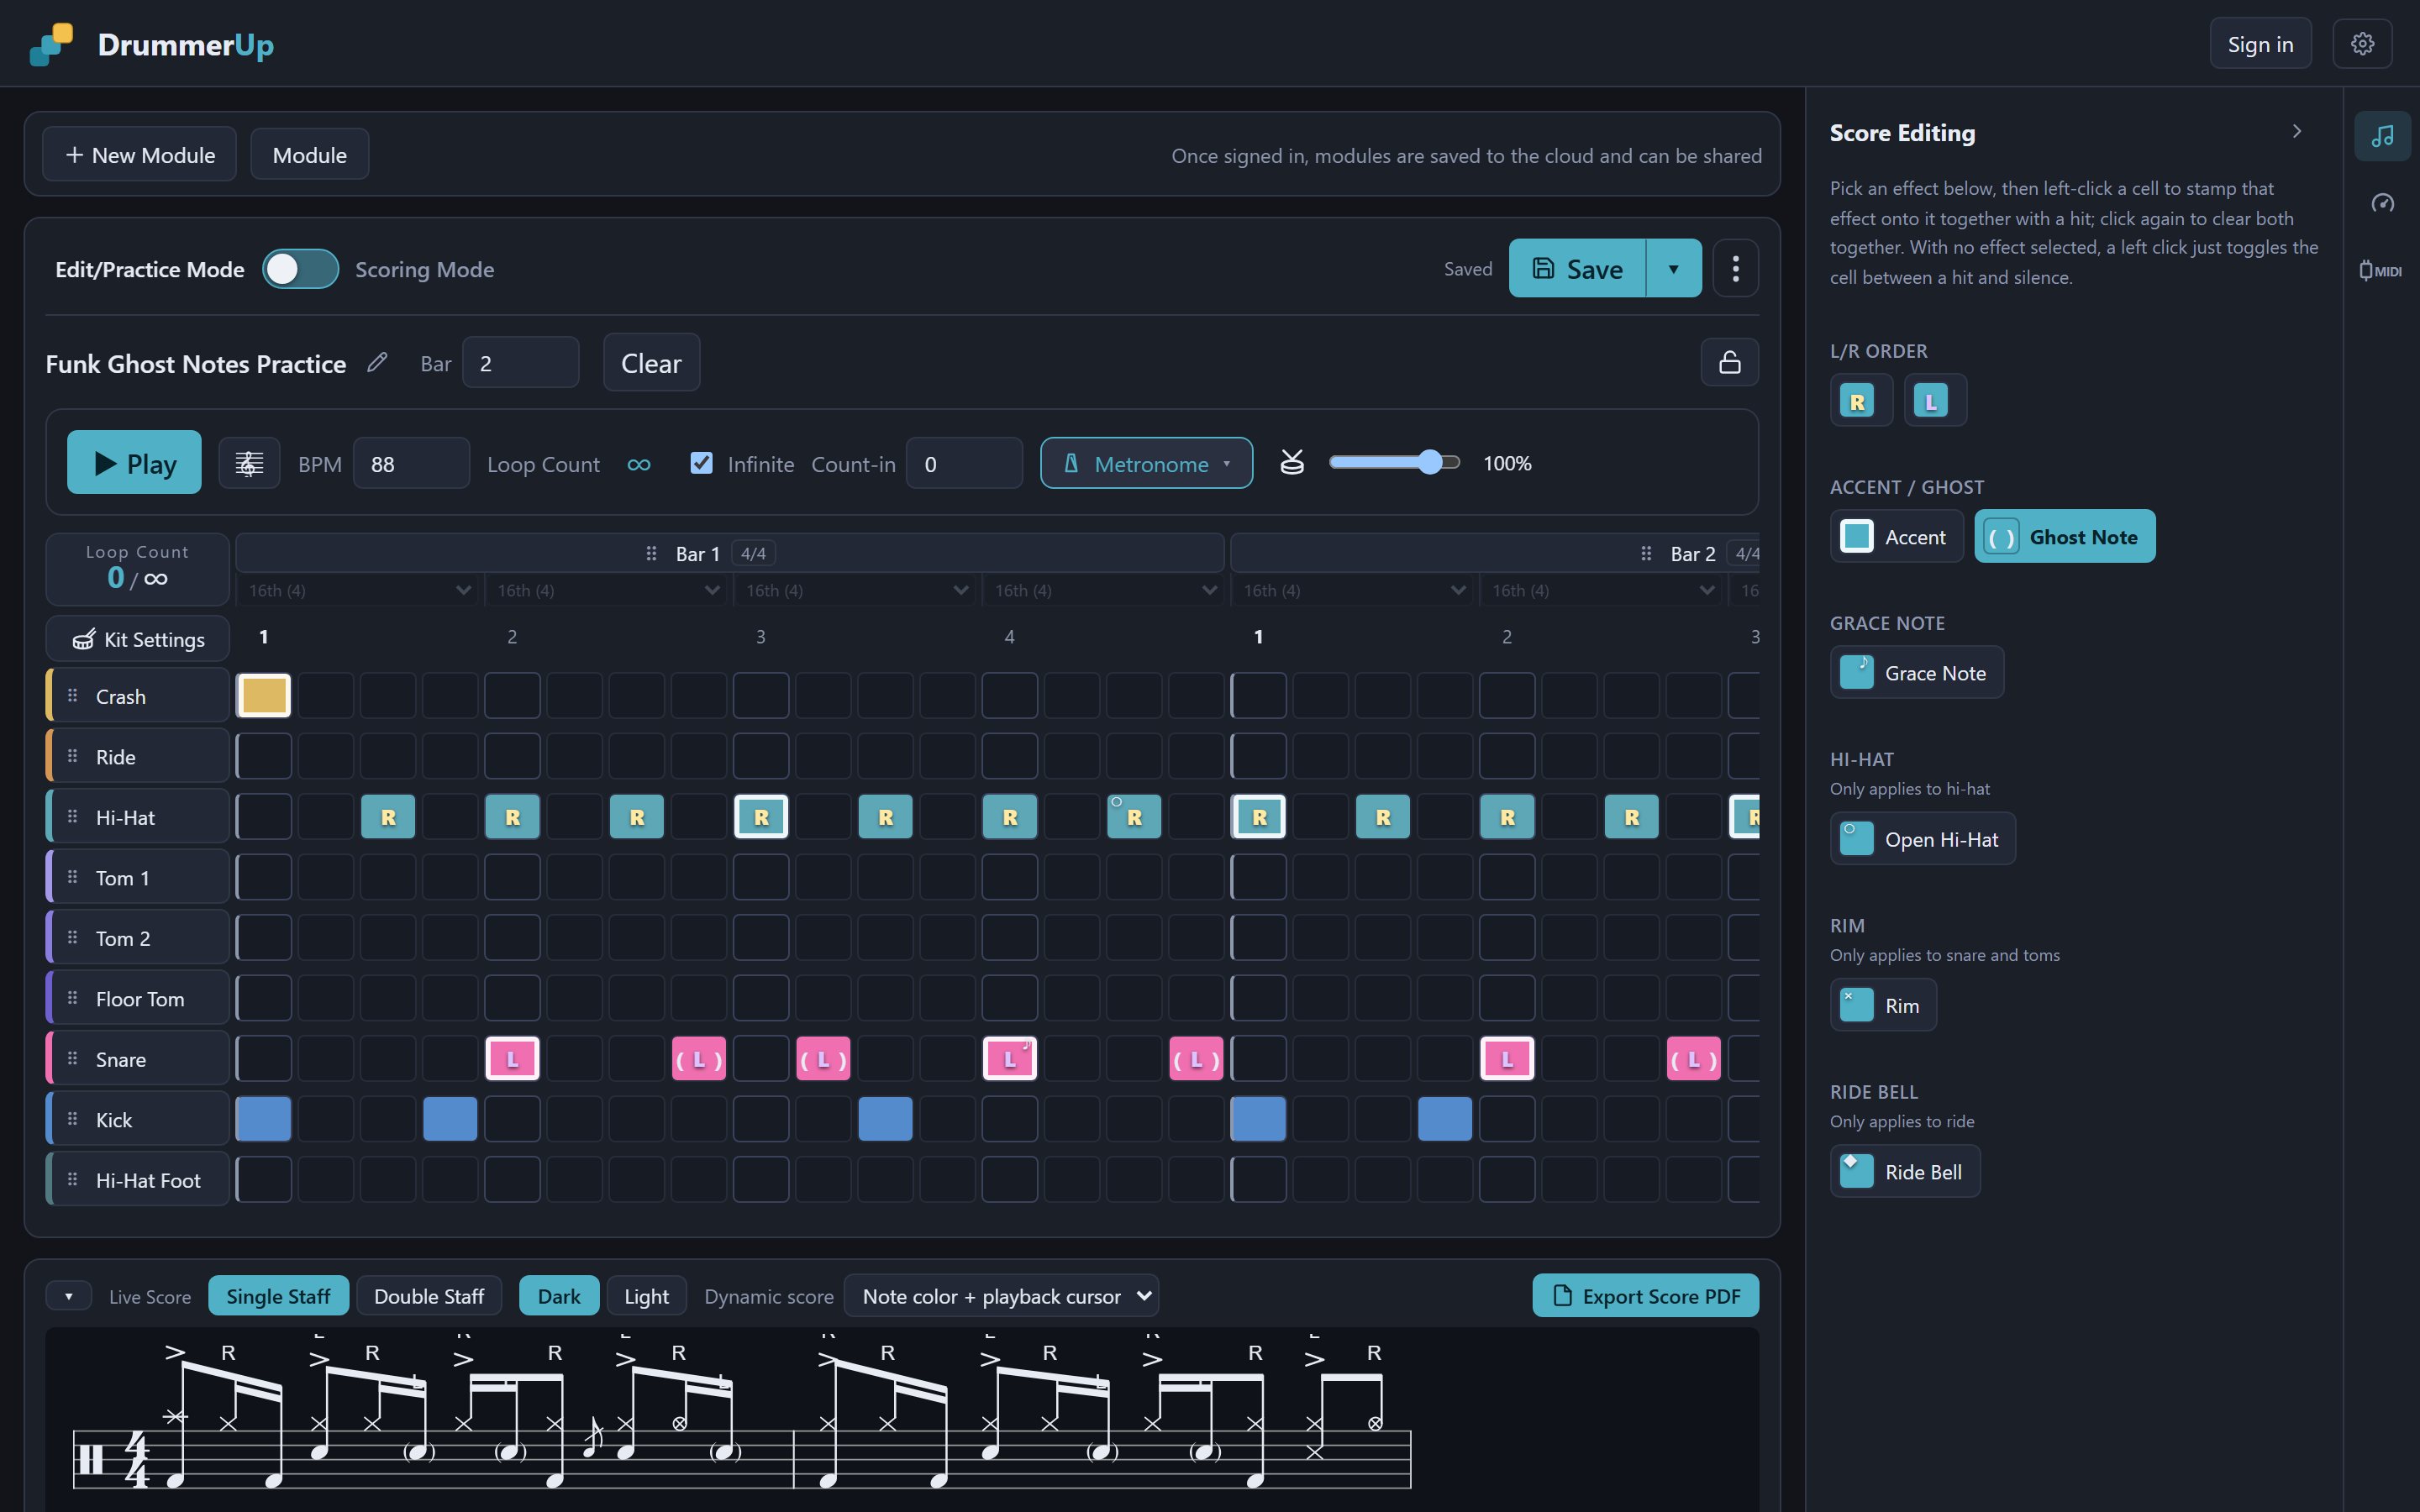
| Area | Where | What's there |
|---|---|---|
| Title bar | Top | "Sign in" at the top right (your avatar once signed in) and the gear menu (language, Preferences, Score History, Guide). |
| Module bar | Below the title bar | + New Module and Module (opens the module library). |
| Editor | Middle | The mode switch (Edit/Practice ↔ Scoring), module name, bar count, Save, the transport, the step grid, and the live score below it. |
| Right panel | Three icons on the far right | From top to bottom: "Score Editing" (note icon), "Scoring" (gauge icon) and "MIDI Connection" (MIDI icon). Click an icon to open its panel; click it again or the arrow to collapse. On phones the three icons sit at the top right of the screen and panels don't open by themselves — tap them when you need them (in portrait they slide up from the bottom). Phones also have a player bar along the bottom (Play/Stop, BPM ±, Loop, metronome on/off, and "⋯" for the other playback settings), a row of score-editing tools above the grid in edit mode (tap "?" for help; the grid icon next to the grid collapses/expands it, and in Scoring Mode the grid hides automatically), and a live score bar at the very top while scoring. |
1Connecting MIDI
Connect your e-drum kit to DrummerUp, or play on a keyboard or touch screen instead. You need to choose an input device before you can score.
Connect your kit
- Use a USB cable to connect the module's USB COMPUTER (or USB TO HOST) port to your computer. It has to be a data cable, not a charge-only one.
- Open DrummerUp in Chrome or Edge. Safari on the Mac doesn't support Web MIDI.
- Click the MIDI icon at the bottom of the right-hand bar to open the MIDI Connection page.
- Press Connect MIDI Drums and choose "Allow" when the browser asks for access to MIDI devices.
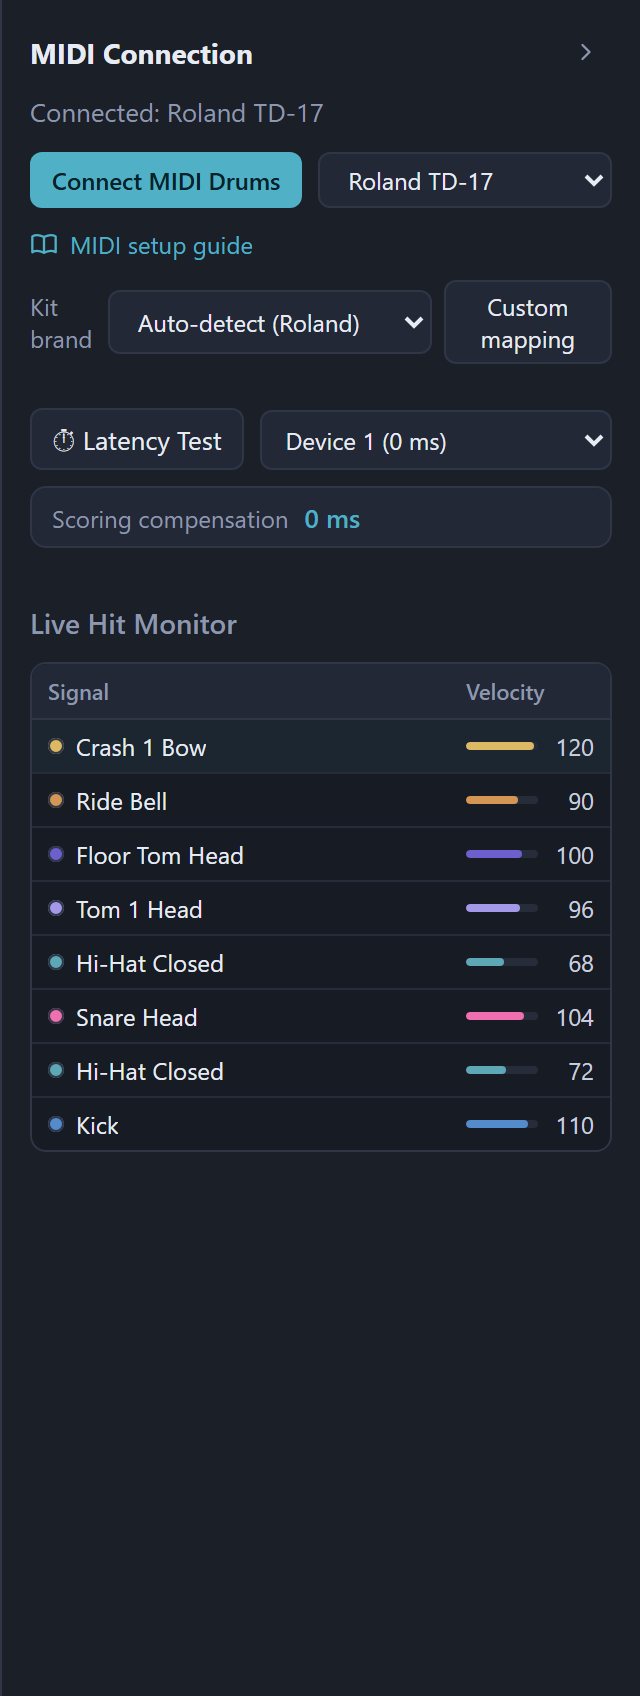
- Once connected, the device menu selects your kit automatically and shows "Connected: device name" at the top. Hit a pad — if its name appears in the Live Hit Monitor below, you're done.
You can also switch the device menu by hand: a real kit, the Keyboard Simulator or the Touch simulator. Choosing "Select input device…" again disconnects.
USB settings on Roland kits
Roland modules have two USB Driver modes. GENERIC (the factory default) uses the computer's built-in driver, needs no installation and only sends MIDI — that's all DrummerUp needs. VENDOR needs the Roland driver and can also carry USB audio. To switch on a TD-17: SETUP → "USB" → "USB Driver", then power the module off and on again. Phones and tablets only work with GENERIC.
Brands and custom mapping (MIDI Learn)
Not every brand sends the same MIDI notes. Once a real kit is connected, the MIDI Connection page shows a Kit brand row:
- Auto-detect recognises Roland, Alesis, Yamaha and EFNOTE from the device name, and falls back to the General MIDI mapping otherwise.
- If it guesses wrong, pick the brand from the menu; DrummerUp remembers which brand this device uses.
If a single pad doesn't line up (say you hit Tom 3 and it shows Tom 2), press Custom mapping next to it. This opens the "Drums & MIDI" tab of Kit Settings:
- Click the drum you want to set in the kit drawing (for example the Floor Tom).
- Under "MIDI mapping" on the right, find the articulation to change and press Learn. The screen shows "Hit a pad…".
- Hit the pad on your kit. That hit makes no sound and isn't scored — it just records the pad's note for this drum.
- Custom mappings are labelled "Custom"; removing one goes back to the brand default, and brand defaults can be set to ignore.
- Received but unmapped: pads you hit that don't map to anything are listed here. You can Assign to… a drum or use the note to create a New track.
- Hi-Hat open/closed detection: how open hi-hat is detected (by note, by the pedal's CC4, or automatically). The brand default is usually right.
- Reset all to brand defaults clears every custom mapping for this device.
Live Hit Monitor
The table at the bottom of the MIDI Connection page, newest hit on top. Each row is one hit: the Signal (the drum and articulation, e.g. Snare Head, Ride Bell, Hi-Hat Closed) and its Velocity (0–127); in Scoring Mode there's also a Judgement column. "Unmapped" means that note isn't mapped to any drum — fix it with custom mapping as described above.
Latency Test
Getting a hit from the module into the browser, plus audio output, always takes a fixed amount of time that differs between setups. Run the test at least once before scoring so judgements are based on when you actually played. After you connect any input device, a Latency Test button appears on the MIDI Connection page.
During the test
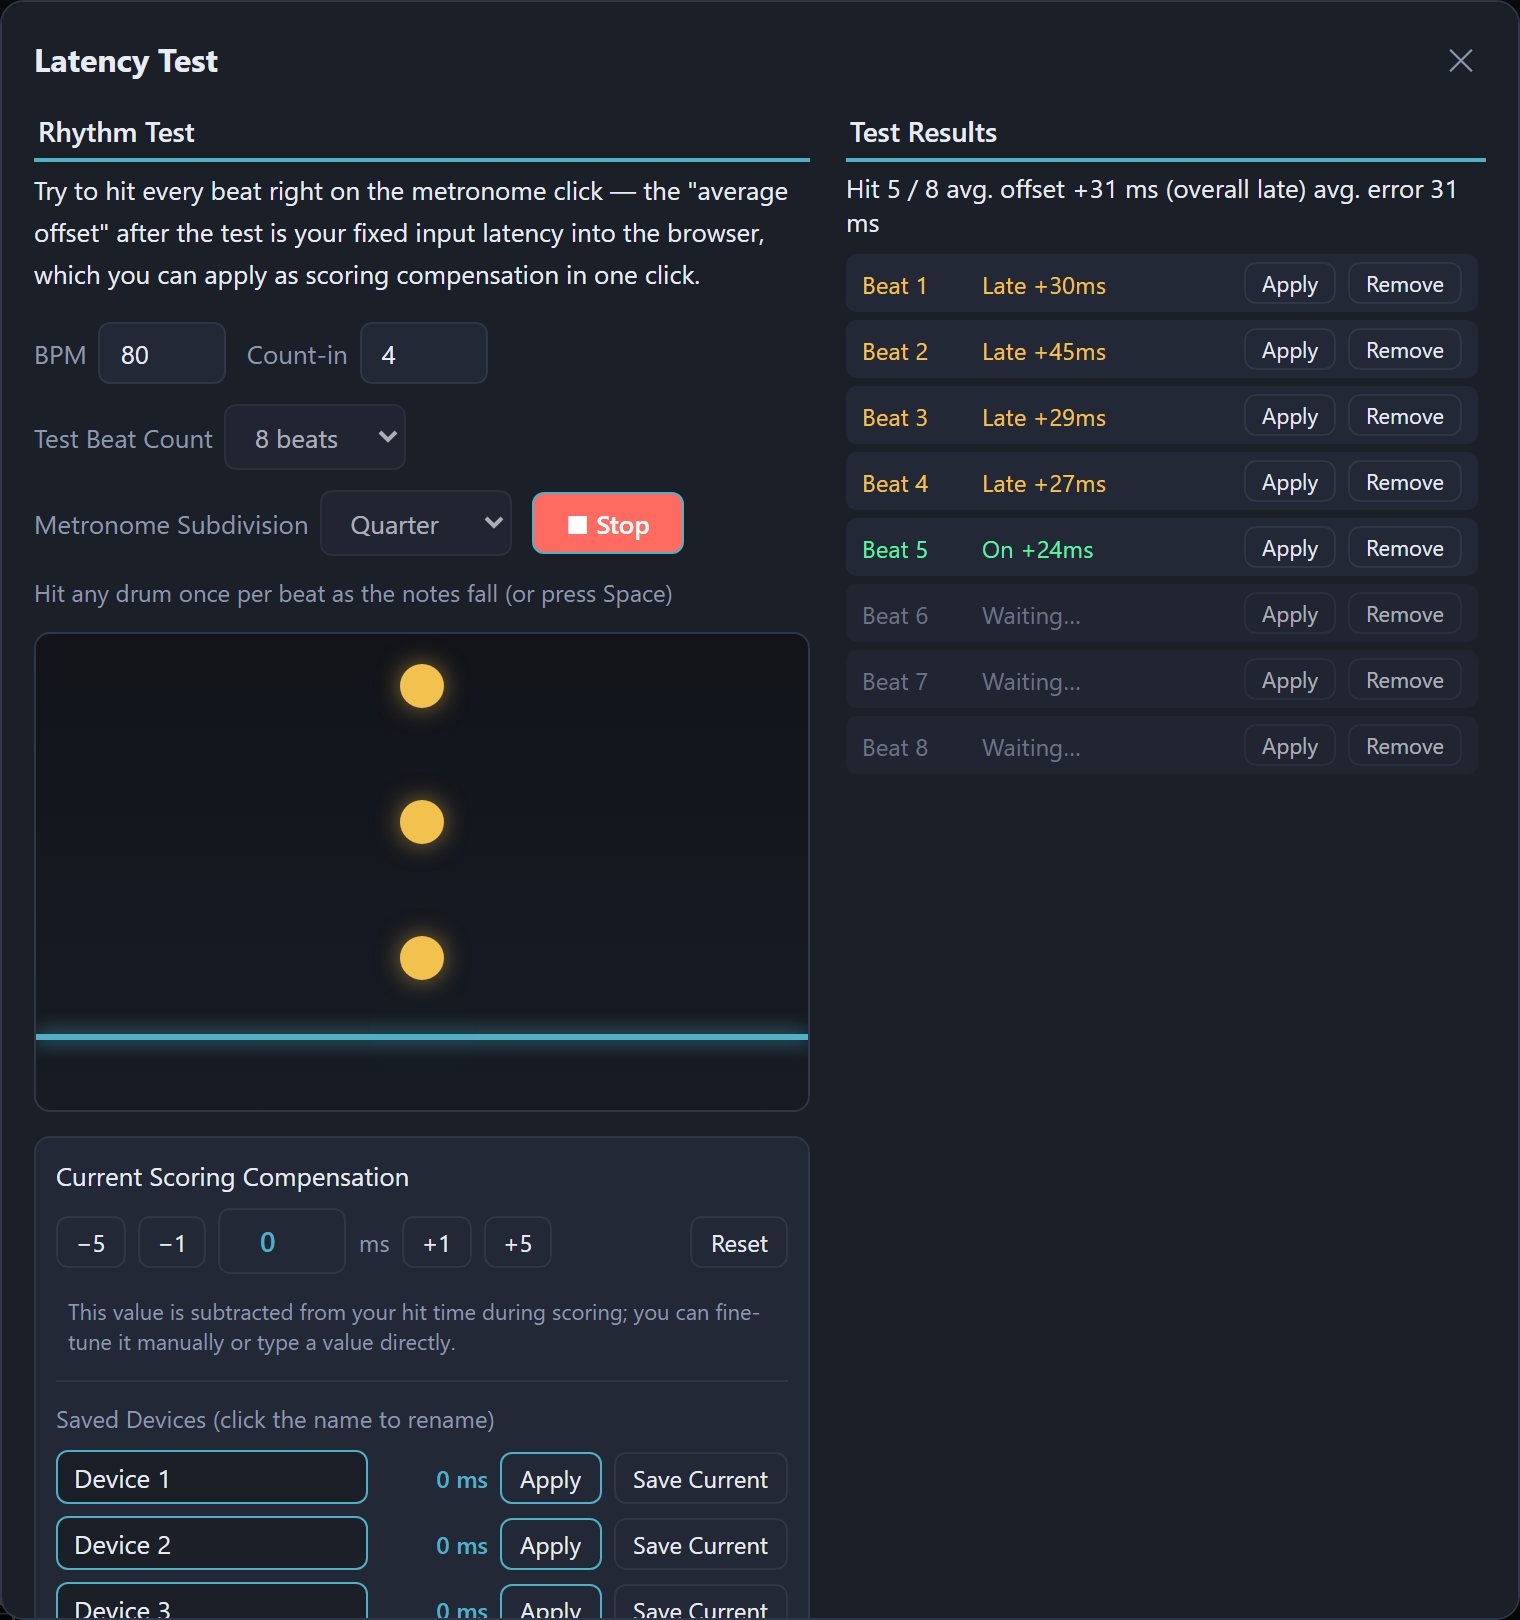
- Set the BPM, count-in, test beat count (e.g. 8 beats) and metronome subdivision, then press Start.
- After the count-in, circles drop down the screen one after another. Hit any drum the moment a circle touches the line at the bottom, together with the click (on the Keyboard Simulator you can press the space bar).
- Each hit is logged under "Test Results" with how many ms early or late it was: on time (green) is within ±25ms (the same as a Perfect in scoring); early/late (yellow) is beyond that. The top shows hits so far, the average offset and the average error.
- If you fumbled a beat or one is clearly off, press Remove to leave it out of the average.
After the test
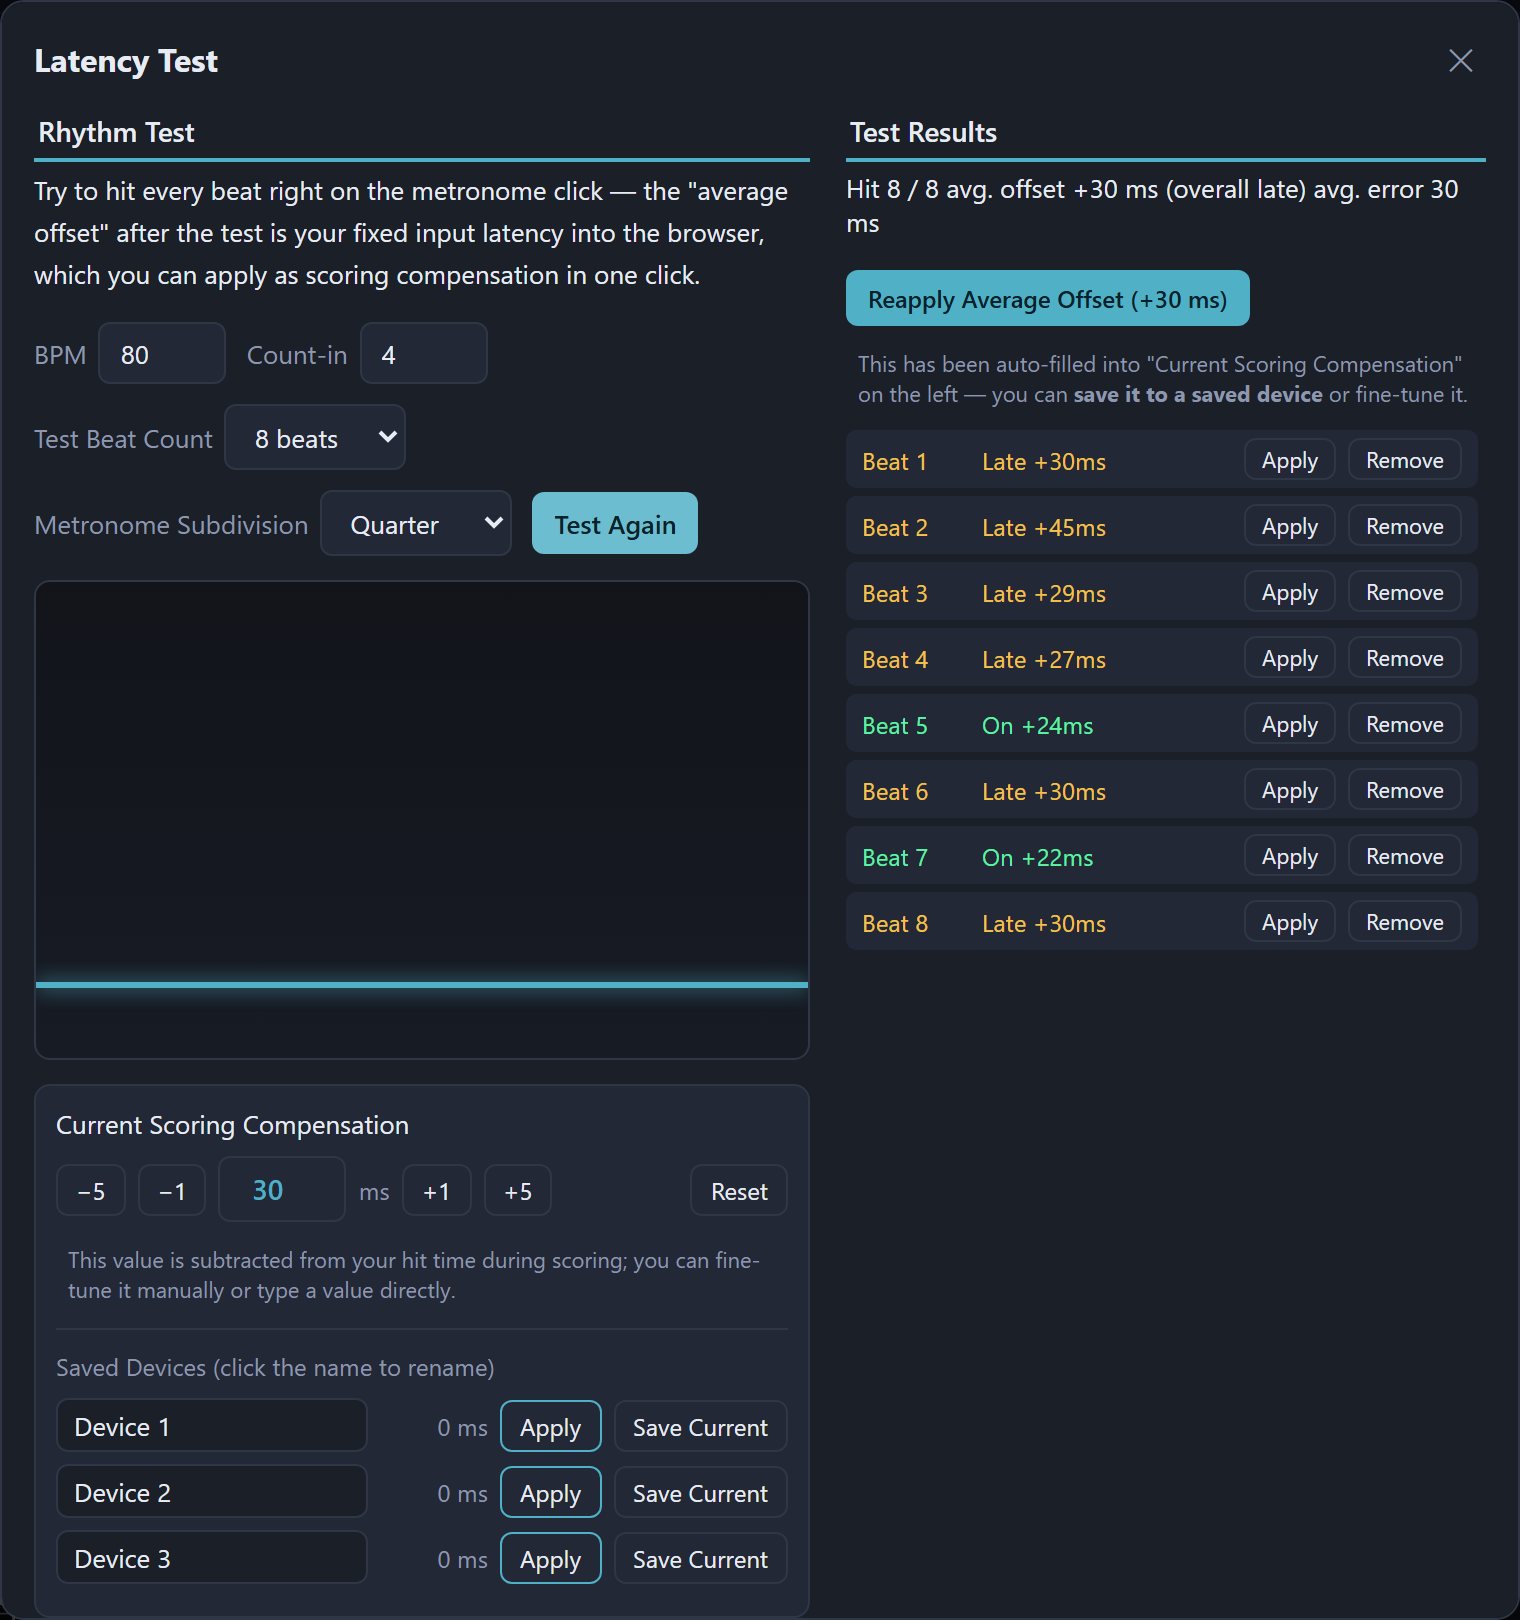
- The average offset is filled into Current Scoring Compensation at the bottom left. From then on, scoring subtracts it from the time of every hit. In the example every hit was around 25–30ms late, so the compensation is about +30ms.
- After removing beats you can press Reapply Average Offset; you can also nudge with −5/−1/+1/+5, type a number, or press Reset. Apply on a single beat uses just that beat's value.
- Save setups you use often: rename one under the saved devices (e.g. "TD-17 wired") and press Save Current; when you're back on that gear, press Apply.
- Press Test Again to check once more.
The MIDI Connection page also has a menu of saved devices for switching compensation, and a reset button next to the scoring compensation value.
Keyboard Simulator
No kit? Choose Keyboard Simulator in the device menu and play on your computer keyboard. Hold Shift for an accent and Alt for a ghost note; neither gives a normal hit.
| Key | Drum | Key | Drum |
|---|---|---|---|
| V | Snare | N | Ride |
| C | Hi-Hat closed | R | Ride Bell |
| X | Hi-Hat open | M | Crash |
| G H J | Tom 1 / Tom 2 / Floor Tom | B | Kick |
| Z | Hi-Hat Foot |
To change keys: with the Keyboard Simulator selected, press Customize Keys, click a drum's key field and press the key you want; Clear removes that key and Reset to Default goes back to the table above. While the Keyboard Simulator is in use, the space bar doesn't start or stop playback.
Touch simulator
On a phone or tablet with no keyboard and no kit, choose Touch simulator in the device menu and the "Touch drums" panel appears.
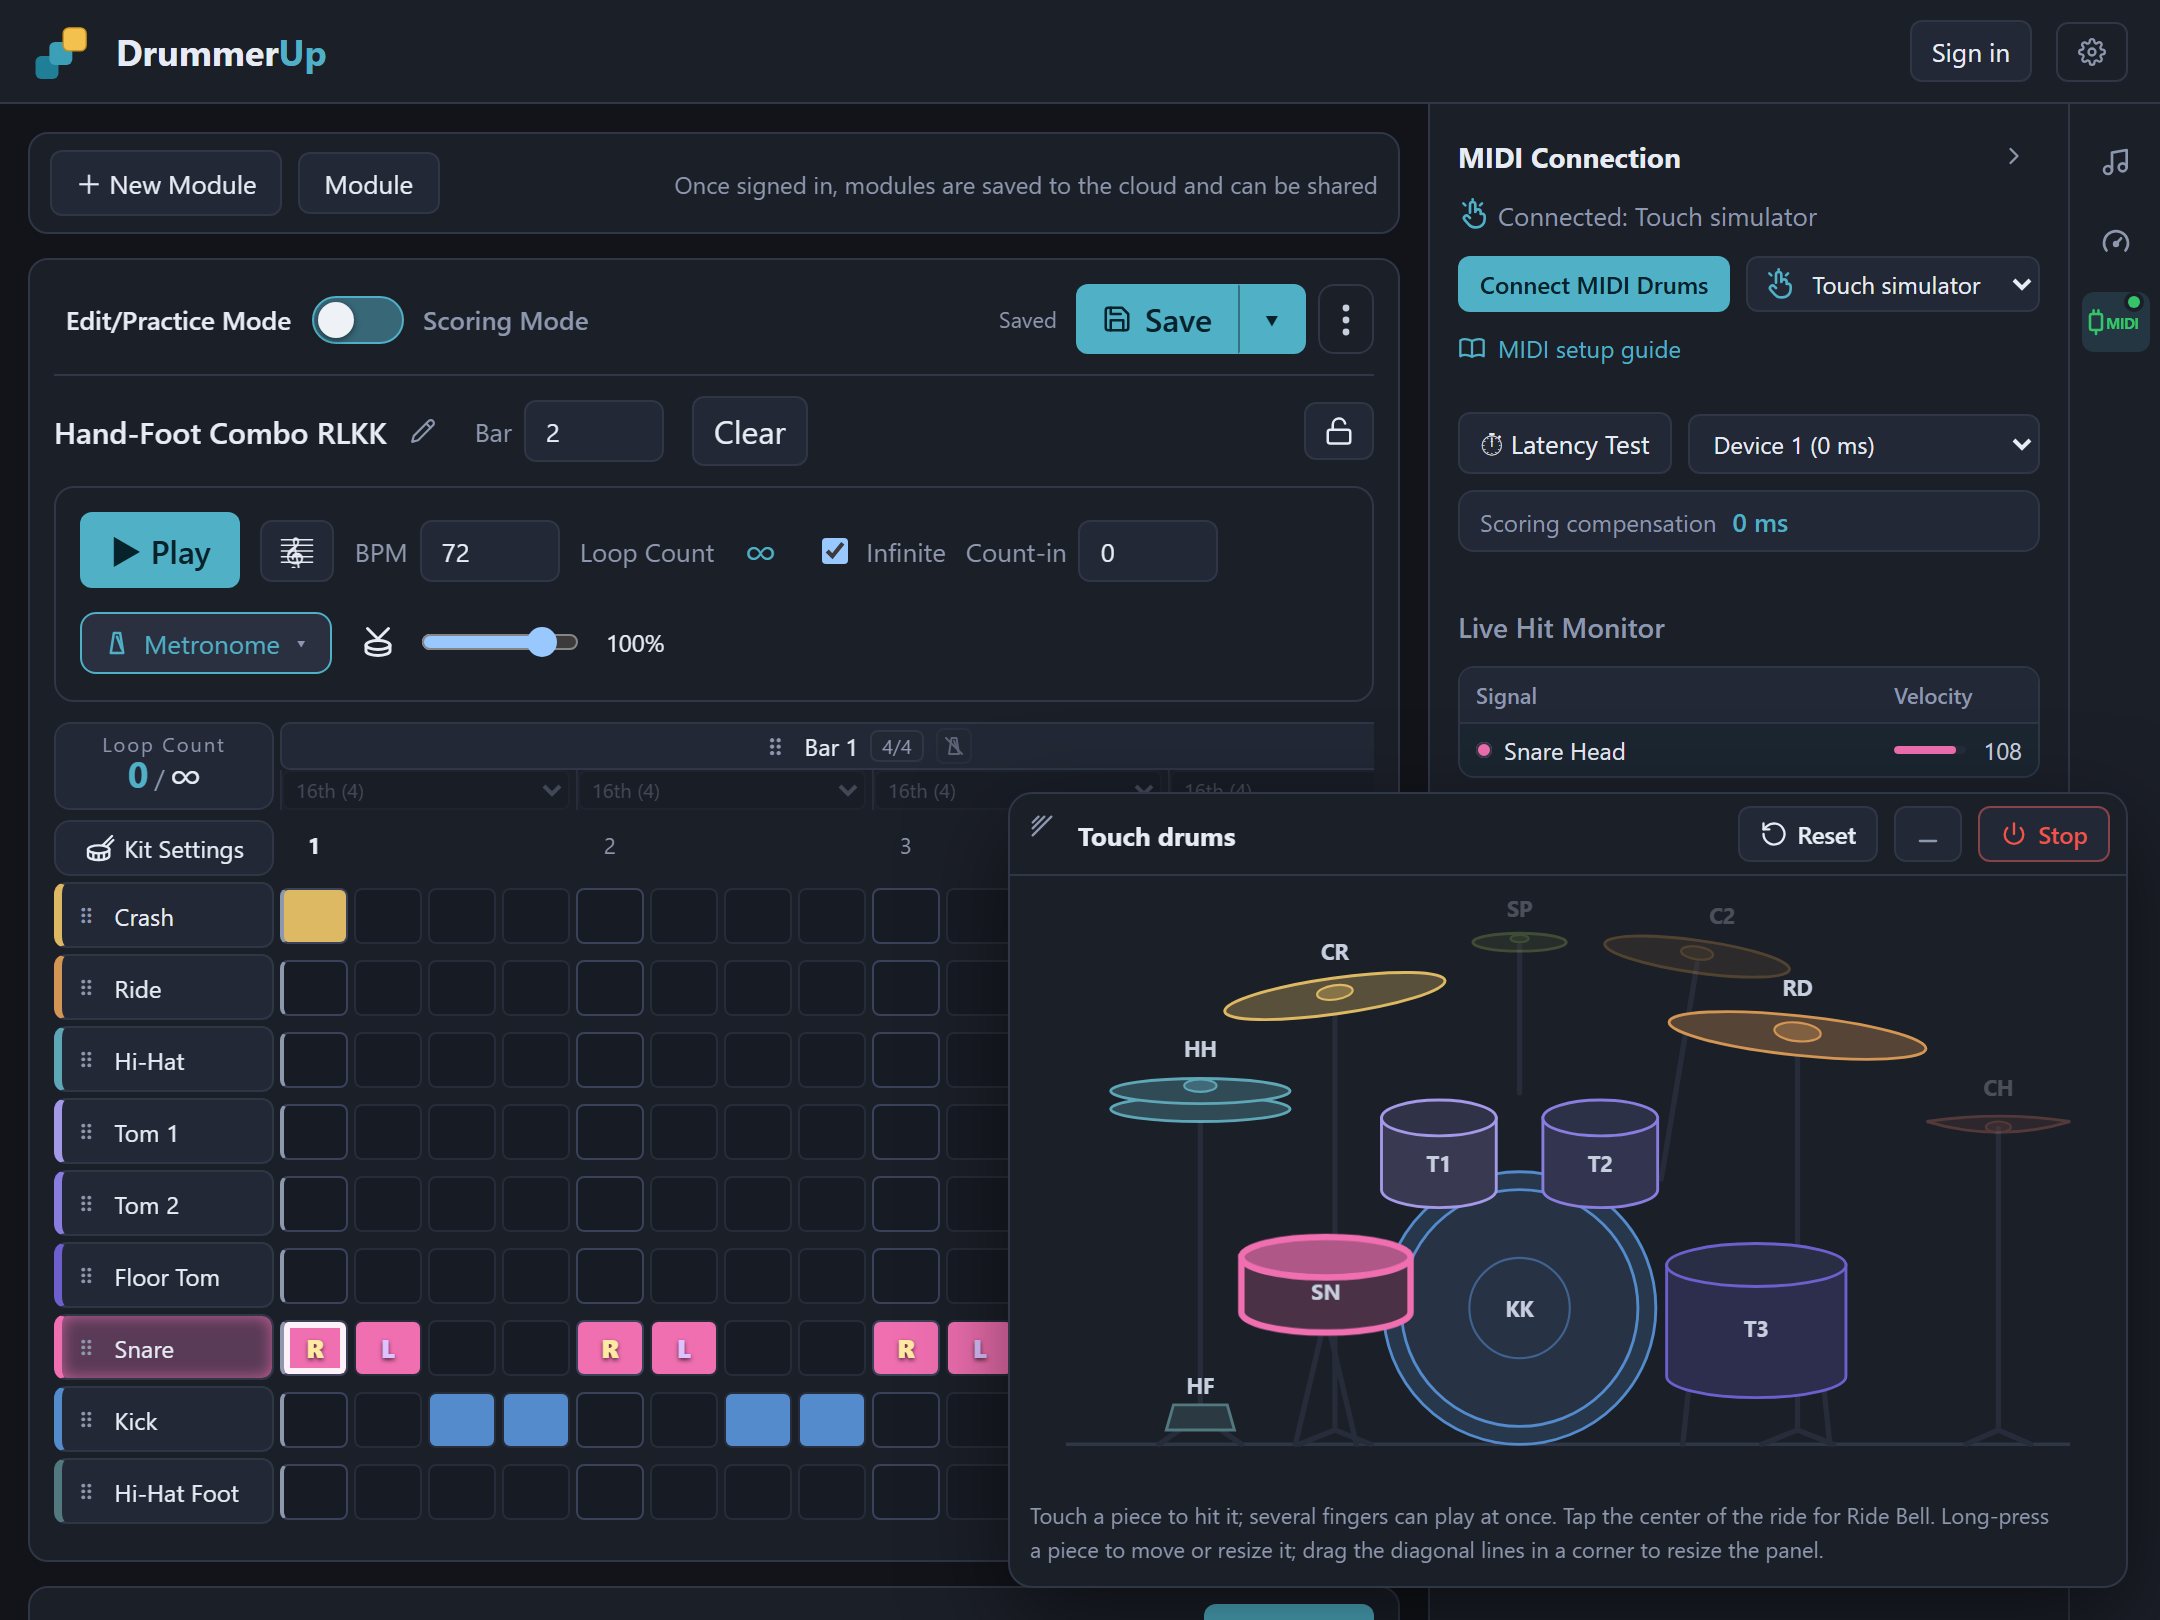
- Playing: a drum sounds as soon as you press it, and you can use several fingers at once; the bell in the middle of the ride is the Ride Bell. Devices that report pressure (such as a stylus) play louder the harder you press; regular finger taps use a fixed normal velocity.
- Moving the panel: drag the title bar.
- Resizing the panel: drag the diagonal handle in the corner; the kit scales proportionally.
- On phones the panel is pinned above the bottom player bar (full width in portrait, on the right in landscape) and can't be moved or resized. The square icon in the title bar switches the kit drawing to square pads (one big pad per drum, plus Ride Bell and open hi-hat); press it again to go back.
- Arranging drums: long-press a drum to enter arrange mode — drag to move, drag the dots on the selection box or pinch to resize, and tap empty space or Done to finish. Reset in the title bar puts every drum back.
- Minimising: press — to shrink it to a button at the bottom; tap it to expand.
- Disconnecting: press the red Stop to close the touch simulator.
Panel position, size and drum layout are stored on this device only, so a phone and a tablet can each have their own.
Phones, tablets and headphones
Android
Open DrummerUp in Chrome. Most phones and tablets have a single USB-C port, so a USB-C hub (with USB-A and a 3.5mm headphone jack) works best: a USB-A to USB-B cable to the module's USB COMPUTER port (the hits), and a 3.5mm male-to-male stereo cable to the module's MIX IN (the app's sound). If you only need the hits, a USB-C to USB-A adapter is enough.
iPad / iPhone
Safari, Chrome and Edge on iOS all lack Web MIDI, so install MIDIWeb Browser and open DrummerUp inside it. That app doesn't support Google or other third-party sign-in yet, so sign in with an email account. The first time you open DrummerUp on an iPad or iPhone, a notice explains this; you can tick "Don't show again".
Hooking up headphones
- Recommended: plug headphones into the module's PHONES jack and run the computer's or phone's sound into the module's MIX IN (some brands call it AUX IN) with a 3.5mm cable. You hear the drums and the web metronome together with practically no delay.
- USB audio: if the module is itself a USB sound card (e.g. Roland set to VENDOR with the driver installed, or EFNOTE 3/5), select the module as the output device in your computer's sound settings.
- Bluetooth: works, but usually adds 0.1–0.3 seconds of delay, so always run the Latency Test. Always send the hits over the USB cable.
2Editing grooves
In Edit/Practice Mode you write grooves, listen to them and play along. The switch above the editor has Edit/Practice Mode on the left and Scoring Mode on the right.
Modules and the library
A groove you practise is called a module.
- + New Module: create an empty module. Its grid subdivision and time signature follow "Preferences → Rhythm".
- Module: open the module library (the "Select Module" window).
- The pencil next to the module name renames it; the Bar field sets the number of bars (up to 30); Clear removes every note.
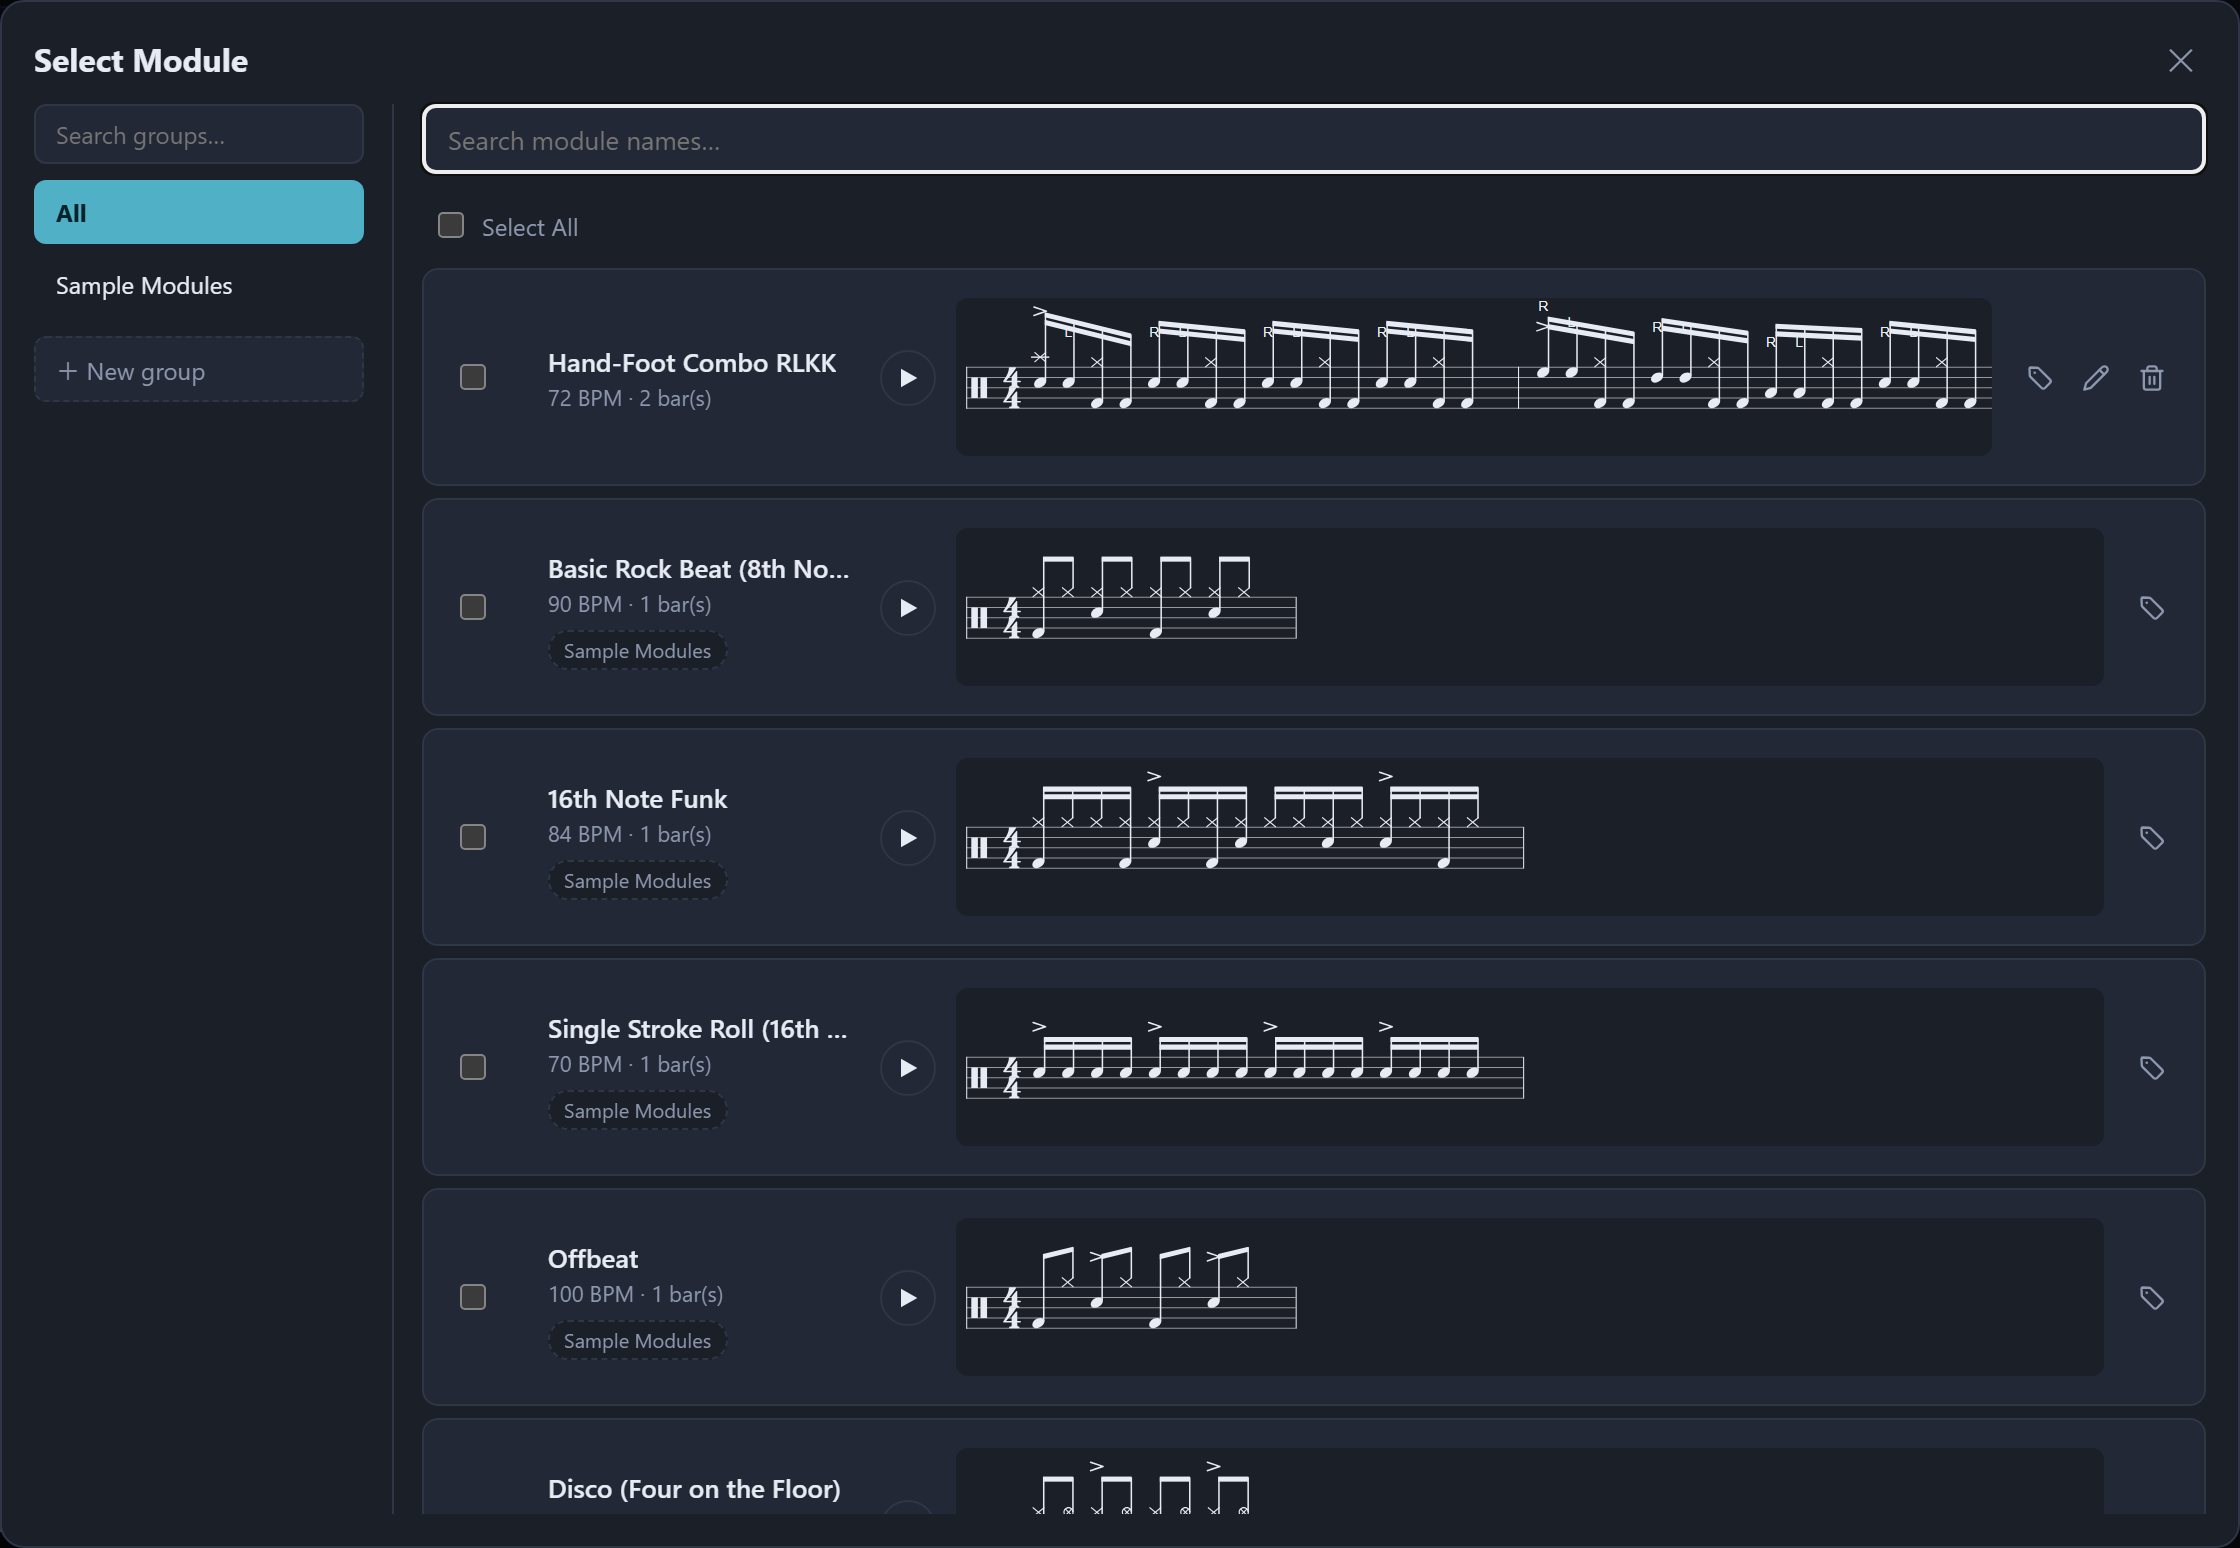
- Click a module's row to load it; the ▶ on the left plays a preview, with a score preview next to it.
- Icons on the right of each row: tag = manage groups, pencil = rename, bin = delete. Once signed in, your own modules also get a share icon. Sample modules only have the tag.
- Tick several modules to delete them or add them to a group at once; search module names at the top.
- There are 11 built-in sample modules (8th-note rock, 16th-note funk, single-stroke roll, bossa nova, shuffle, samba…). Load one, change it freely and save it as your own.
Locking a module
When a module is finished and you don't want it changed, lock it so you can't click cells by accident while practising.

- Click the padlock at the top right of the editor ("Lock module (prevent editing)").
- The padlock turns orange and shows "This module is locked". The step grid can't be changed now; clicking a cell just shows "This module is locked. Unlock it to edit."
- Playback, practice and scoring work as usual.
- Click the padlock again to unlock and edit.
The lock is saved with the module and stays on in modules you share or export. The grid is also locked temporarily while scoring and can be edited again afterwards.
Organising with groups
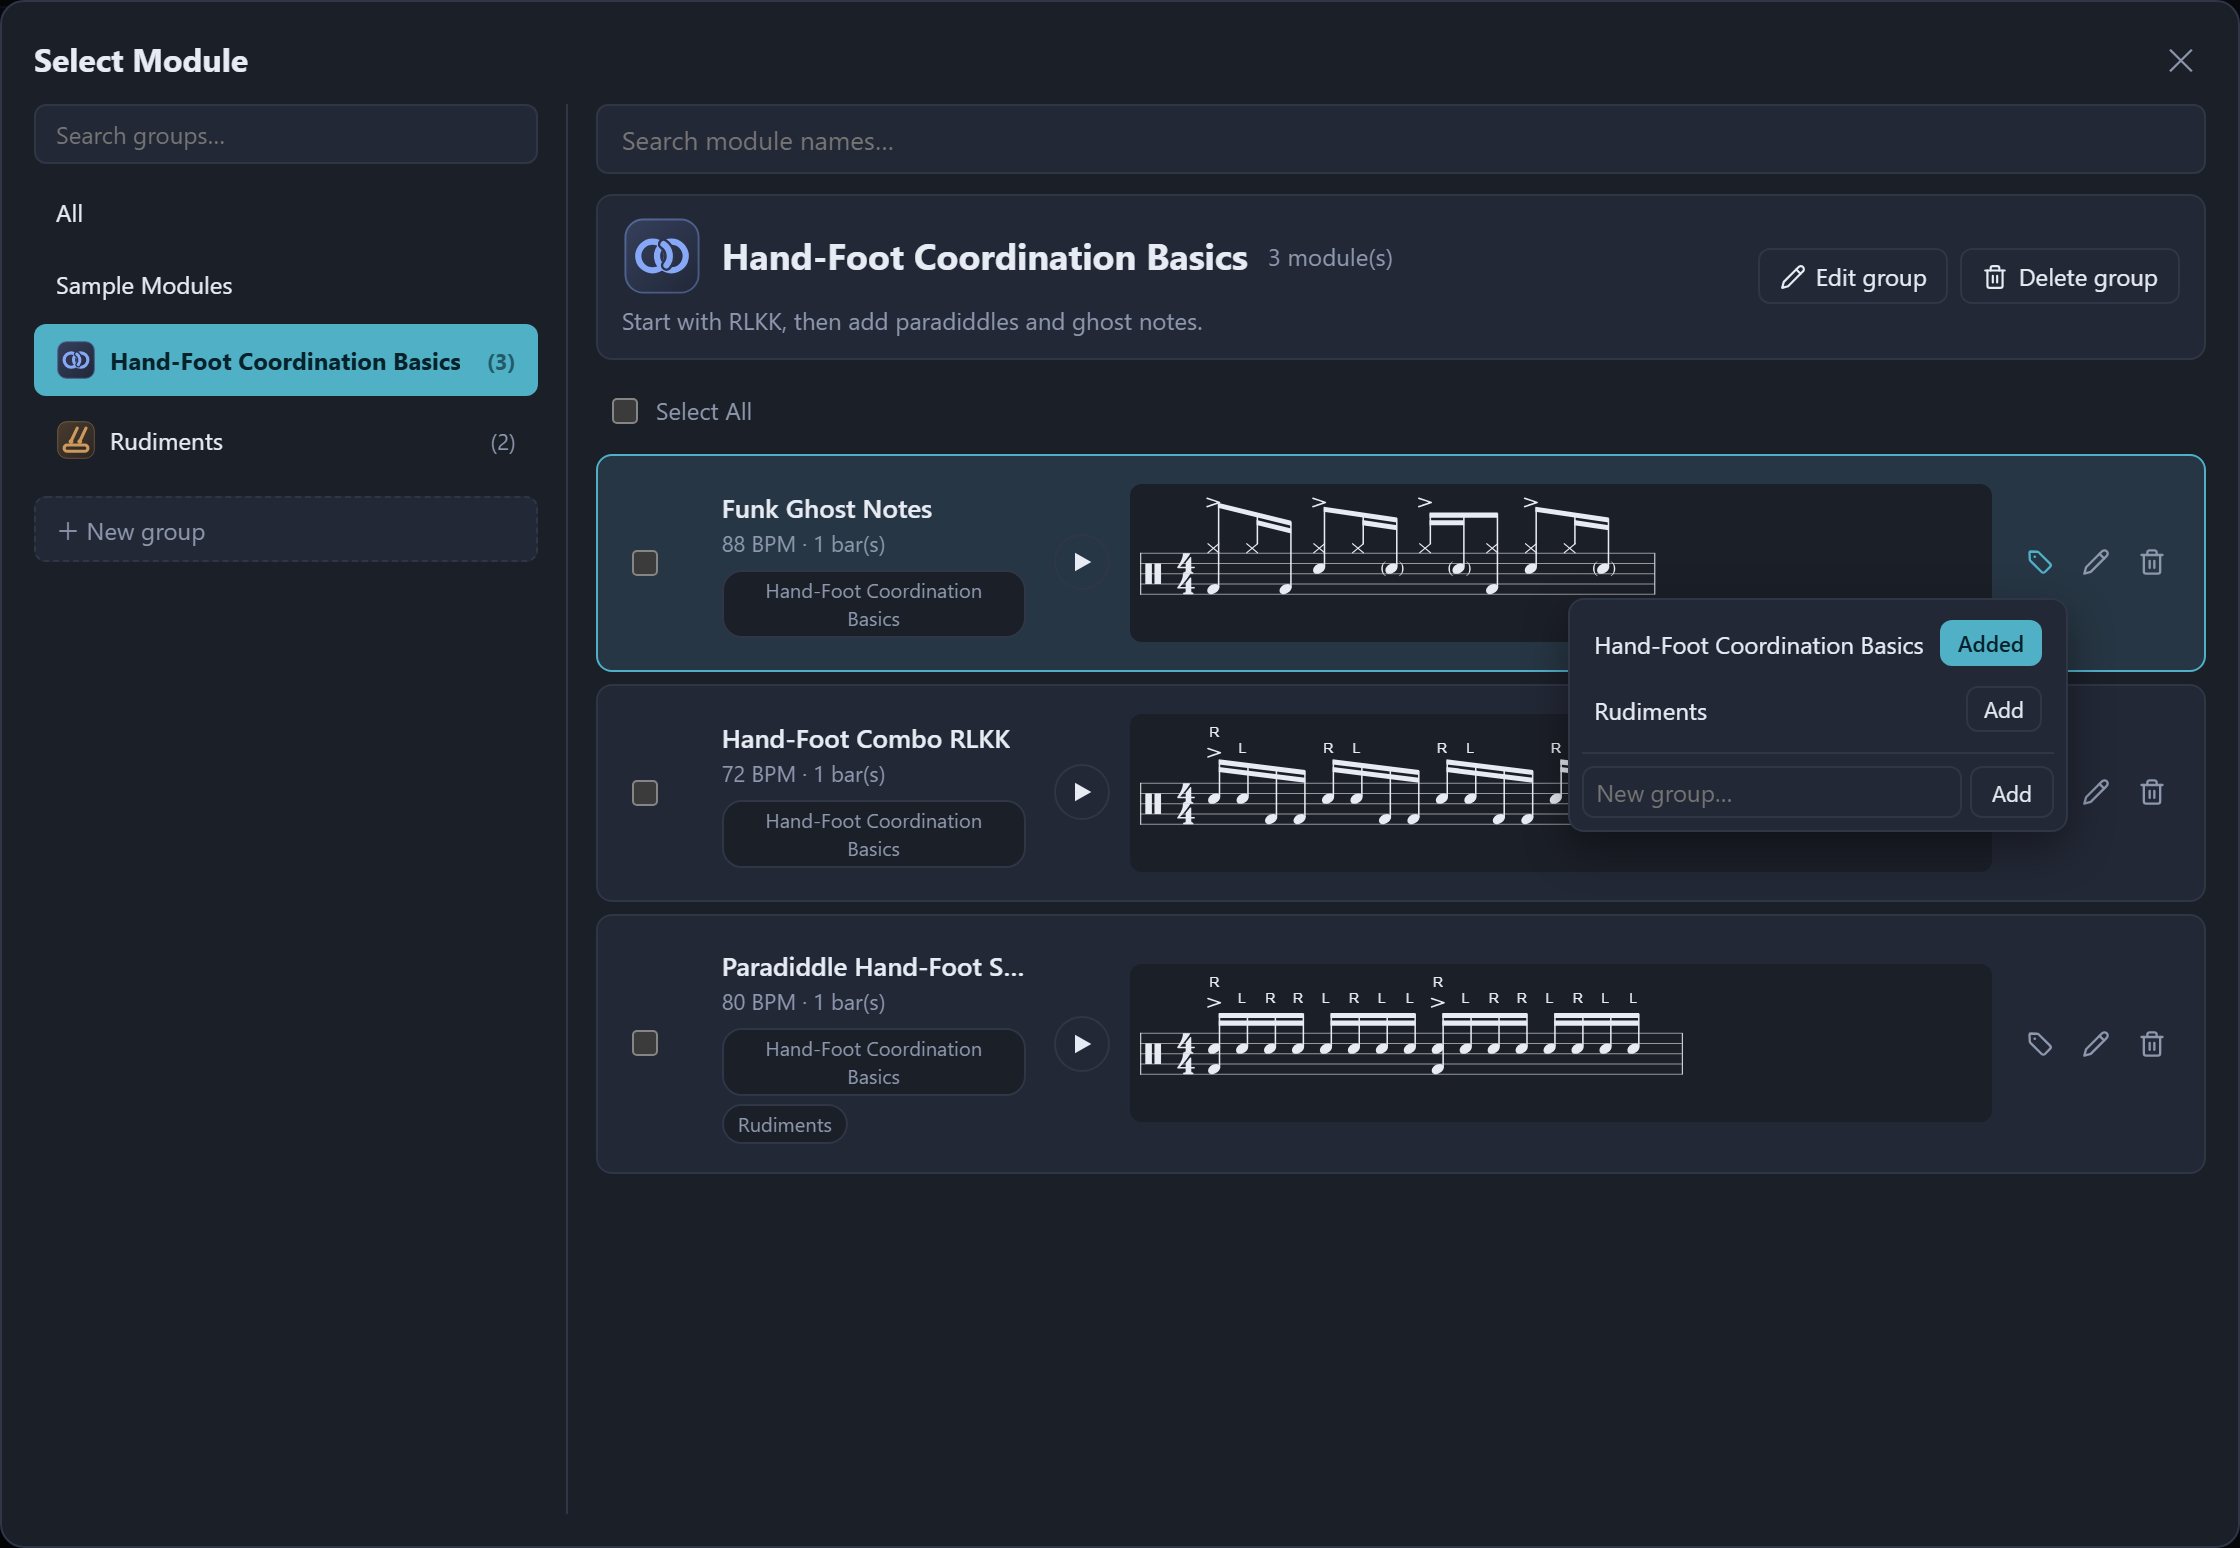
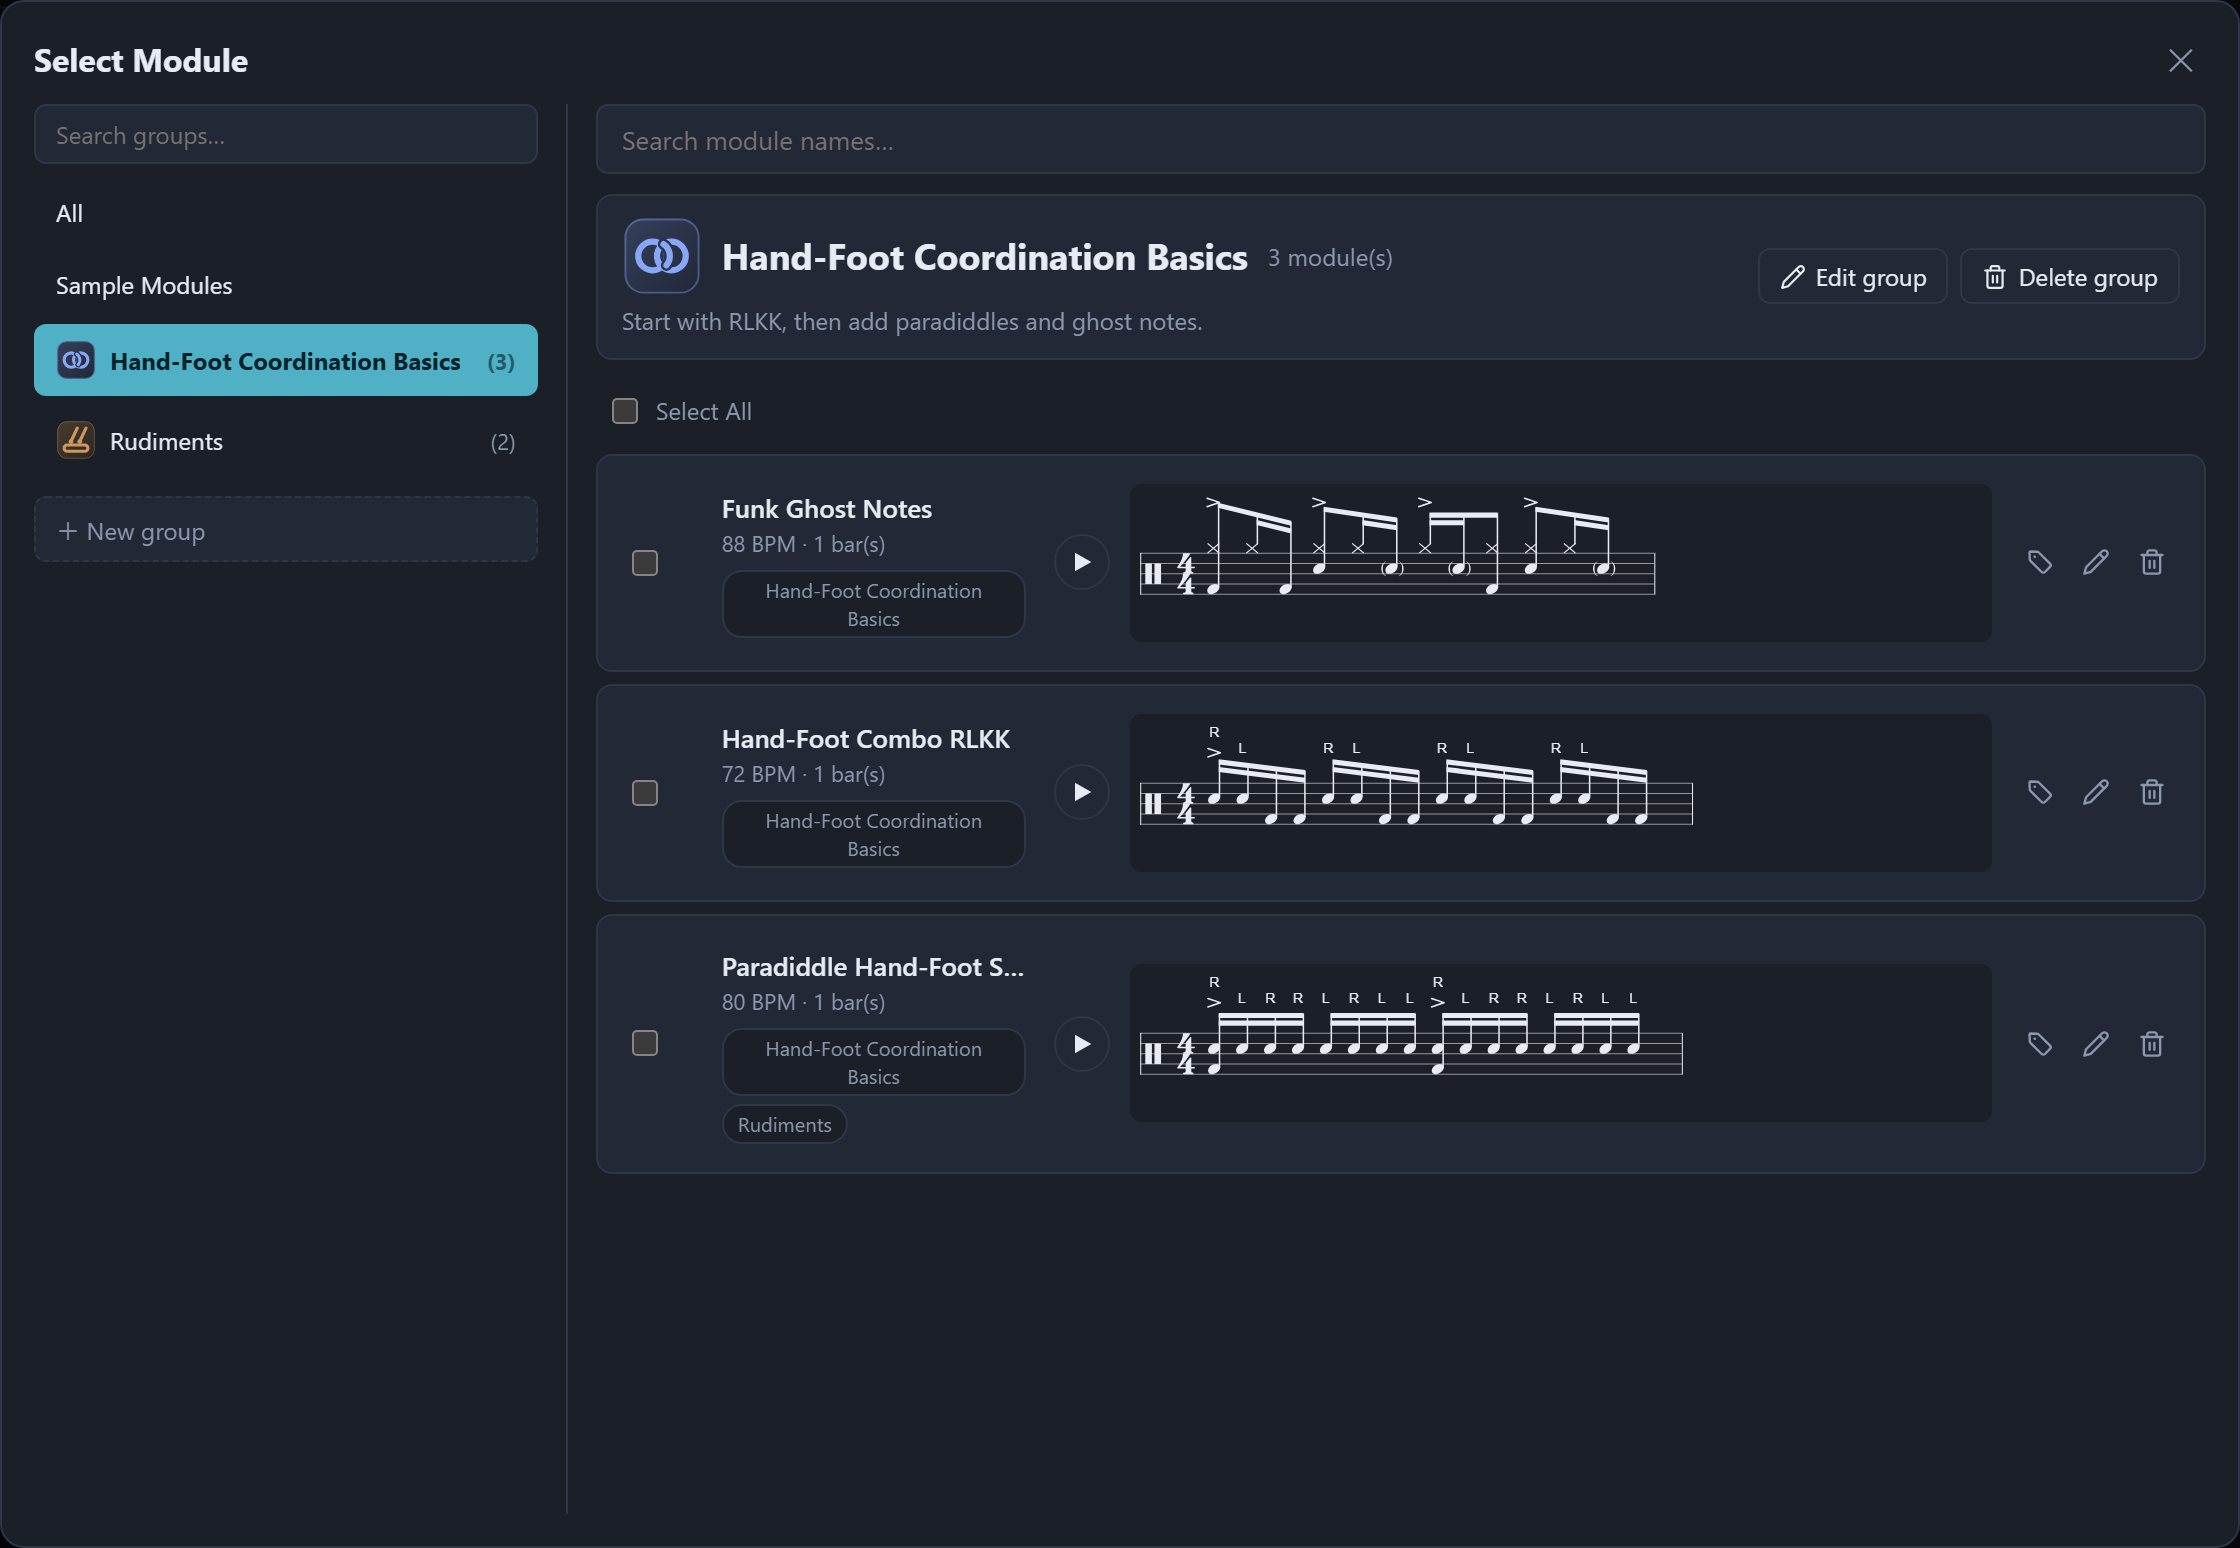
As your modules pile up, sort them into groups such as "Warm-up", "Rudiments" or "Hand-foot coordination". Groups are listed on the left of the library with the number of modules in brackets; click one to show only its modules. You can search groups at the top.
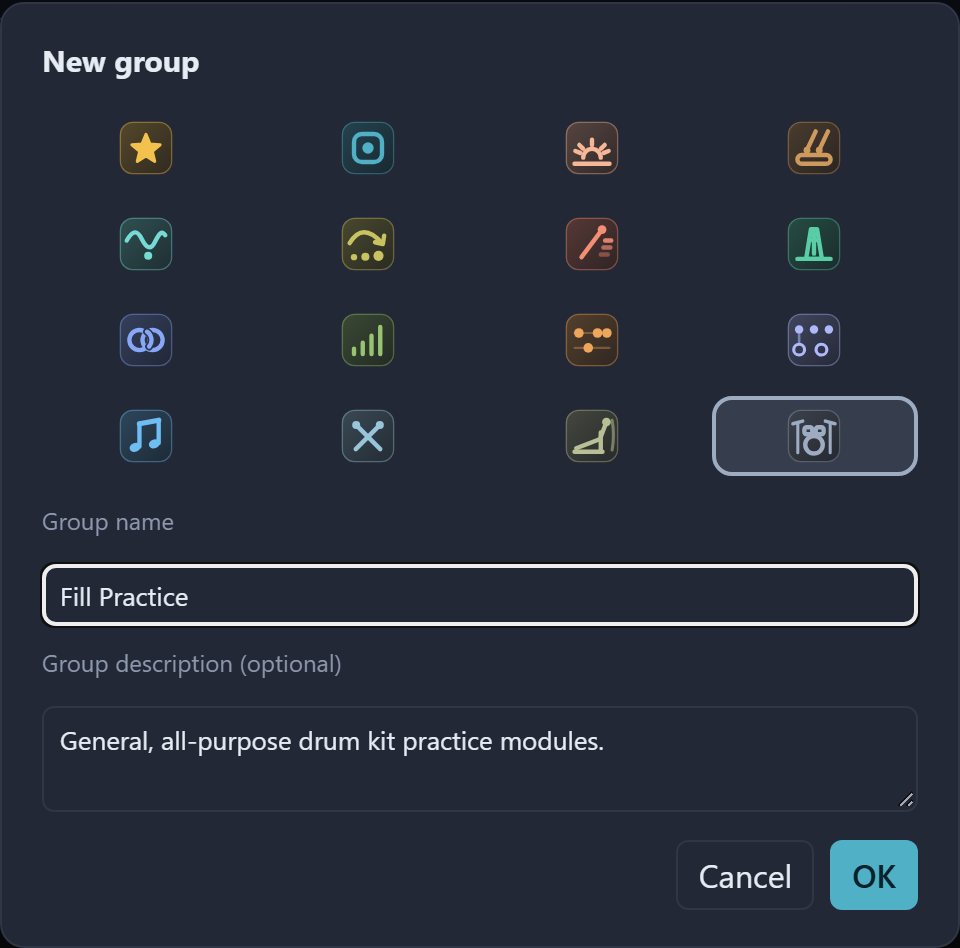
Creating a group
- Press New group on the left of the library.
- Pick an icon (16 to choose from, such as warm-up, rudiments, groove, fills, coordination, speed). Until you change them yourself, the name and description follow the icon's suggestions.
- Fill in the Group name and an optional Group description, then press OK.
Adding modules to a group
A module can be in several groups at once, and a group holds up to 20 modules. There are a few ways:
- The tag icon on each library row lists every group; press Add/Added to toggle. You can also type a name at the bottom to create a new group.
- Drag a module row onto a group on the left and drop it. Tick several modules first and drag one of them to add them all. (Dragging needs a mouse.)
- Tick several modules and add them to the same group at once.
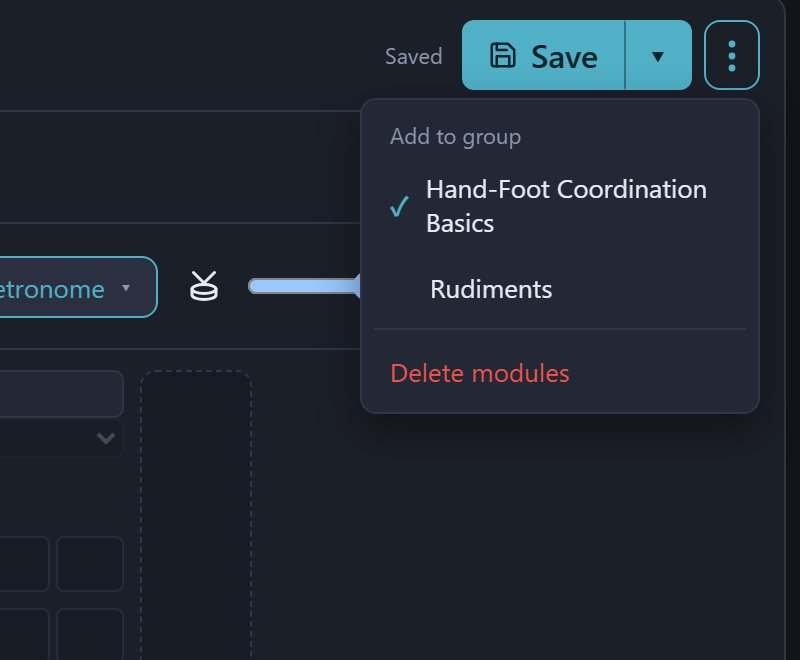
- The ⋮ next to Save in the editor → Add to group: tick the groups this module should be in (save the module first).
Editing, sharing and deleting groups
With a group selected on the left, its icon, name and description appear at the top, with Edit group, Share (when signed in) and Delete group on the right. When deleting you can delete just the group and keep its modules, or delete your own modules in the group as well (sample modules are never deleted). For sharing groups, see Share a group.
The step grid
Each row is a drum, each cell a point in time.
- Click a cell to toggle it on or off. Drag to paint a whole row.
- Click a drum name (the instrument column on the left) to hear it. When you hit a real drum, its row lights up briefly.
- Reorder tracks by dragging the handle on the left of a row. This is your personal preference and applies to every module.
- Track volume: hover over a row to show the volume icon, click it and drag the slider.
- Hide a track: hover over a row and press ✕. Hidden tracks can be brought back by ticking "Show as a track" under "Kit Settings → Drums & MIDI"; tracks with notes are always shown.
Score Editing panel
Accents, ghost notes, sticking and other marks live in the Score Editing panel on the right (the note icon at the top of the right-hand bar). It opens automatically in Edit/Practice Mode.
- Click an effect in the panel; its button lights up.
- Click cells in the step grid to add the mark together with the note; drag to mark a whole row.
- Click a marked cell again to clear the whole cell.
- Click the lit effect button again to deselect it; clicking cells goes back to plain on/off.
| Category | Effect | What it does |
|---|---|---|
| L/R Order | R / L | Sticking. Feet can be marked R/L too (right foot, left foot). Timing by Hand is based on these marks. |
| Accent / Ghost | Accent / Ghost Note | Accents are played louder (> in the score); ghost notes are very soft (in brackets). |
| Grace Note | Grace Note | Adds a small grace note (flam) before the main note. For now it only affects the score, not playback or scoring. |
| Hi-Hat | Open Hi-Hat | Hi-hat only. Plays the open hi-hat sound; shown as a circled-X notehead. |
| Rim | Rim | Snare and toms only. Plays a cross-stick sound; shown as an X notehead. |
| Ride Bell | Ride Bell | Ride only. Plays the bell sound; shown as a diamond notehead. |
Marks placed on a drum they don't apply to (say, open hi-hat on the snare) simply do nothing.
Working with bars
The bar header above each bar (the "Bar 1 4/4" row) lets you select, drag, change the time signature and mute the metronome.
Select bars to practise just those
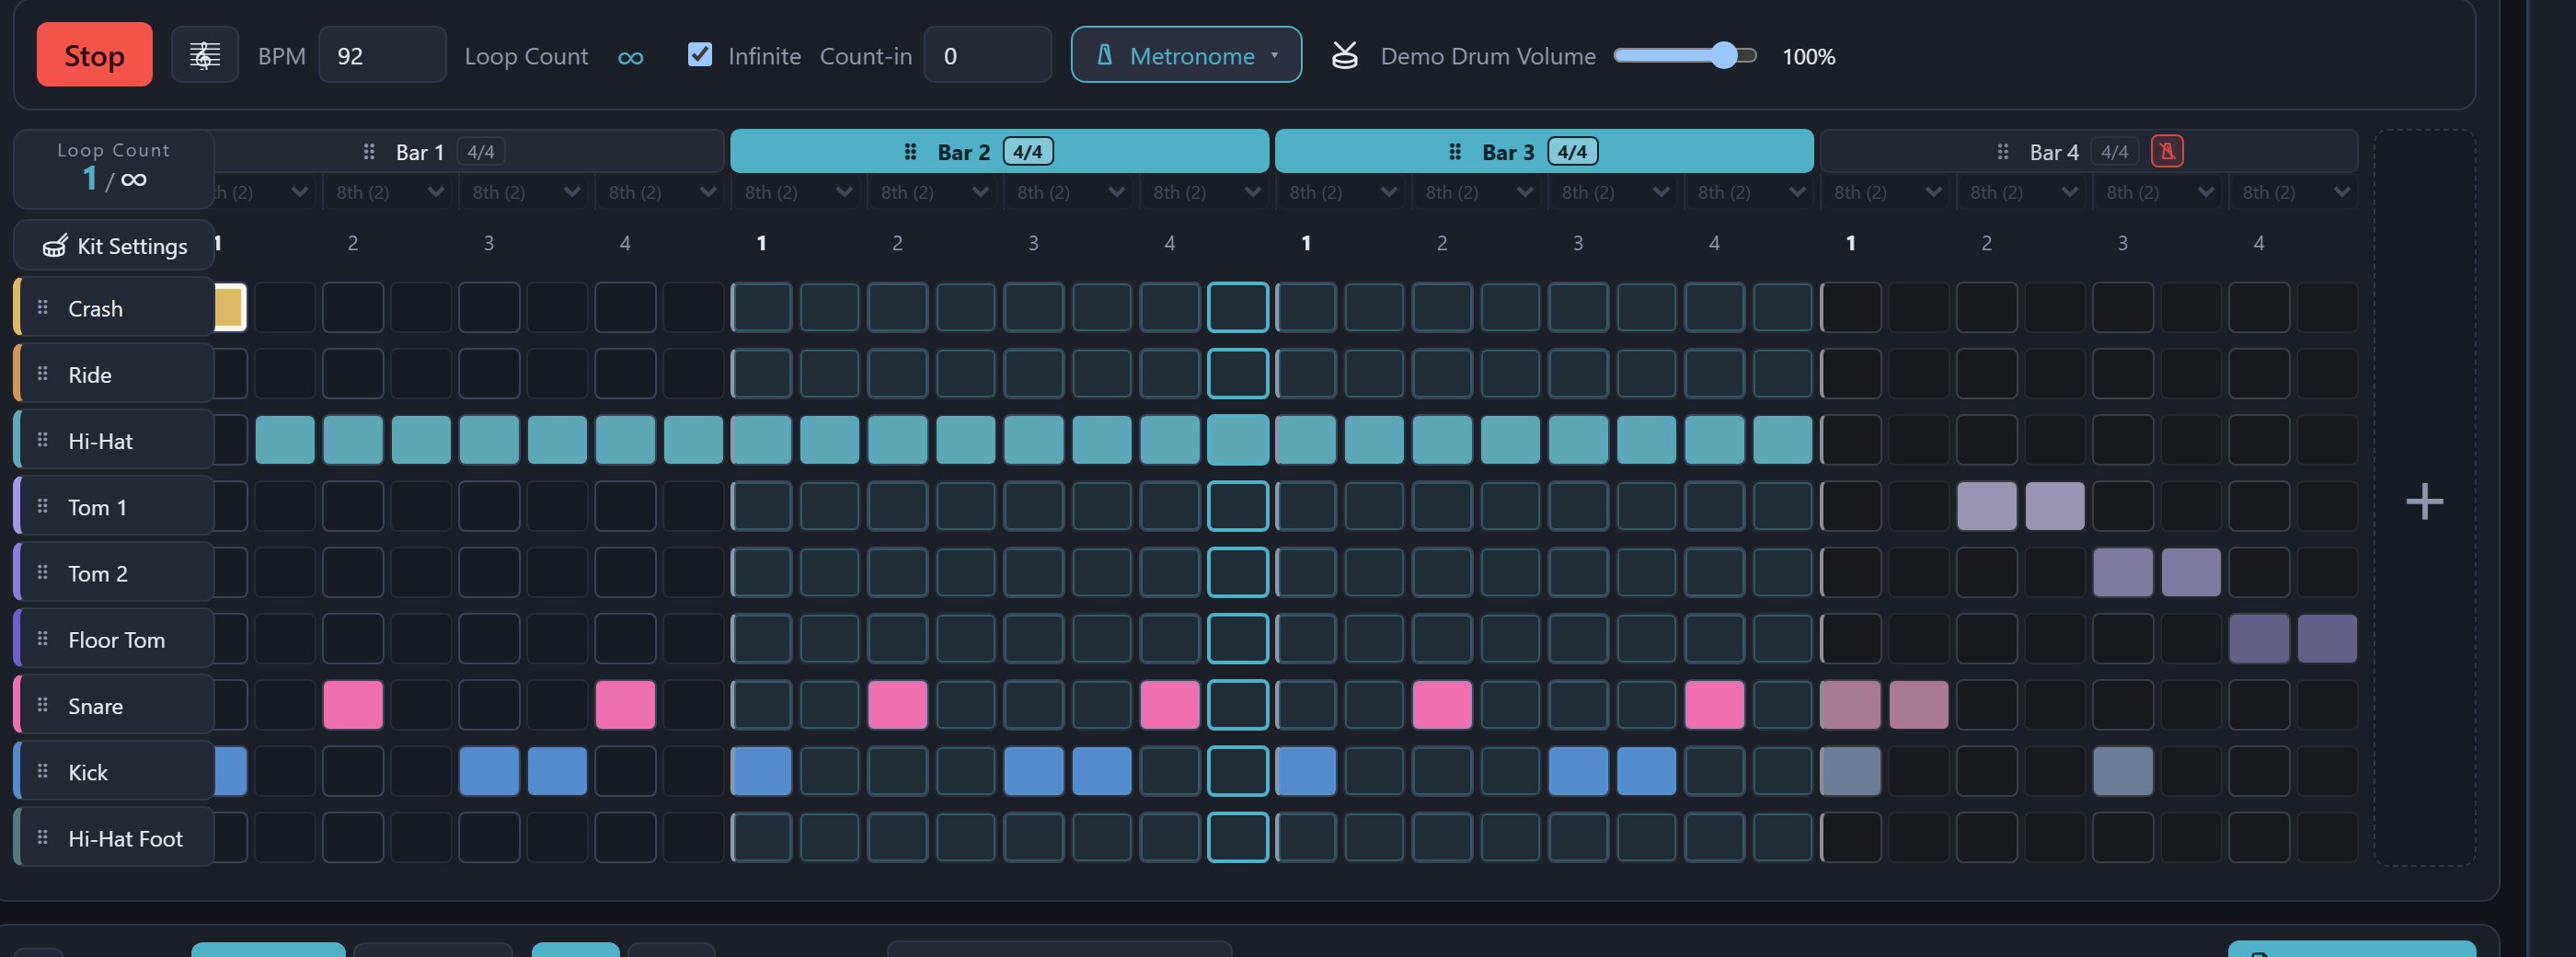
- Select: click a bar header. Shift+click another bar selects the range in between; Ctrl+click adds or removes a single bar; Esc clears the selection. On phones and tablets, tapping a bar header toggles it.
- Play only the selection: with bars selected, Play loops just those bars — great for pulling out the hardest part and drilling it. Scoring Mode also scores only the selected bars.
- You can change the selection during playback; the new range starts after the current bar. Grid changes during Edit/Practice playback are heard straight away.
- Clear the selection to play the whole module again.
Dragging bars: move, copy, delete
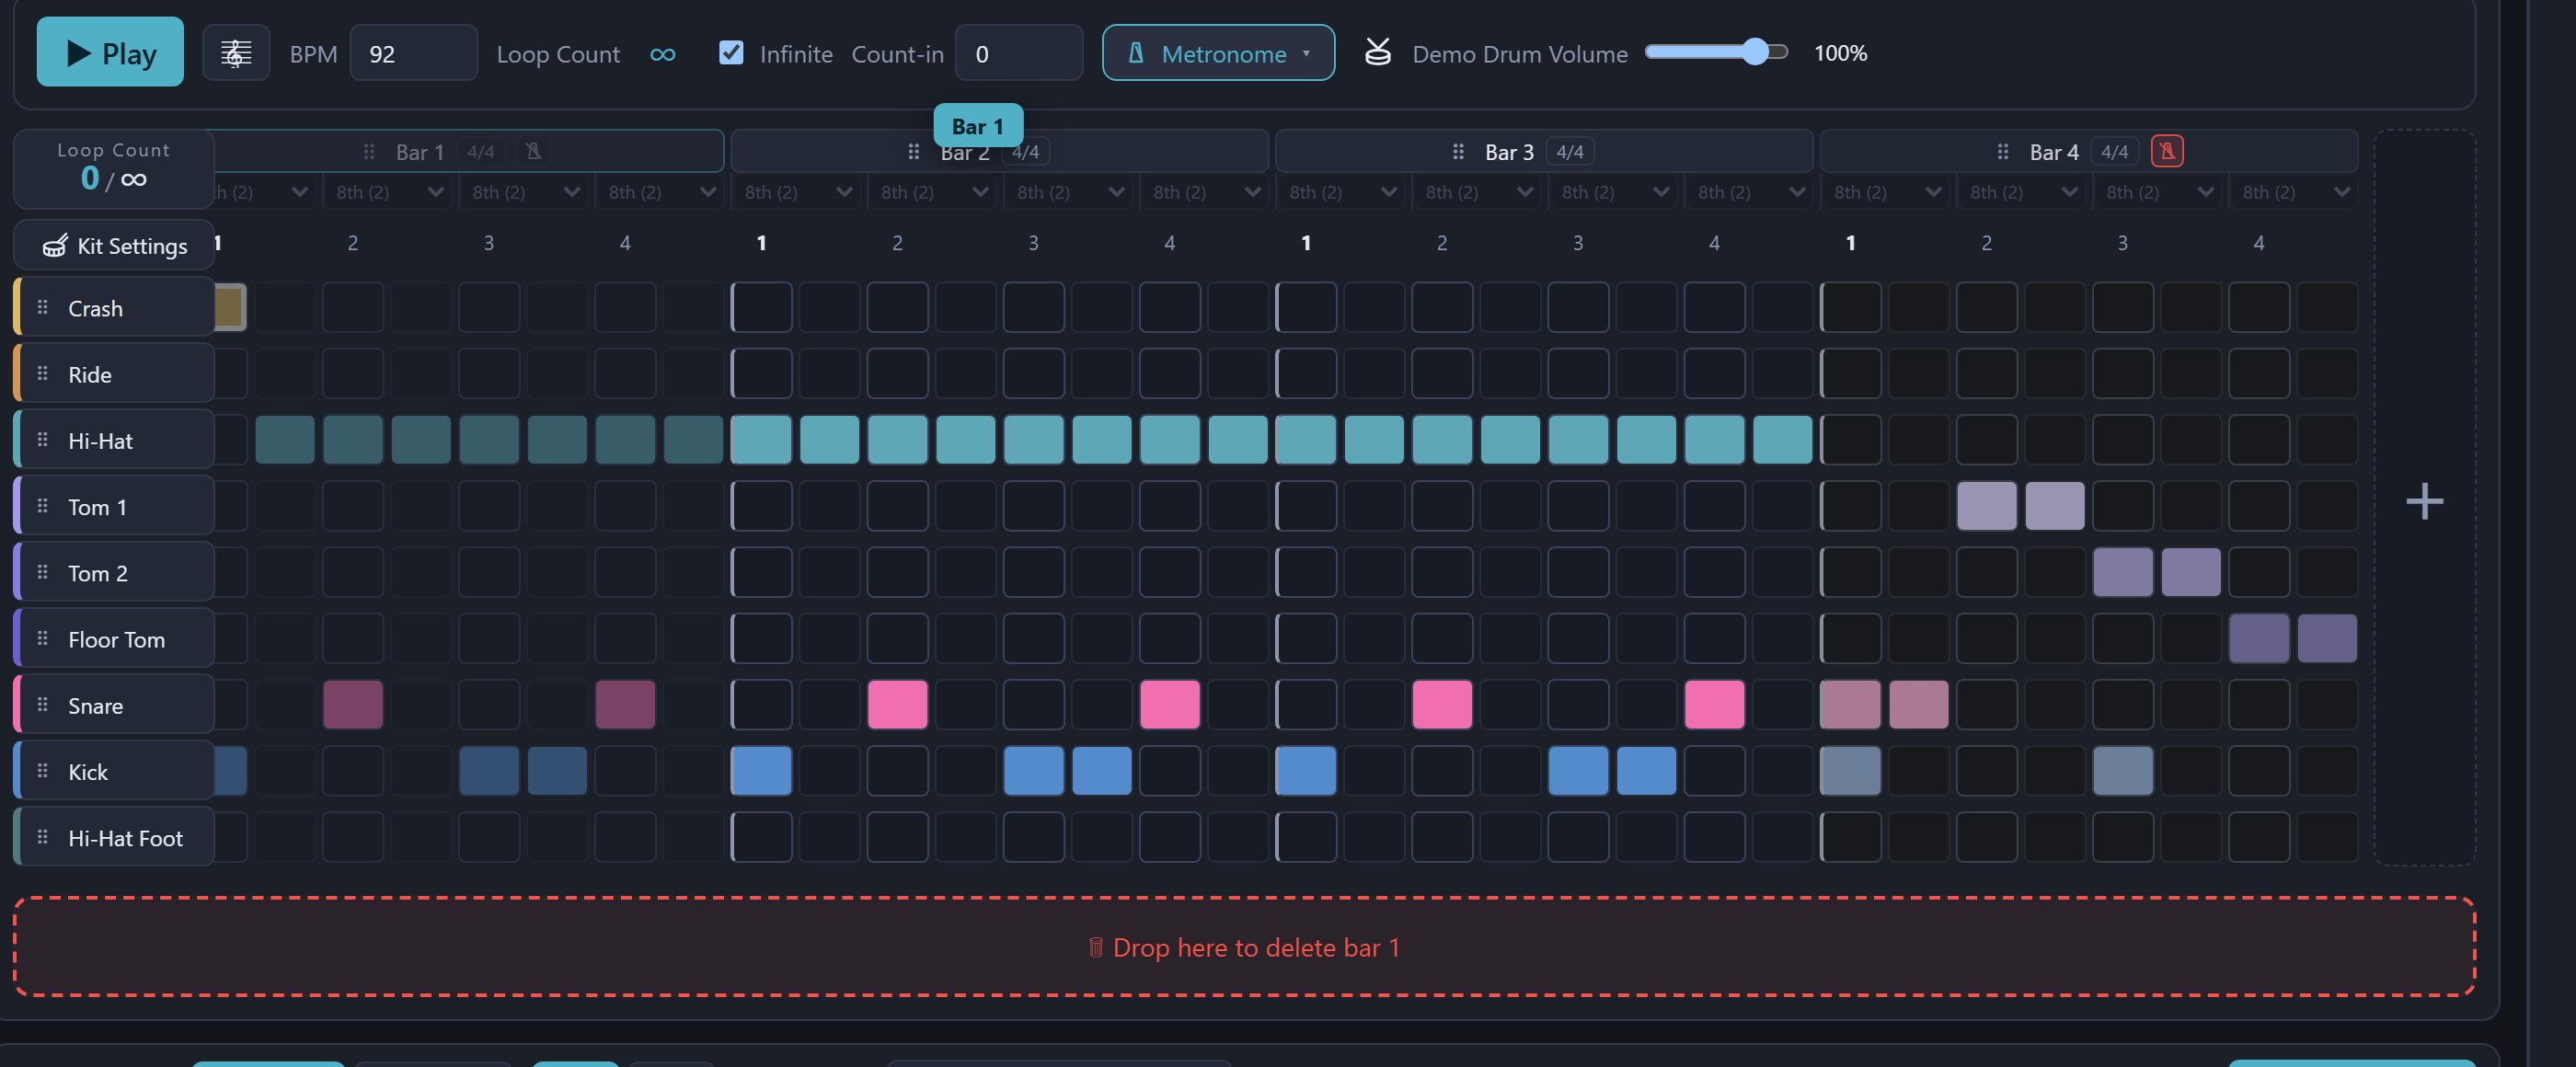
- Move: drag the handle (⠿) on the left of a bar header to a new position. Select several bars first and drag one of them to move them all.
- Copy: hold Ctrl while dragging; a copy is placed where you drop.
- Delete: drop onto the "Drop here to delete" area that appears below, or select bars and press Delete. Deleted the wrong one? Ctrl+Z undoes it.
- Add: the + at the far right of the grid, or change the "Bar" number at the top (up to 30 bars).
Time signatures, tuplets and metronome mutes belong to the bar, so they move and copy along with it.
Muting bars (metronome)
You can make chosen bars play without the metronome to practise keeping time yourself: the click carries you for a while, then you hold the tempo on your own.

- Hover over a bar header and a small metronome icon ("Mute the metronome for this bar") appears on the right. On tablets it's always shown faintly; on phones it's in the bar header's ⋯.
- Click it: the icon turns red and stays visible, and the bar's cells dim to show it's muted.
- When playback, practice or scoring reaches this bar, the metronome is silent (including the downbeat accent); the demo drums still play and scoring still counts.
- Click the red icon again to unmute.
- You can mute several bars. Mutes belong to the bar: they move and copy with it and are kept when you save or share. Bars added at the end start unmuted.
- Playback in the score report follows this too, with no metronome in muted bars.
- This only silences the metronome. To silence the demo drums and keep only the metronome, use Mute demo drum sound in the transport (no drums for the whole module); to turn off the metronome entirely, use the switch in the metronome menu.
Practice idea: in a four-bar module, keep the metronome only in bar 1 and mute bars 2–4, play a few rounds in Scoring Mode, then check the report's micro-timing chart to see whether you sped up or slowed down in the last three bars. Once that's steady, mute more bars.
Time signatures and tuplets
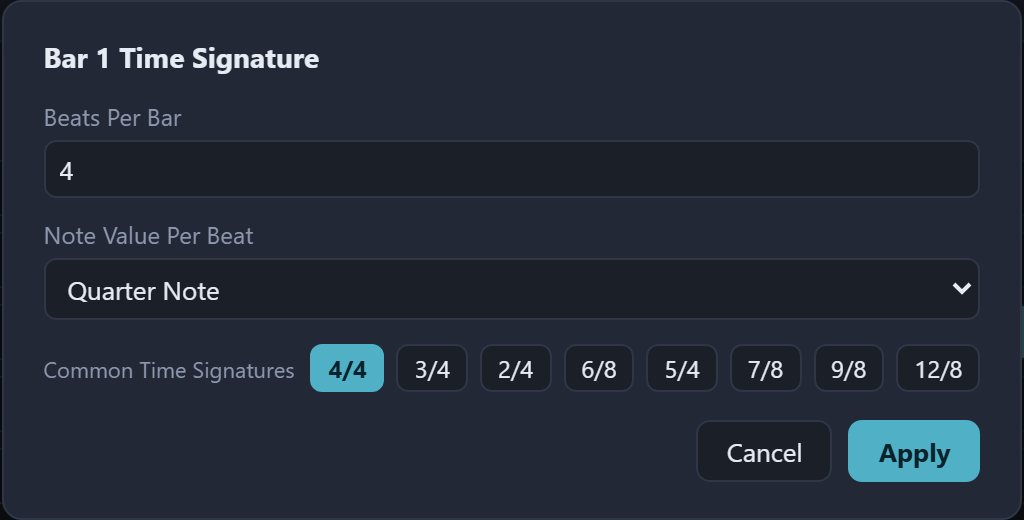
- Time signature per bar: click "4/4" on a bar header to set the beats per bar (1–16) and the note value per beat, or pick a common one (4/4, 3/4, 2/4, 6/8, 5/4, 7/8, 9/8, 12/8). Every bar can differ; if reducing the beats would delete notes, you're asked first.
- Tuplets per beat: below the bar header, each beat has a menu — quarter (1), eighth (2), triplet (3), sixteenth (4), sextuplet (6), thirty-second (8) — that decides how many cells the beat is split into.
Transport and metronome
| Control | What it does |
|---|---|
| Play / Stop | Play the demo (in Scoring Mode it's "Start Scoring"). Space works on the main screen too. |
| Collapse grid (clef icon) | Collapses the step grid and centres the score below, for reading while you play. |
| BPM | Tempo. |
| Loop Count / Infinite | How many times to play; tick "Infinite" to loop until you press Stop. The default is in Preferences. |
| Count-in | How many beats to count before starting. |
| Metronome menu | Metronome on/off, subdivision (quarter, eighth, triplet, sixteenth), metronome volume, accent on the first beat of each bar, and the Tempo Trainer (below). It can't be changed while scoring. |
| Demo Drum Volume | The volume of the app's own drums; click the drum icon to mute. In Scoring Mode with a real kit, demo drums are muted automatically and only the metronome remains. |
Tempo Trainer: from slow to fast
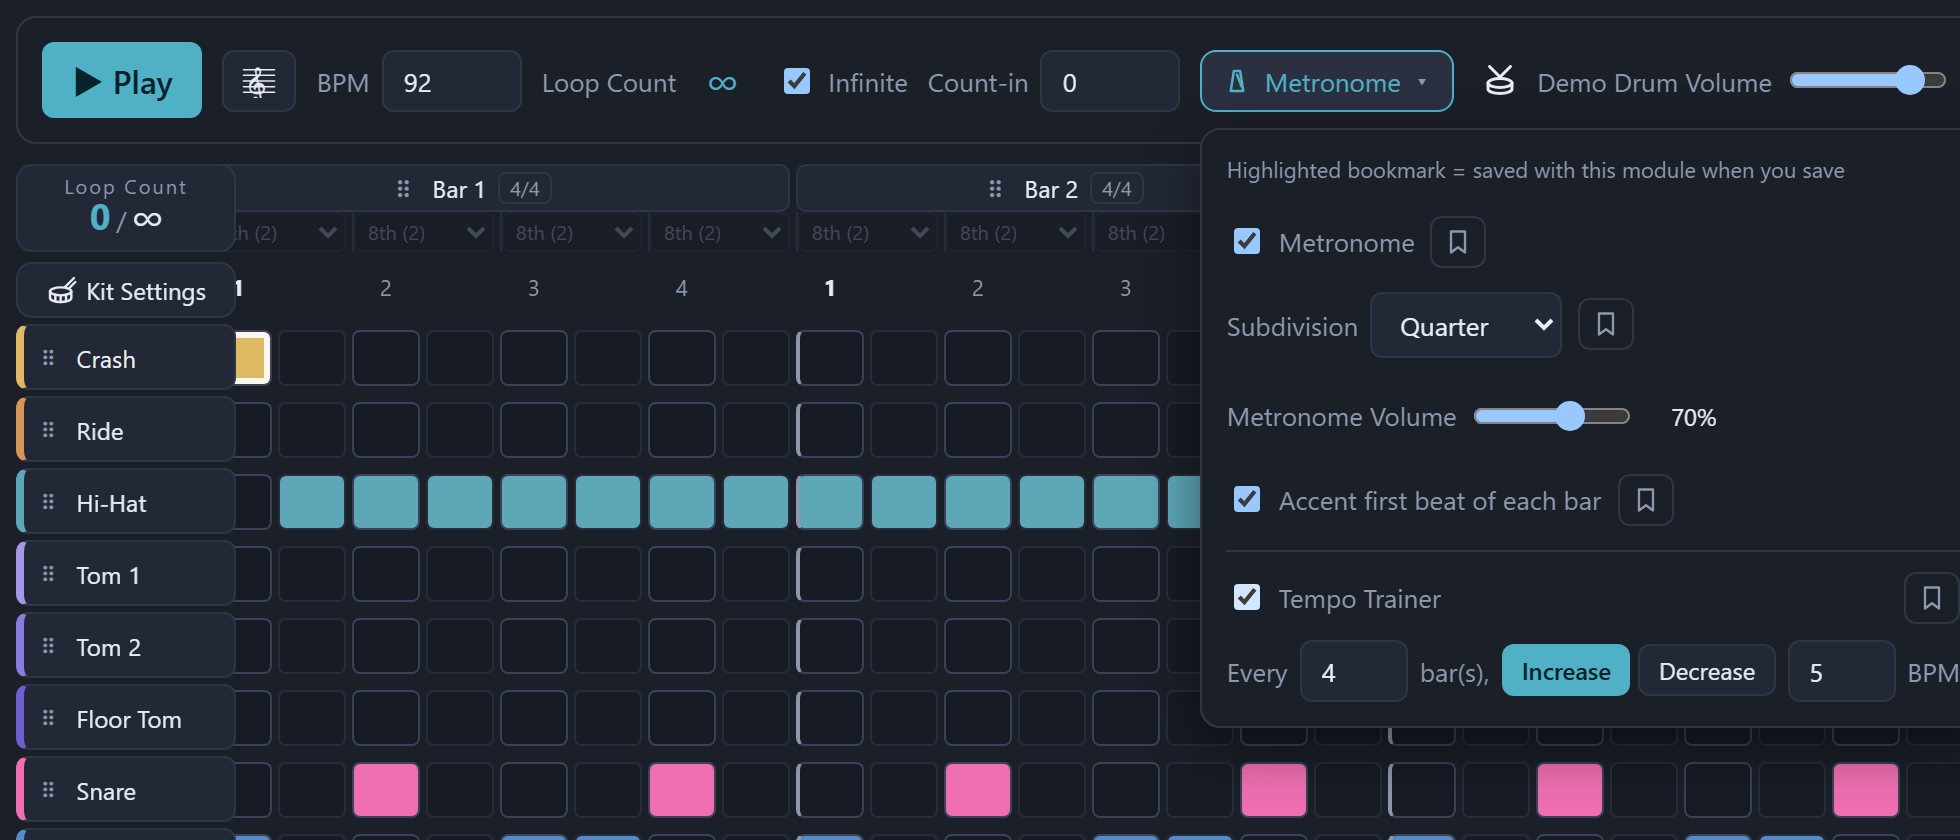
- Set the BPM to a tempo you can play steadily.
- Open the Metronome menu in the transport and tick Tempo Trainer.
- Set "Every N bar(s), Increase/Decrease by X BPM", for example +5 BPM every 4 bars.
- Press Play (an infinite Loop Count is best). The tempo keeps climbing and the BPM field follows it; when you can't keep up, press Stop, note the tempo, and start from there next time.
- It works in Scoring Mode too: the tempo still changes every N bars and the BPM field shows the current tempo, but the module's BPM isn't changed. The report gains a Tempo Ramp Analysis that tells you at which tempo things started to slip.
- Each tempo change flashes "Speeding up to 120 BPM" (or "Slowing down to") at the top of the screen; if it coincides with the "Loop N" notice, both are merged into one.
- With bars selected, the count is of bars actually played. Tempos range from 30 to 260 BPM.
- In Edit/Practice Mode the tempo changes the module's BPM directly; if you don't want to keep the new tempo, set the BPM back before saving.
- Choose "Decrease" to work the other way: from fast to slow, checking you stay just as steady at slow tempos.
Saving metronome settings with a module
Some exercises are really metronome exercises — timed tempo increases, or hearing the same groove against an eighth-note or triplet click. In the metronome menu, Metronome on/off, Subdivision, Accent first beat of each bar and Tempo Trainer each have a bookmark next to them:
- Click a bookmark (it lights up) to remember that setting in this module; it's saved with the module, and opening the module later uses the remembered setting.
- Unlit items follow your own preferences; switching to a module without remembered settings also goes back to your preferences.
- Changing a bookmarked setting counts as changing the module (it shows "unsaved changes" and can be undone); click the bookmark again to stop remembering it.
- Loop count, count-in and volumes are never saved with a module — they always use your own settings. A locked module's remembered settings can't be changed.
Live Score
The staff below the editor updates with the grid as you edit. The toolbar lets you switch:
- Single / Double Staff: Double Staff separates hands (stems up) from feet (kick and hi-hat pedal, stems down).
- Dark / Light: the score's colours, set separately from the app theme.
- Dynamic score: what happens during playback — no dynamic effect, note color highlight, playback cursor, or note color + playback cursor.
- On phones these options (including Export Score PDF) are tucked behind the options button to the right of the "Live Score" title and only open when tapped.
- Export Score PDF: exports the score in black on white, ready to print.
- The small arrow on the far left collapses the score.
Saving and shortcuts
- Save: saves the current module — on this device when signed out, in the cloud when signed in. You're reminded when there are unsaved changes.
- The ▾ next to Save: Duplicate Module (save a copy), Export Module, Import Module.
- The ⋮ next to Save: Add to group (tick the groups to add to) and Delete modules. A module must be saved before it can join a group.
- Once signed in, a share button appears to the left of Save — see Share.
| Shortcut | Action |
|---|---|
| Space | Play/Stop (not while using the Keyboard Simulator or typing in a field) |
| Ctrl+Z | Undo |
| Ctrl+Y or Ctrl+Shift+Z | Redo |
| Delete | Delete the selected bars (can be undone) |
| Esc | Clear the bar selection, close windows |
| Shift / Ctrl+click a bar | Select a range / add a single bar |
| Ctrl+drag | Copy bars or tracks |
On a Mac, undo/redo also work with ⌘ instead of Ctrl. On tablets, drag the handles to reorder, tap the bar itself to select, and swipe over the cells to scroll the page. On phones, move bars from their ⋯; reorder tracks in Kit Settings or on a tablet or computer.
3Kit Settings
Open it with Kit Settings at the top left of the step grid. It has two tabs, "Sound" and "Drums & MIDI", and changes apply immediately. Kit settings belong to you, not to a module, and follow you to other devices once you sign in.
Sound
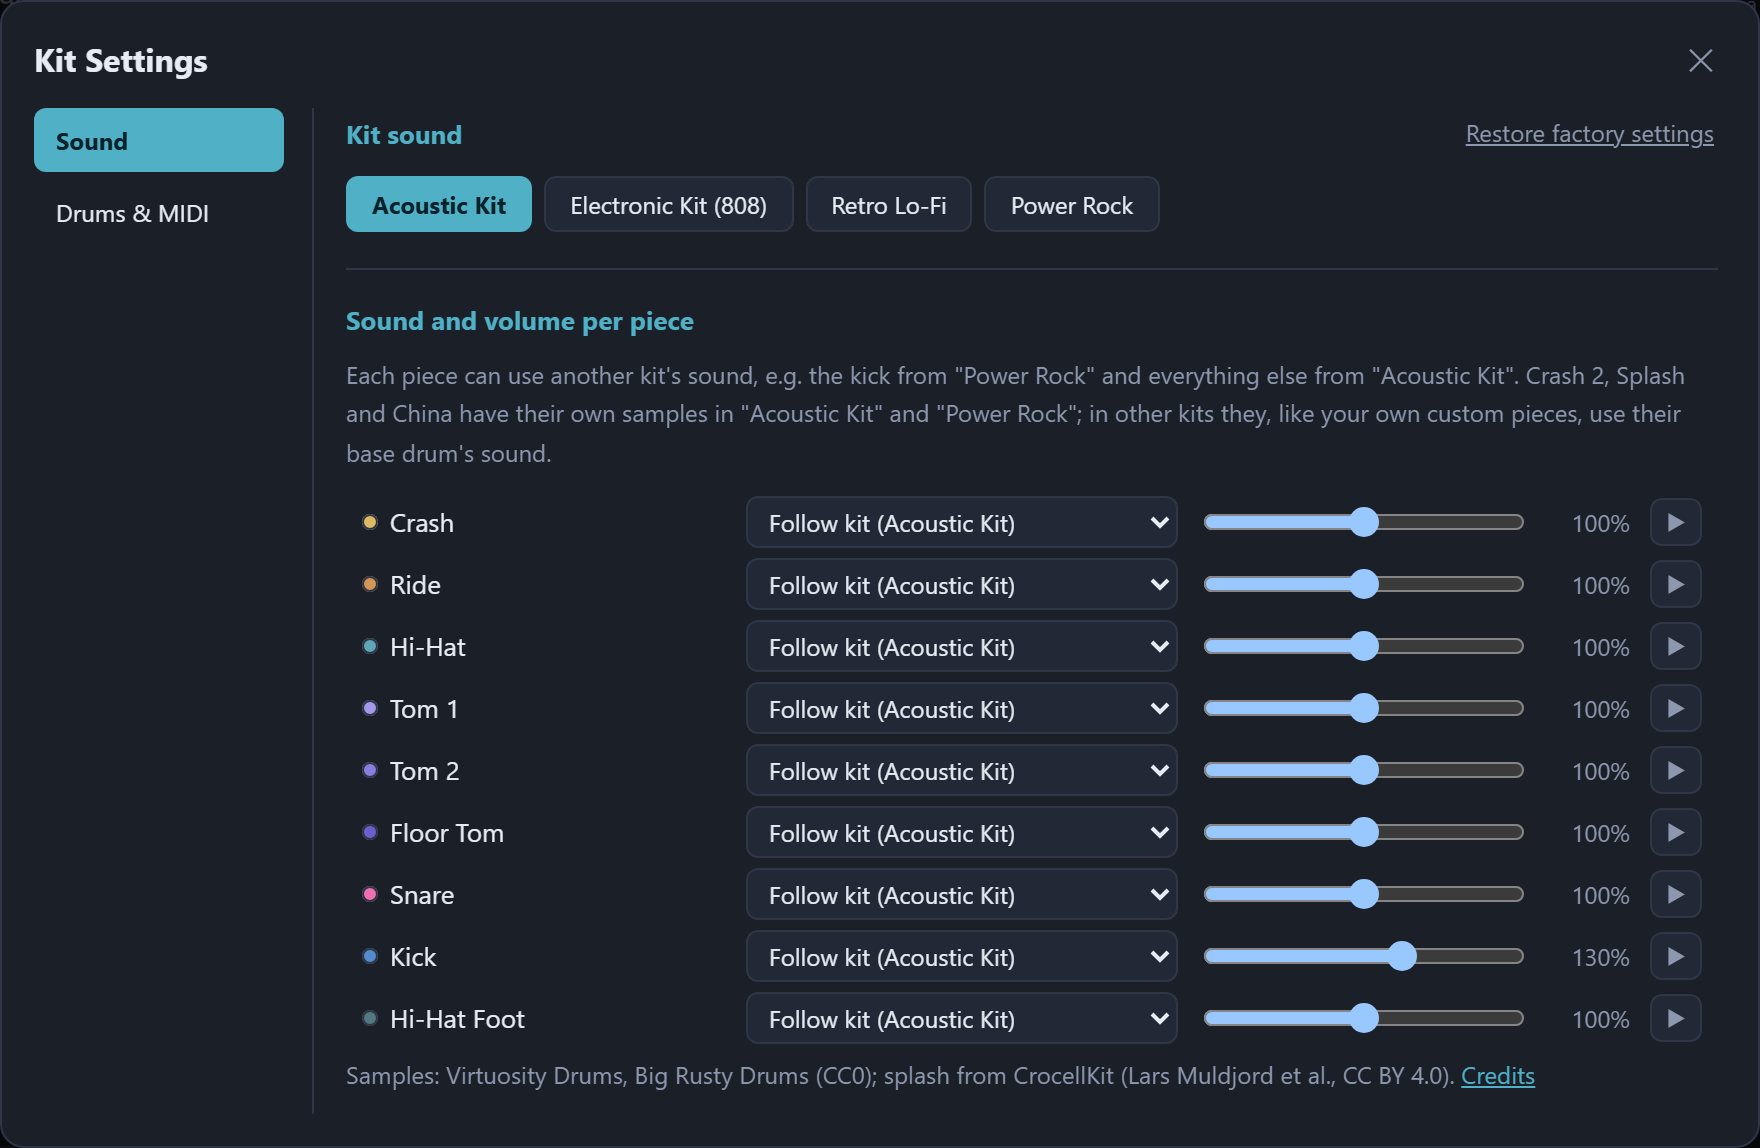
- Kit sound: Acoustic Kit and Power Rock (both recorded samples), plus Electronic Kit (808) and Retro Lo-Fi (synthesised). Sampled kits take a moment to download the first time; until then the synthesised sounds are used.
- Sound and volume per piece: each drum can use the sound of a different kit (by default it follows the whole kit) and has its own volume; press preview to hear it.
- Restore factory settings: puts the kit sound, per-piece sounds and volumes back to default. The kick defaults to a louder 130% so it sounds as clear as the other drums on small speakers.
Drums & MIDI
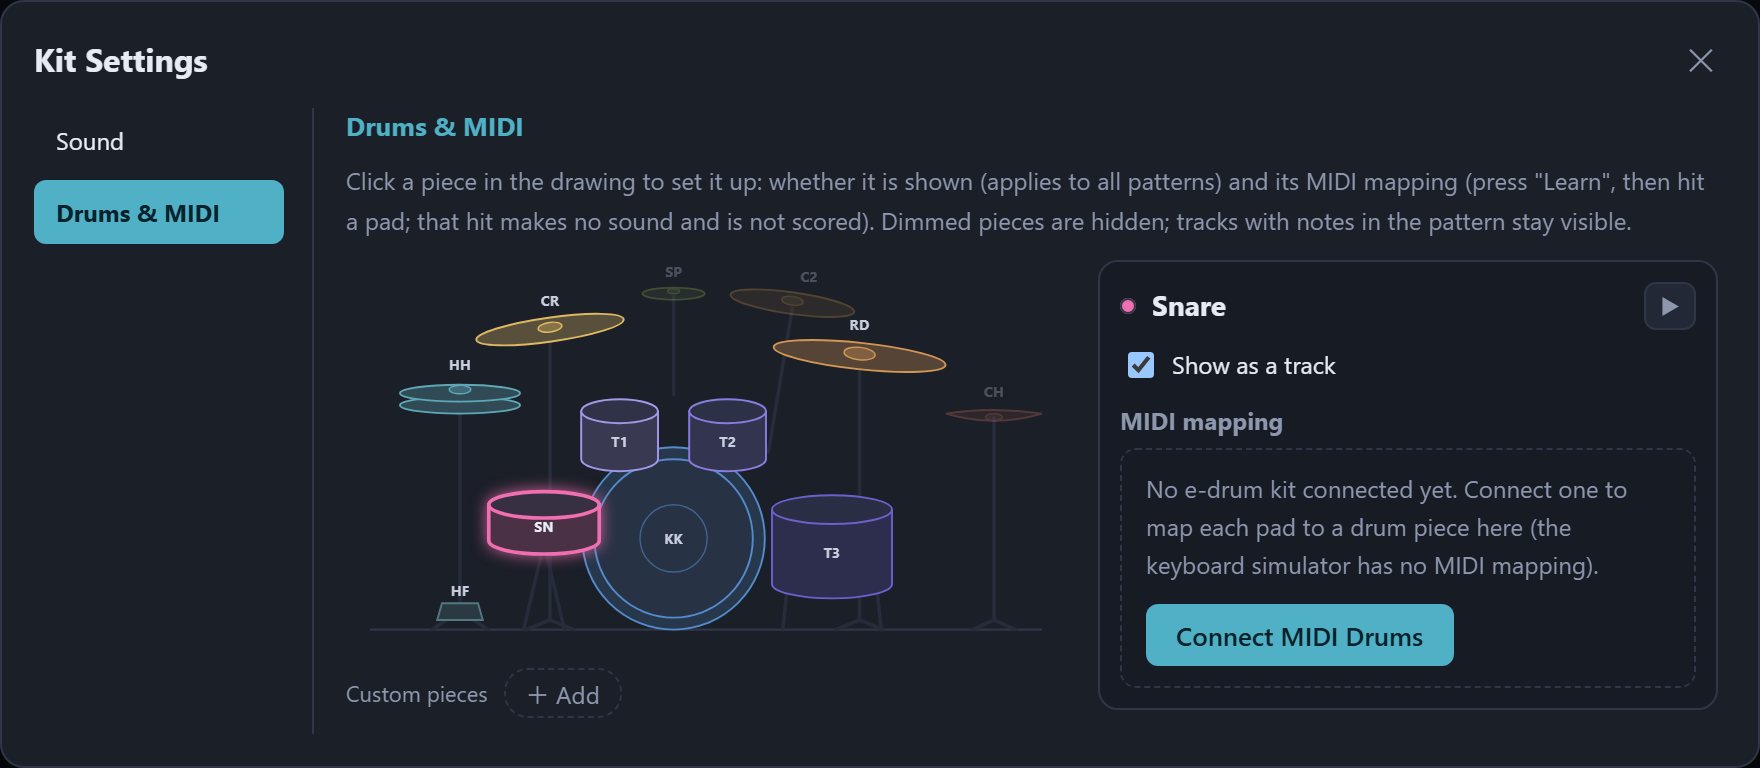
A drum kit drawing is on the left; click a drum to set it up on the right:
- Show as a track: whether this drum gets a row in the step grid (for every module). Dimmed drums in the drawing are hidden. Tracks with notes in the module are always shown; unticking only hides a track once it has no notes.
- MIDI mapping: which pad on your kit maps to this drum; you can "Learn" or remove mappings, see MIDI Learn. Without a kit connected there's a shortcut button to connect one here.
- When you hit a real pad, the drum lights up in the drawing so you can check the mapping.
- Splash, China, Crash 2: off by default (dimmed). Tick "Show as a track" to add them to your kit and use them like any other drum.
Custom pieces
Under "Custom pieces" below the drawing, press Add to add your own drums, such as a second snare or a cowbell. Up to 8 (Splash, China and Crash 2 count too).
- Name, Short name, Color: shown in the grid and the kit drawing.
- Base drum: which built-in drum this piece is "like". Playback uses its sound, scoring accepts hits on the base drum when the piece hasn't been learned, and it decides whether the piece is played by hand or foot.
- Staff position: which line it's drawn on in the score; defaults to the base drum's.
- Press ✕ next to the name to delete it; modules that already use it keep their own copy.
When you open a shared module that brings its own custom pieces, a "Tracks from this pattern" section appears at the bottom of the window where you can Add to my kit or Remove from pattern.
4Share, export, import
Creating share links needs an account; opening links, previewing and importing don't. Without signing in you can still swap modules by exporting and importing files.
Create a share link
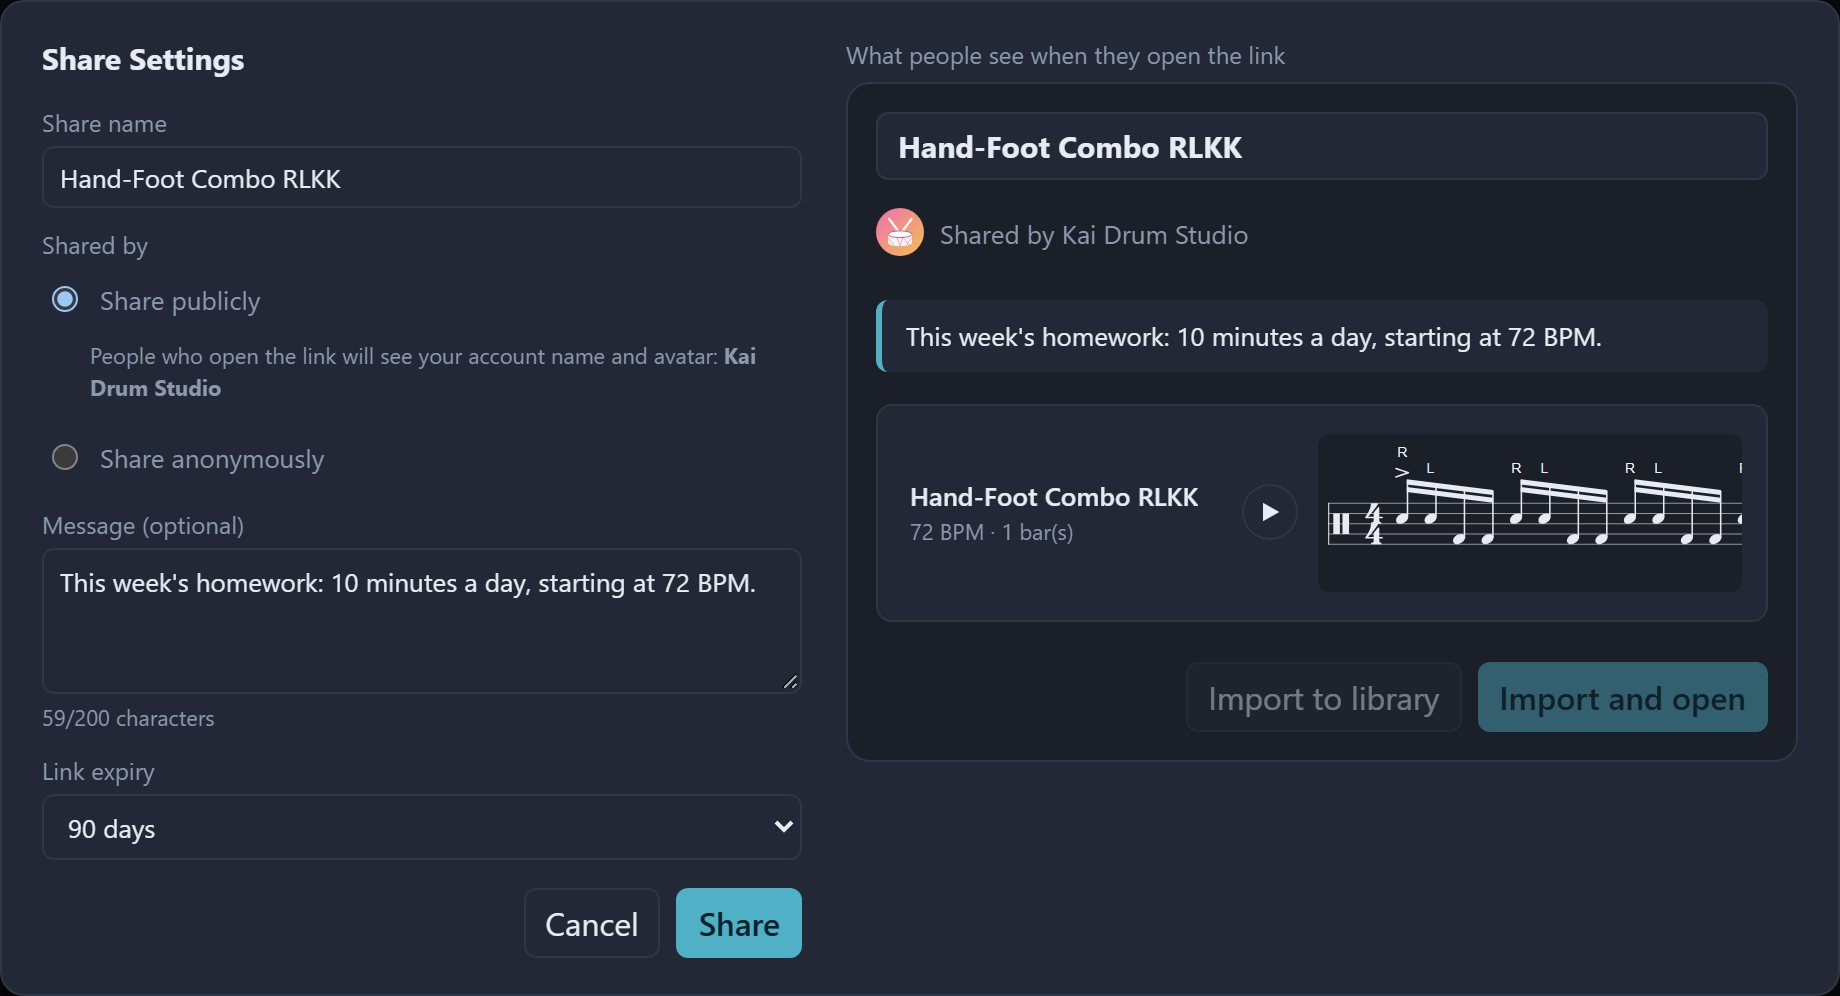
- Sign in and save the module.
- Press the share icon to the left of Save in the editor (shown once signed in), or the share icon on the module's row in the library.
- Fill in the "Share Settings" window: Share name, Shared by (public = shows your account name and avatar; anonymous = only the name you choose), an optional Message (up to 200 characters) and the Link expiry (7/30/90/365 days or never). If the module has remembered metronome settings, the window lists them and only ticked ones are shared (all ticked by default); for groups it's a single "share each module's remembered metronome settings" tick box. The right side previews what people will see.
- Press Share; the link is copied automatically, ready to paste to a friend.
Sharing the same module again: if nothing changed you get the original link back; if the content changed you're asked whether to update the original link (people with the link see the new version) or create a new one.
The sharer mode, anonymous name, default expiry and default message can be set in advance under Preferences → Share.
Open someone's link
Just open the link you were sent — no account needed. DrummerUp shows an import window first instead of replacing the module you're editing.
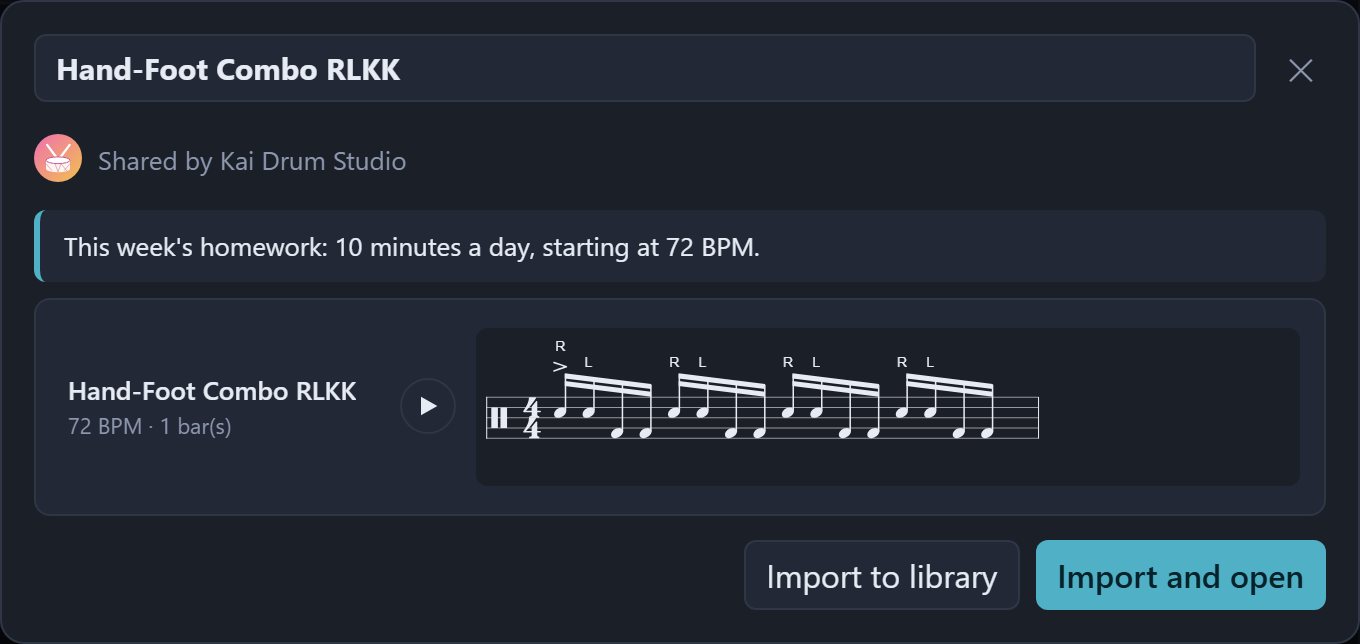
Module links
- The sharer (or anonymous name) and message are at the top, the module's score below; press ▶ to preview.
- You can change the module name first, then choose Import to library (save it without touching what you're editing) or Import and open (save it and open it).
- If the name clashes with one of your modules, a number is added — nothing is overwritten.
- If the sharer set metronome settings for the module (subdivision, downbeat accent, Tempo Trainer and so on), the window lists each one, and ticked ones are saved with the module (all ticked by default). They only apply to the imported module — your other modules and your preferences are untouched. Group links have a single "keep the sharer's metronome settings" tick box.
Group links
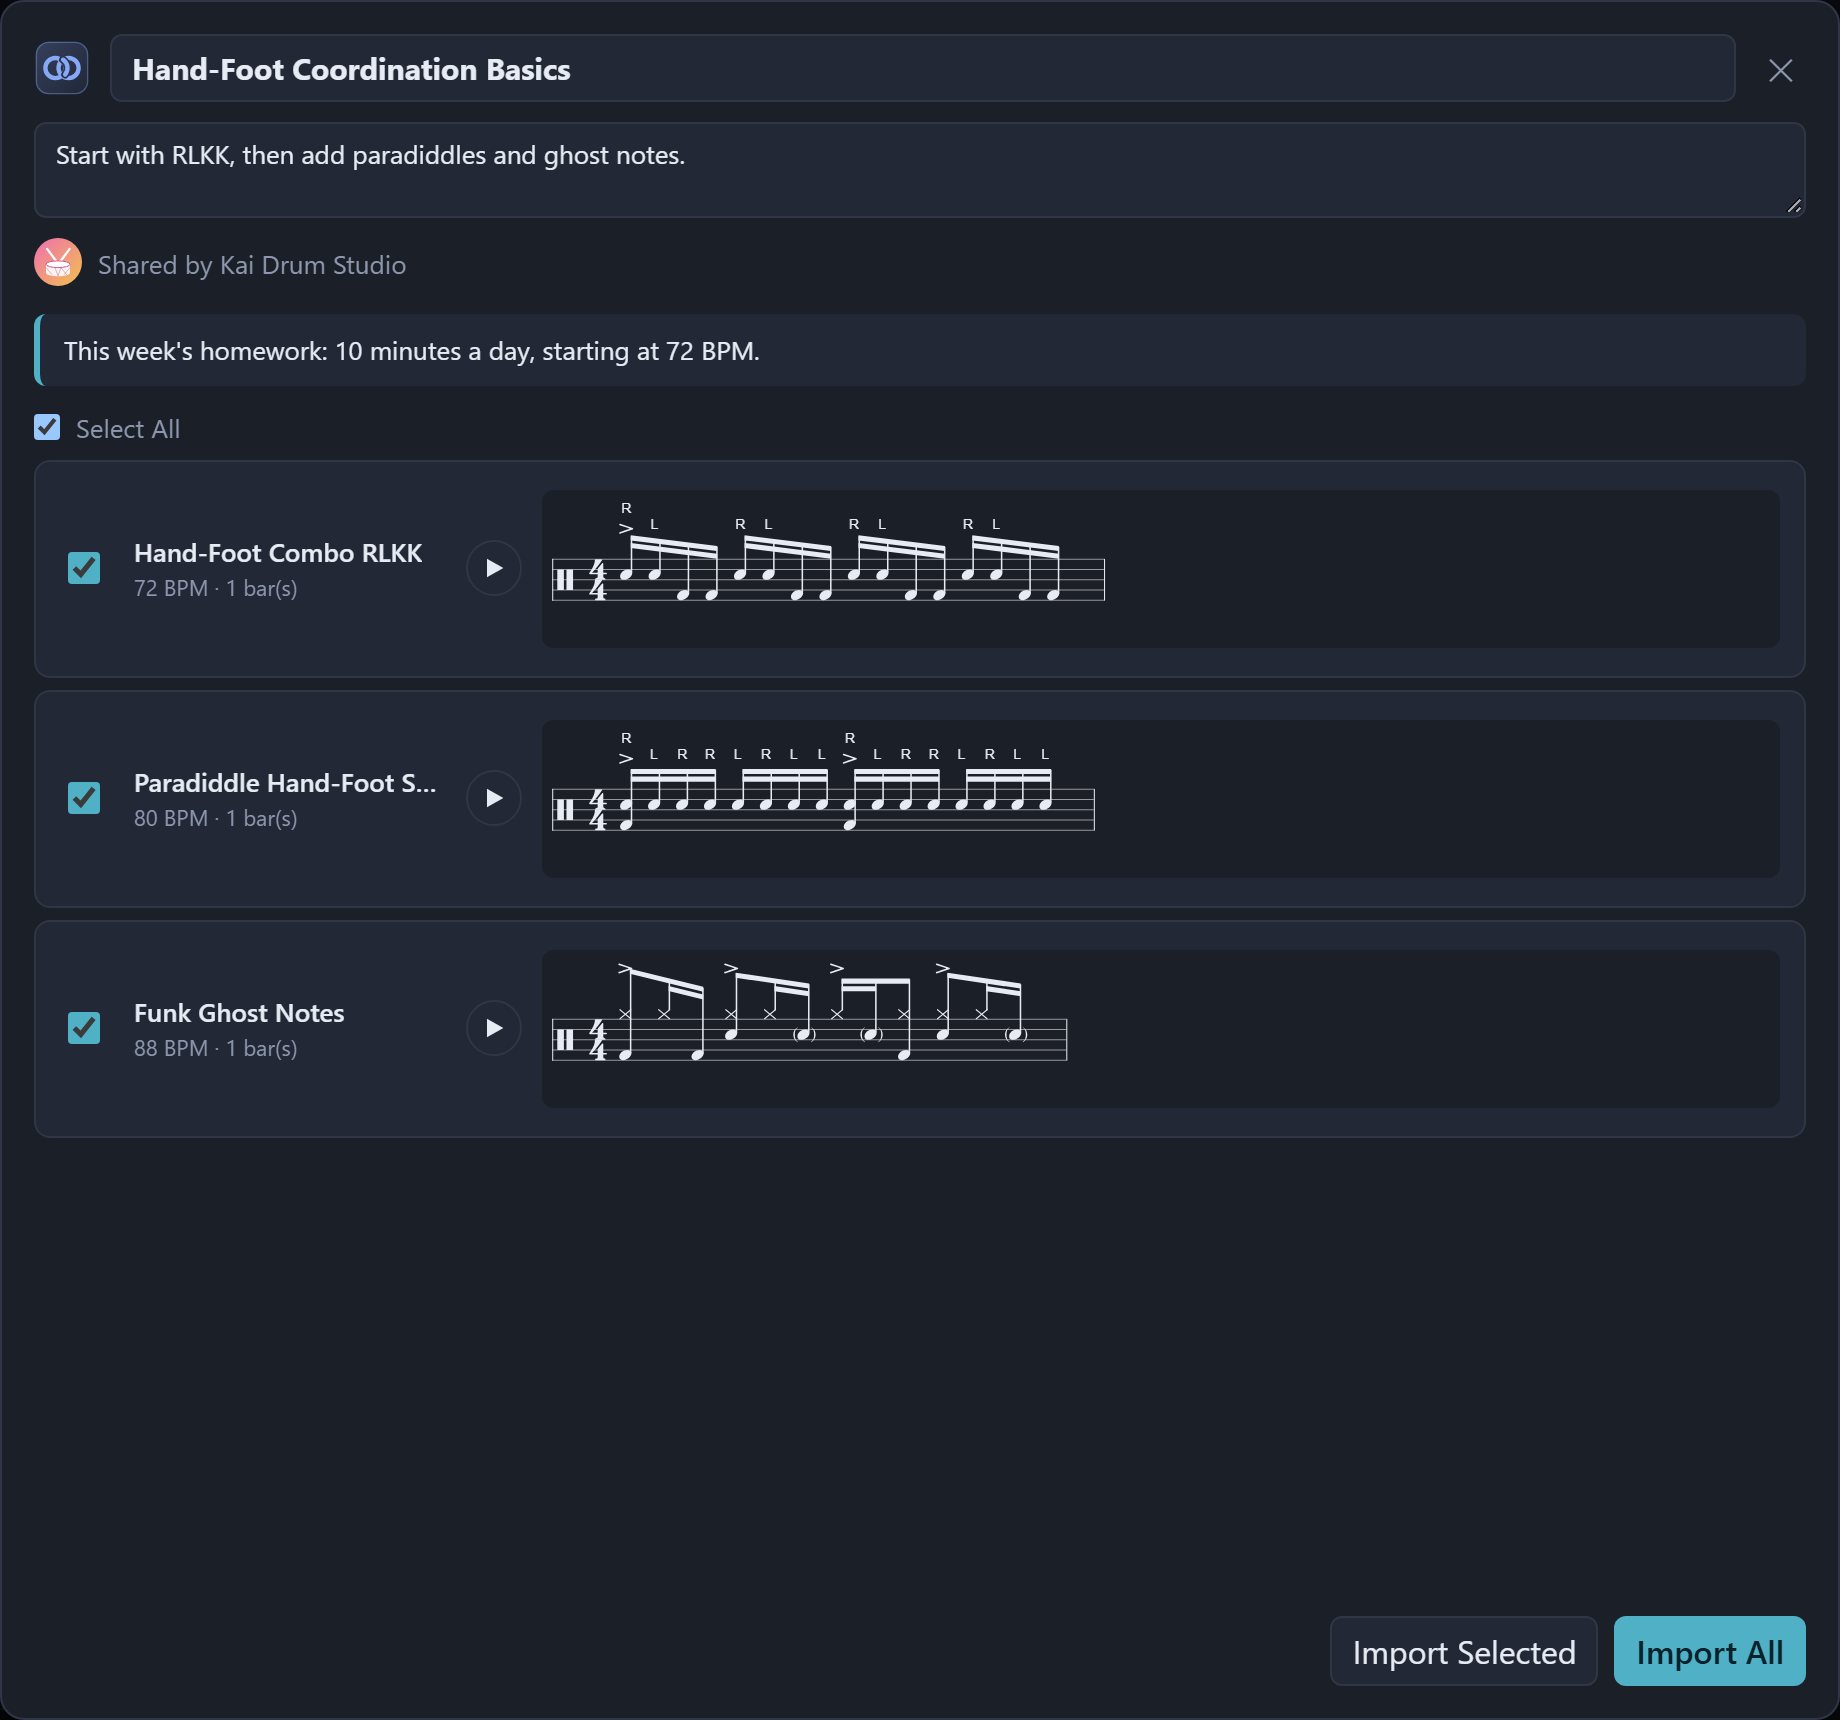
- The group's icon, name and description are at the top; you can rename it before importing.
- Every module in the group is listed below and can be previewed; all are selected by default, untick the ones you don't want.
- Import All or Import Selected creates a group with the same name and puts the modules in it. Clashing group or module names get a number added. Items marked Sample Modules are already in your library, so they're added to the group rather than copied.
If the link has expired or the sharer revoked it, you'll see that the share can't be found.
Manage share links
Press Manage Share Links in the module library to list every module and group share you've created:
- Copy Link: get the link again.
- Reset expiry: restart the expiry period from now.
- Revoke: the link stops working immediately; this can't be undone. Tick several to revoke them together.
- Expired shares are cleaned up automatically when you open this list.
Share a group
Share a whole set of exercises at once: select the group on the left of the library and press Share above it (sign-in required). Settings work just like sharing a module. The group's icon, description and every module in it are shared; people who open it see the "Group links" import window above and can import everything or just a few. To create and organise groups, see Organising with groups.
Export and import files
No account needed. The ▾ next to Save → Export Module downloads a module file; on another computer or browser, Import Module and choose the file to load it.
Two other kinds of export: scores via Export Score PDF in the Live Score toolbar, and reports via Export PDF at the top right of the report.
5Scoring Mode
Play along with the module; every hit is judged on timing, and you get a score report at the end.
Start scoring
- Choose an input device (e-drum kit, keyboard or touch simulator) and run the Latency Test. You can't start scoring without an input device.
- Flip the switch above the editor to Scoring Mode. The step grid collapses and the score is centred (this can be turned off in Preferences), and the right panel switches to the "Scoring" page.
- Check the BPM, Loop Count and count-in (4 beats by default in Scoring Mode). A fixed Loop Count is recommended for scoring.
- Press Start Scoring and play along with the score after the count-in.
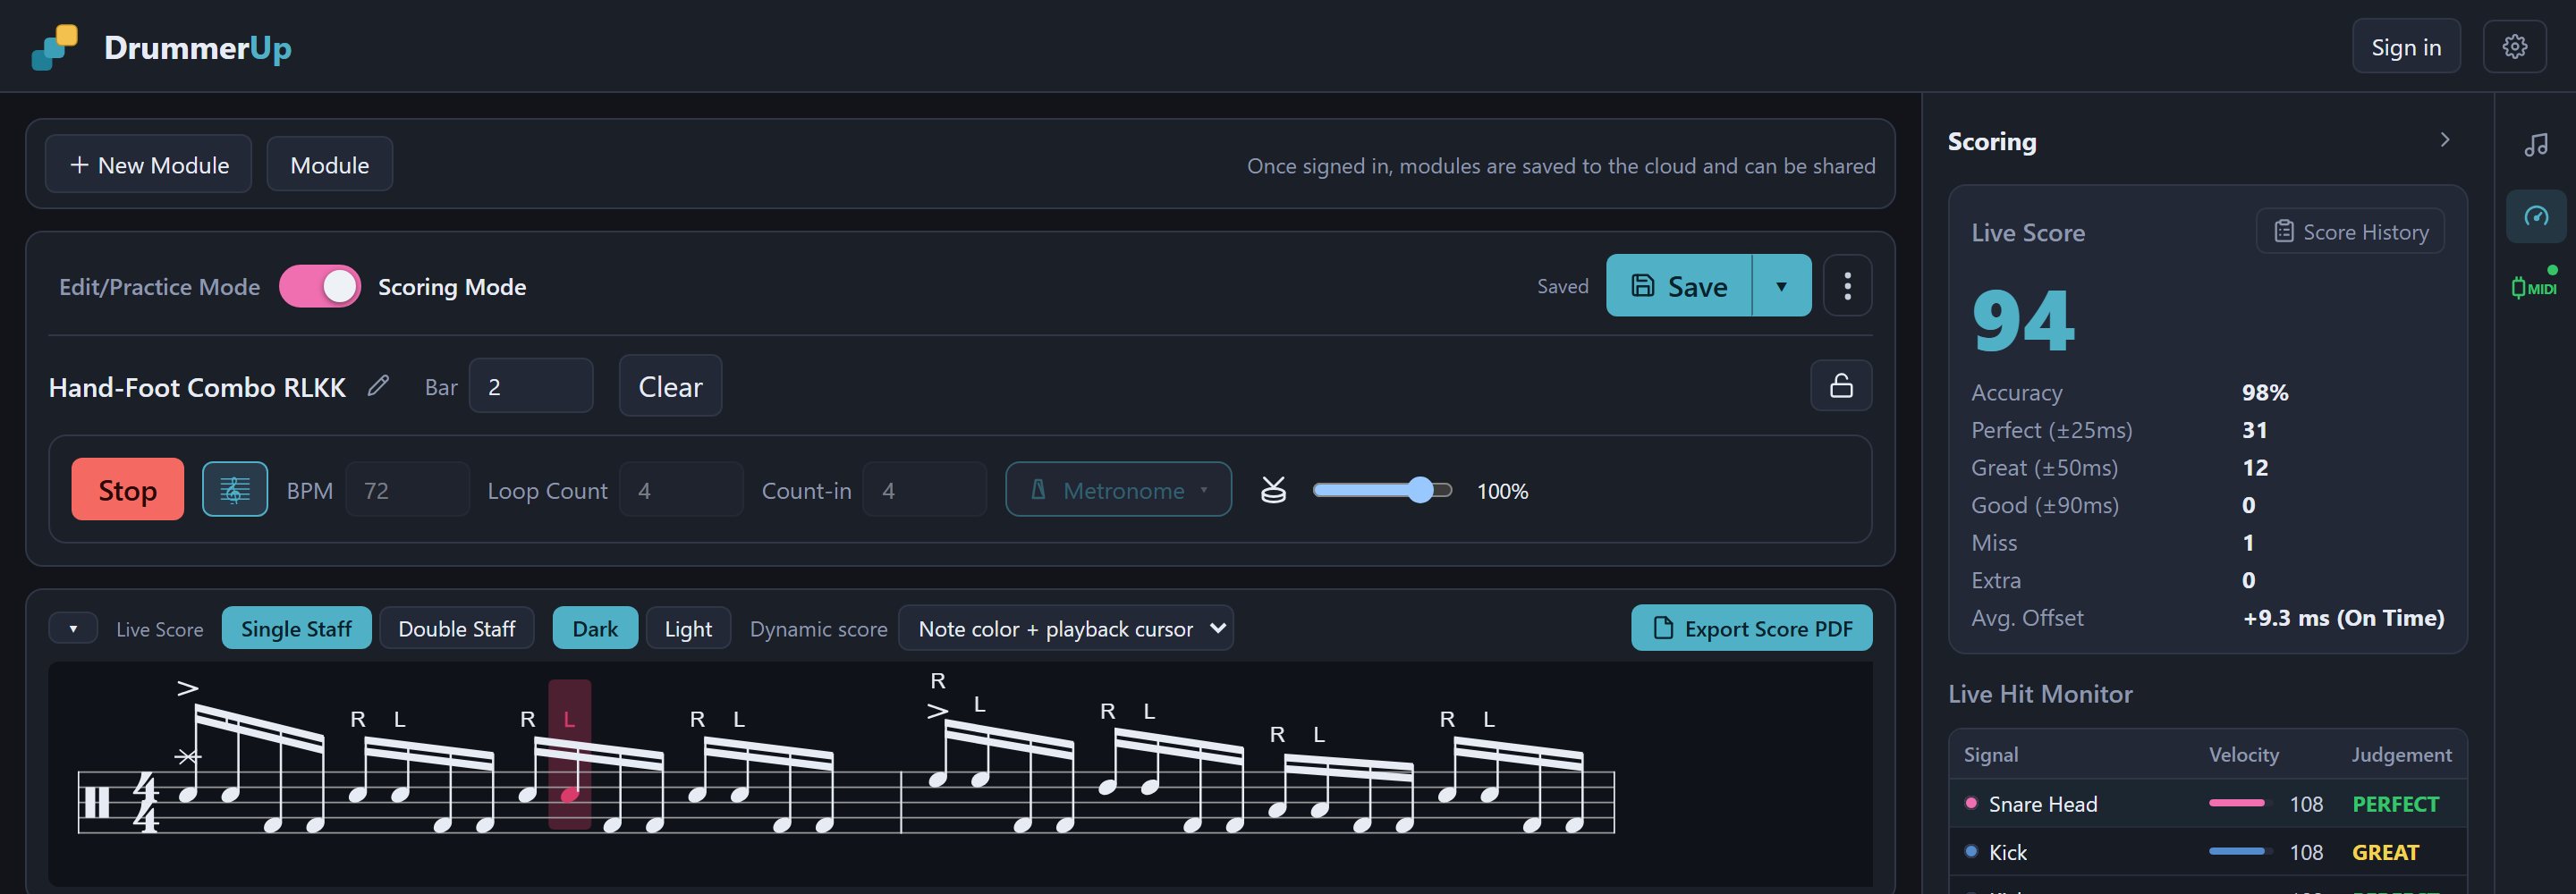
- With a real e-drum kit, the app's demo drums are muted automatically and only the metronome plays; with the keyboard or touch simulator the demo drums stay on.
- The metronome can't be changed while scoring.
- Pressing Stop or switching back to edit mode partway through discards that run.
Judgements and score
| Judgement | Distance from the correct time | Points |
|---|---|---|
| Perfect | Within ±25ms | 1 |
| Great | Within ±50ms | 0.85 |
| Good | Within ±90ms | 0.6 |
| Miss | Not played (or more than 90ms off) | 0 |
| Extra | A hit that isn't in the score | −0.4 |
Total score = (Perfect×1 + Great×0.85 + Good×0.6 − Extra×0.4) ÷ total expected × 100. Grades: S (95+), A (85+), B (70+), C (50+), D.
Judgements only look at which drum and when: open vs. closed hi-hat, or ride bell vs. bow, currently count as the same drum. For custom pieces that haven't been learned, hitting the base drum also counts.
Results and history
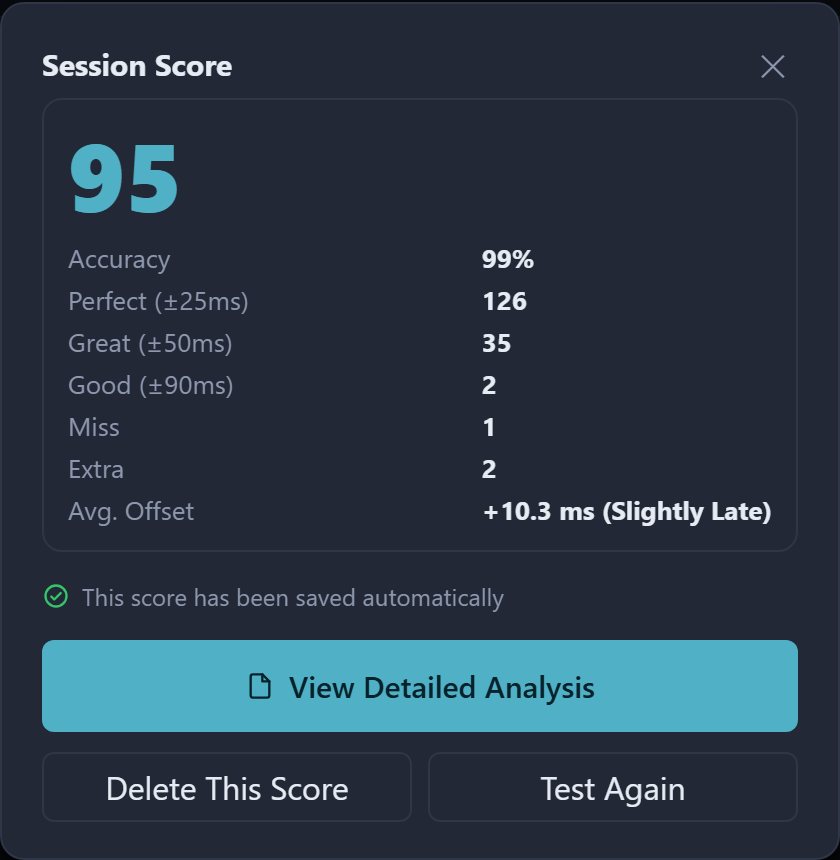
When the set number of loops is done, "Session Score" pops up — the result is already saved:
- View Detailed Analysis: open the full report; see Reading the report.
- Delete This Score: if you don't want to keep it.
- Test Again: score again right away with the same settings.
Score History: gear menu → Score History, or Score History on the right-hand "Scoring" page. It lists the time, module, score, grade, accuracy and device of every run; press View to open a report, or tick several to delete them. Signed out, history is kept on this device (up to 200 runs); signed in, in the cloud.
6Reading the report
The report turns "it doesn't feel quite steady" into problems you can see. At the top left you can go ← Back to home or to the Score History list; at the top right you can Share, Export PDF or Delete the run. Share creates a score card image (Instagram Story 9:16 or Post 4:5, dark or white) with your score and grade, an upbeat headline picked from this run (e.g. "New personal best", "Big improvement", "Zero mistakes", or by grade "Rhythm genius", "Steady as a metronome" and so on), accuracy, average offset and the module's first bar. The headlines are deliberately stricter than the report — "Clockwork precision" needs an average offset within 5ms (the report's "on time" is 10ms), and "Ambidextrous" or "Hands and feet as one" need at least 8 hits (pairs) within ±10ms. On phones you can pick Instagram straight from the share sheet; on computers you can download or copy the image. The image is made on your device and never uploaded. Export PDF opens the browser's print dialog — choose "Save as PDF" as the destination. It prints the whole report (including hands, hand–foot coordination, velocity and the track record) laid out for A4, without the interactive buttons. It first asks for White (saves ink, good for paper) or Dark (like the screen, good for reading as a PDF) and remembers your choice; Ctrl/⌘+P does the same. The examples below come from an RLKK run (right hand, left hand, kick + hi-hat, kick).
Overall summary
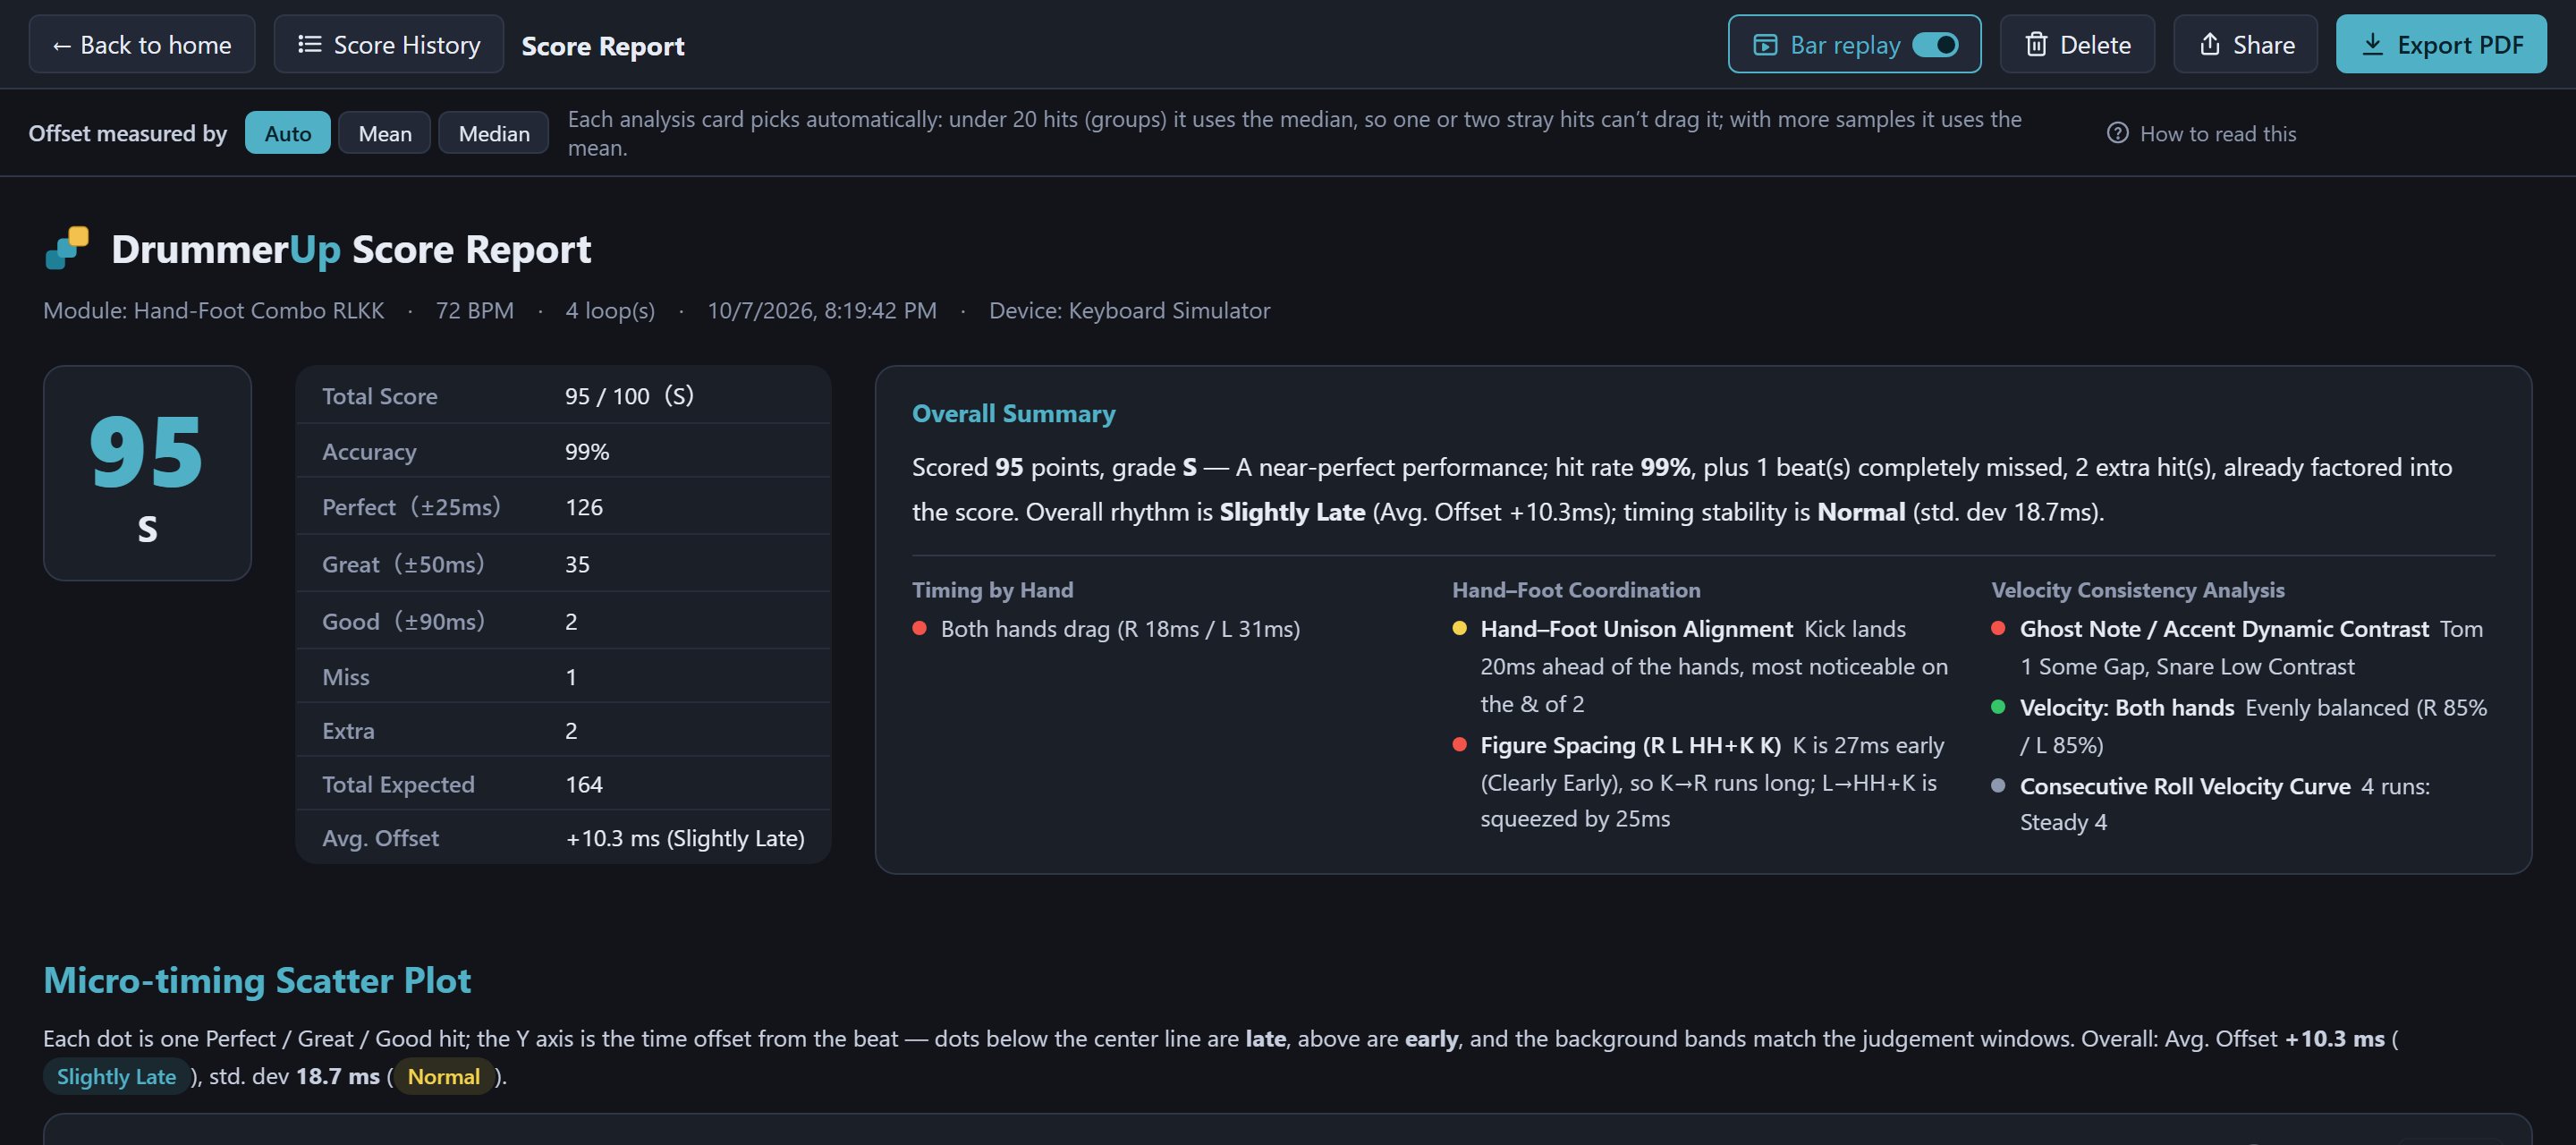
- Below the title: module, tempo, number of loops, time and the device used.
- Total score and grade, the count of each judgement and the total expected.
- Avg. Offset (or Median offset, see "Offset measured by" below): how early or late your hits were overall. Positive is late (dragging), negative is early (rushing).
- Overall Summary: one paragraph summing up the run, including your tendency and stability.
- Below it are the conclusions of Timing by Hand, Hand–Foot Coordination and Velocity Consistency Analysis (the same as each section below with no bars selected; sections that don't apply are left out — no sticking, no hand analysis). The dot in front of each line: green = good, yellow = slightly off, red = clearly off, grey = just a description (velocity trends in fast runs may be intentional, so they aren't judged). Conclusion boxes in the sections below use the same colours, except that a "just a description" box keeps the default yellow border rather than grey — that doesn't mean slightly off. These conclusions are also printed in the PDF.
Tendencies are worded by size: within ±10ms "On Time", within 15ms "Slightly Early/Late", within 25ms "Early/Late", beyond 25ms "Clearly Early/Late". Stability is always the standard deviation (how many ms each hit strays from the centre): under 15ms "Stable", under 30ms "Normal", above that "Unstable".
How to read this at the right end of the same row opens a short explanation: offset means how on time you are, standard deviation means how steady, and what each section needs before it shows data.
Offset measured by (mean / median): switch between Auto, Mean and Median at the top of the report, and every offset number in the report follows (scoring itself isn't affected). The mean counts every hit, so mistakes show up in the numbers; the median isn't dragged by one or two wild hits. The default Auto decides per analysis card from the whole run's sample size: under 20 hits (groups) it uses the median, otherwise the mean; selected bars and every heatmap cell in the same card use the same choice so they can be compared with the overall figure. Each card's title says which it uses, and stability (± standard deviation) is measured around the same centre.
Indicative only: small samples still show their numbers, just marked "indicative only". There are only two thresholds: fewer than 8 hits (timing by hand, hands vs feet, hand independence, velocity by hand) or fewer than 5 groups (change vs same hand, hand–foot unison, figure spacing).
Micro-timing Scatter Plot and Per-Bar Analysis
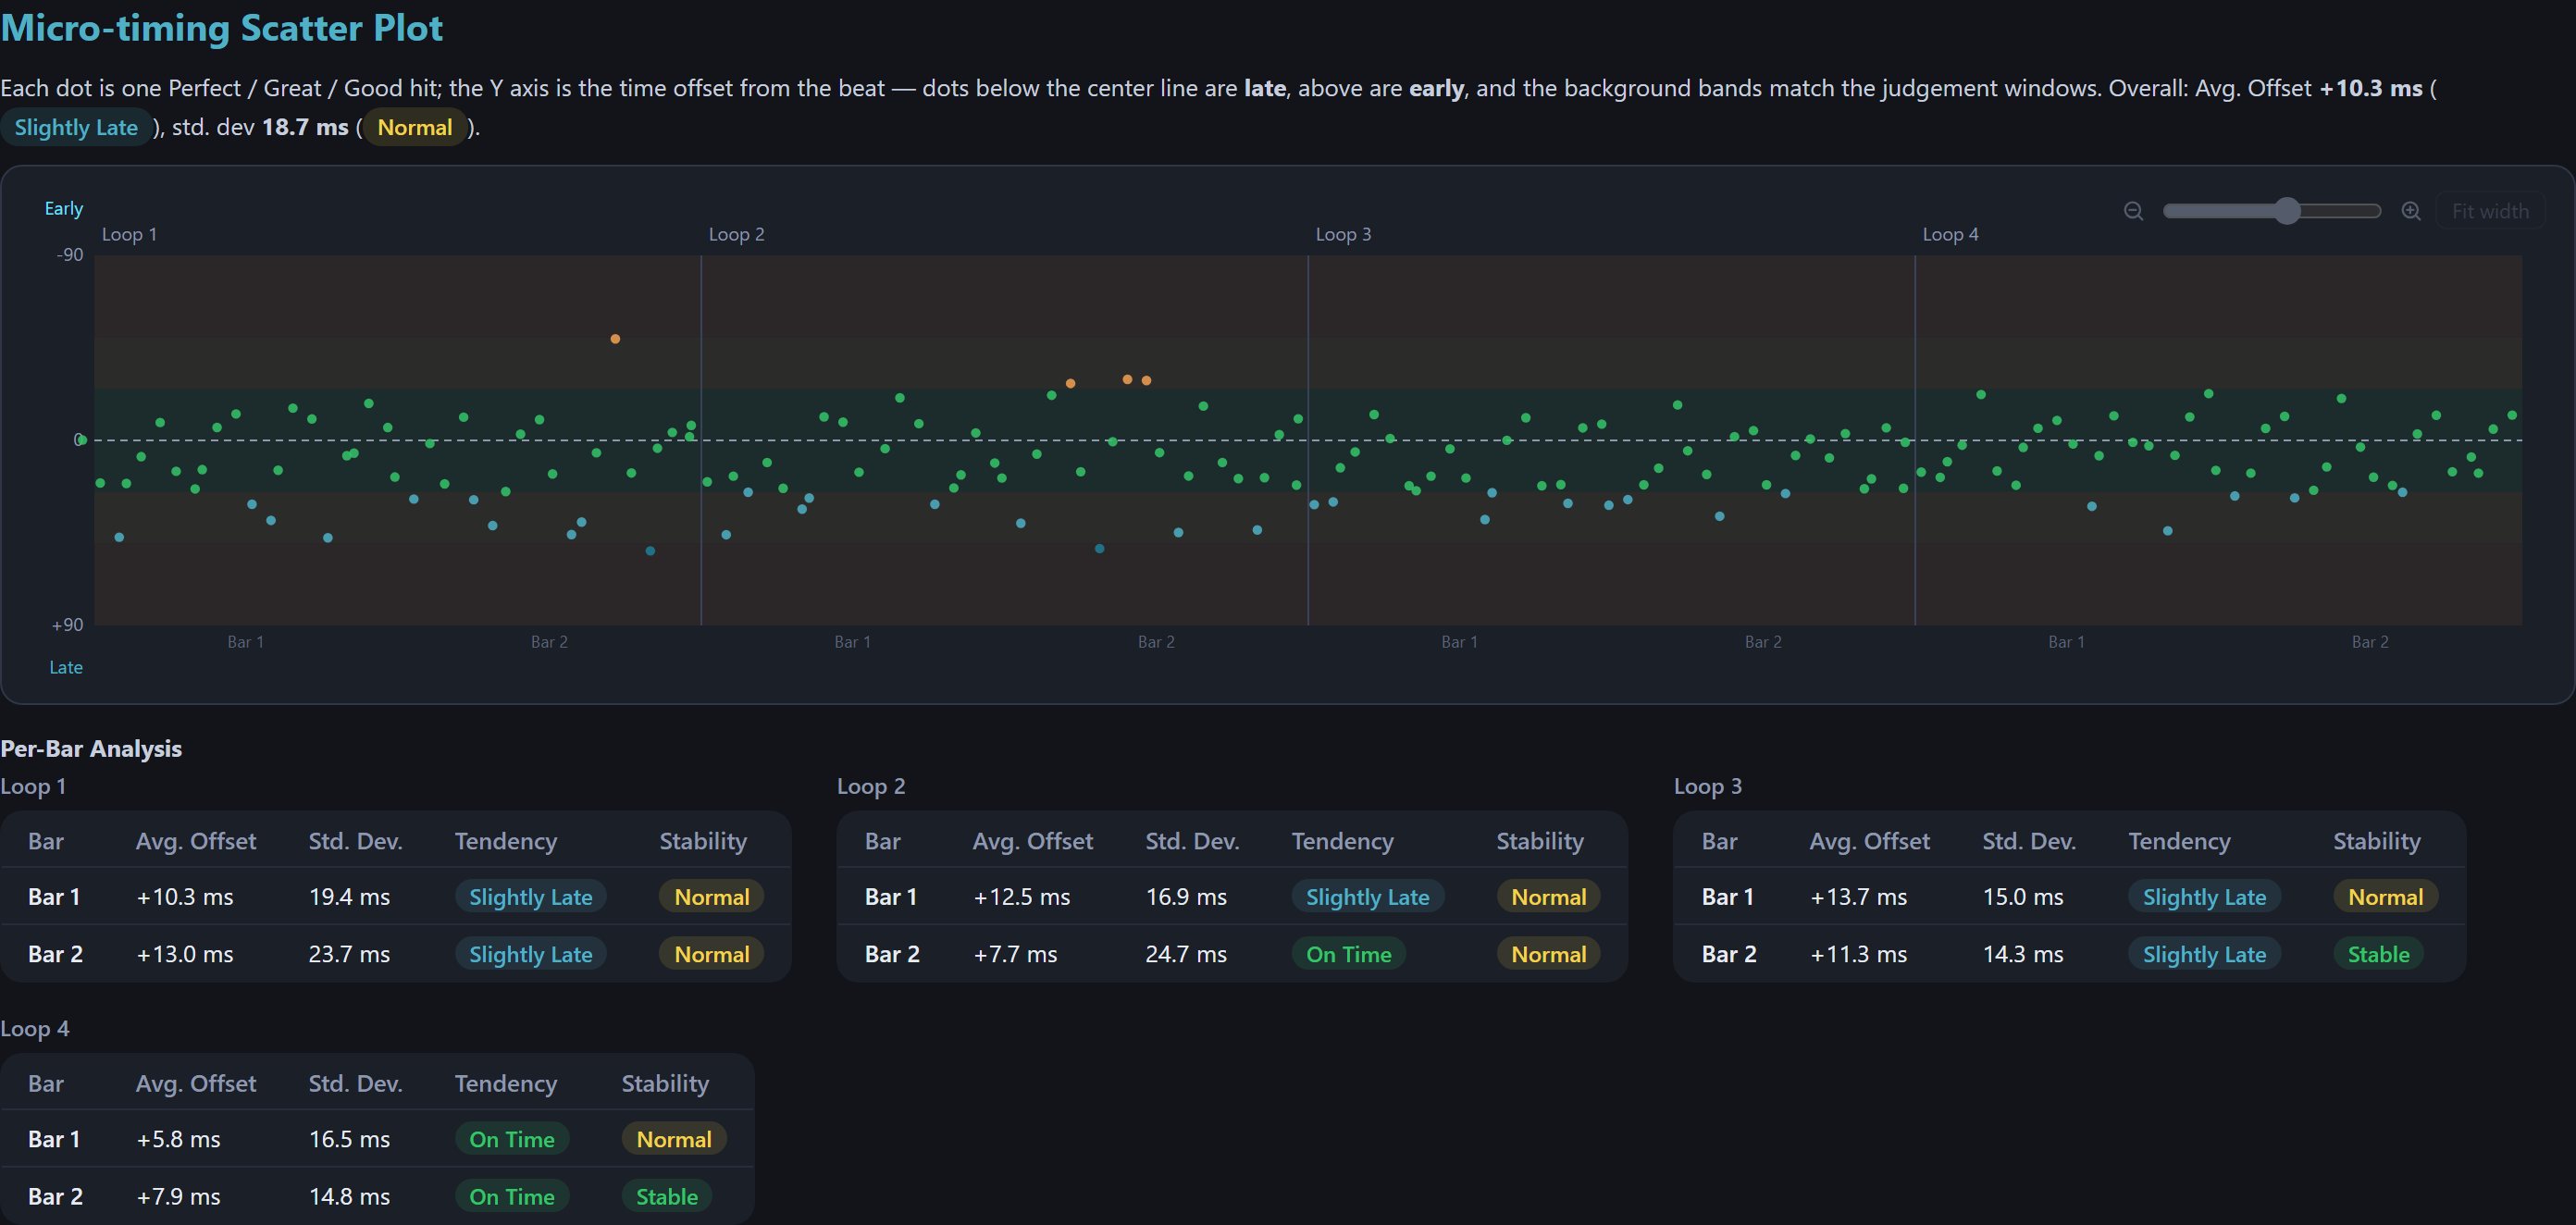
- Each dot is one hit. The horizontal axis is time (by loop and bar), the vertical axis is offset: below the centre line is late (dragging), above is early (rushing). The background bands match the Perfect/Great/Good windows.
- The more the dots spread, the less steady you were; a whole cluster on one side means you habitually rush or drag.
- Zoom: the slider at the top right widens the chart (for detail, scrolling sideways inside it) or narrows it; Fit width fits the whole chart on screen. The Note-by-Note Timeline under "Timing by Hand" has the same slider.
- Per-Bar Analysis: offset, standard deviation, tendency and stability for every bar of every loop. Compare the same bar across loops to see whether you got steadier.
- Selecting bars: you can click bars in the micro-timing chart, every row of the per-bar table, every row of the velocity curve table, the note-by-note timeline and the track record, and the selection is shared between all of them. Multi-select by dragging, Shift+click, Ctrl (⌘)+click, or long-press on phones and tablets; click anywhere outside the selection, click a selected bar again, or press Esc to clear it.
Tempo Ramp Analysis (with the Tempo Trainer)
If the metronome's Tempo Trainer was on while scoring, the report gets this extra section (otherwise it isn't shown):
- The tempo under the title is written as "start→end", e.g. 90→180 BPM; the micro-timing chart marks the new BPM above bars where the tempo changed, and the per-bar table gets a BPM column.
- Hit rate, offset and standard deviation are listed for each tempo. A standard deviation of 30ms or more, or a hit rate under 85% (roughly one miss in seven), counts as "unstable" — the most common thing to go first as the tempo rises is missed notes, and looking only at the notes you hit would make it seem steady, so the hit rate counts too. The conclusion reads like "steady up to 120 BPM, unstable from 150 BPM": that tempo is your current ceiling, and next time you can start climbing from the last steady one.
- Click a row to select that tempo's bars, then listen with Bar replay; playback follows each bar's original tempo.
- This conclusion also appears in the overall summary at the top, and the BPM column in Score History reads "90→180".
Timing by Hand
Only shown when the module has sticking (R/L). It compares hands based on the marks in the score — an e-drum kit can't tell which hand you actually used.
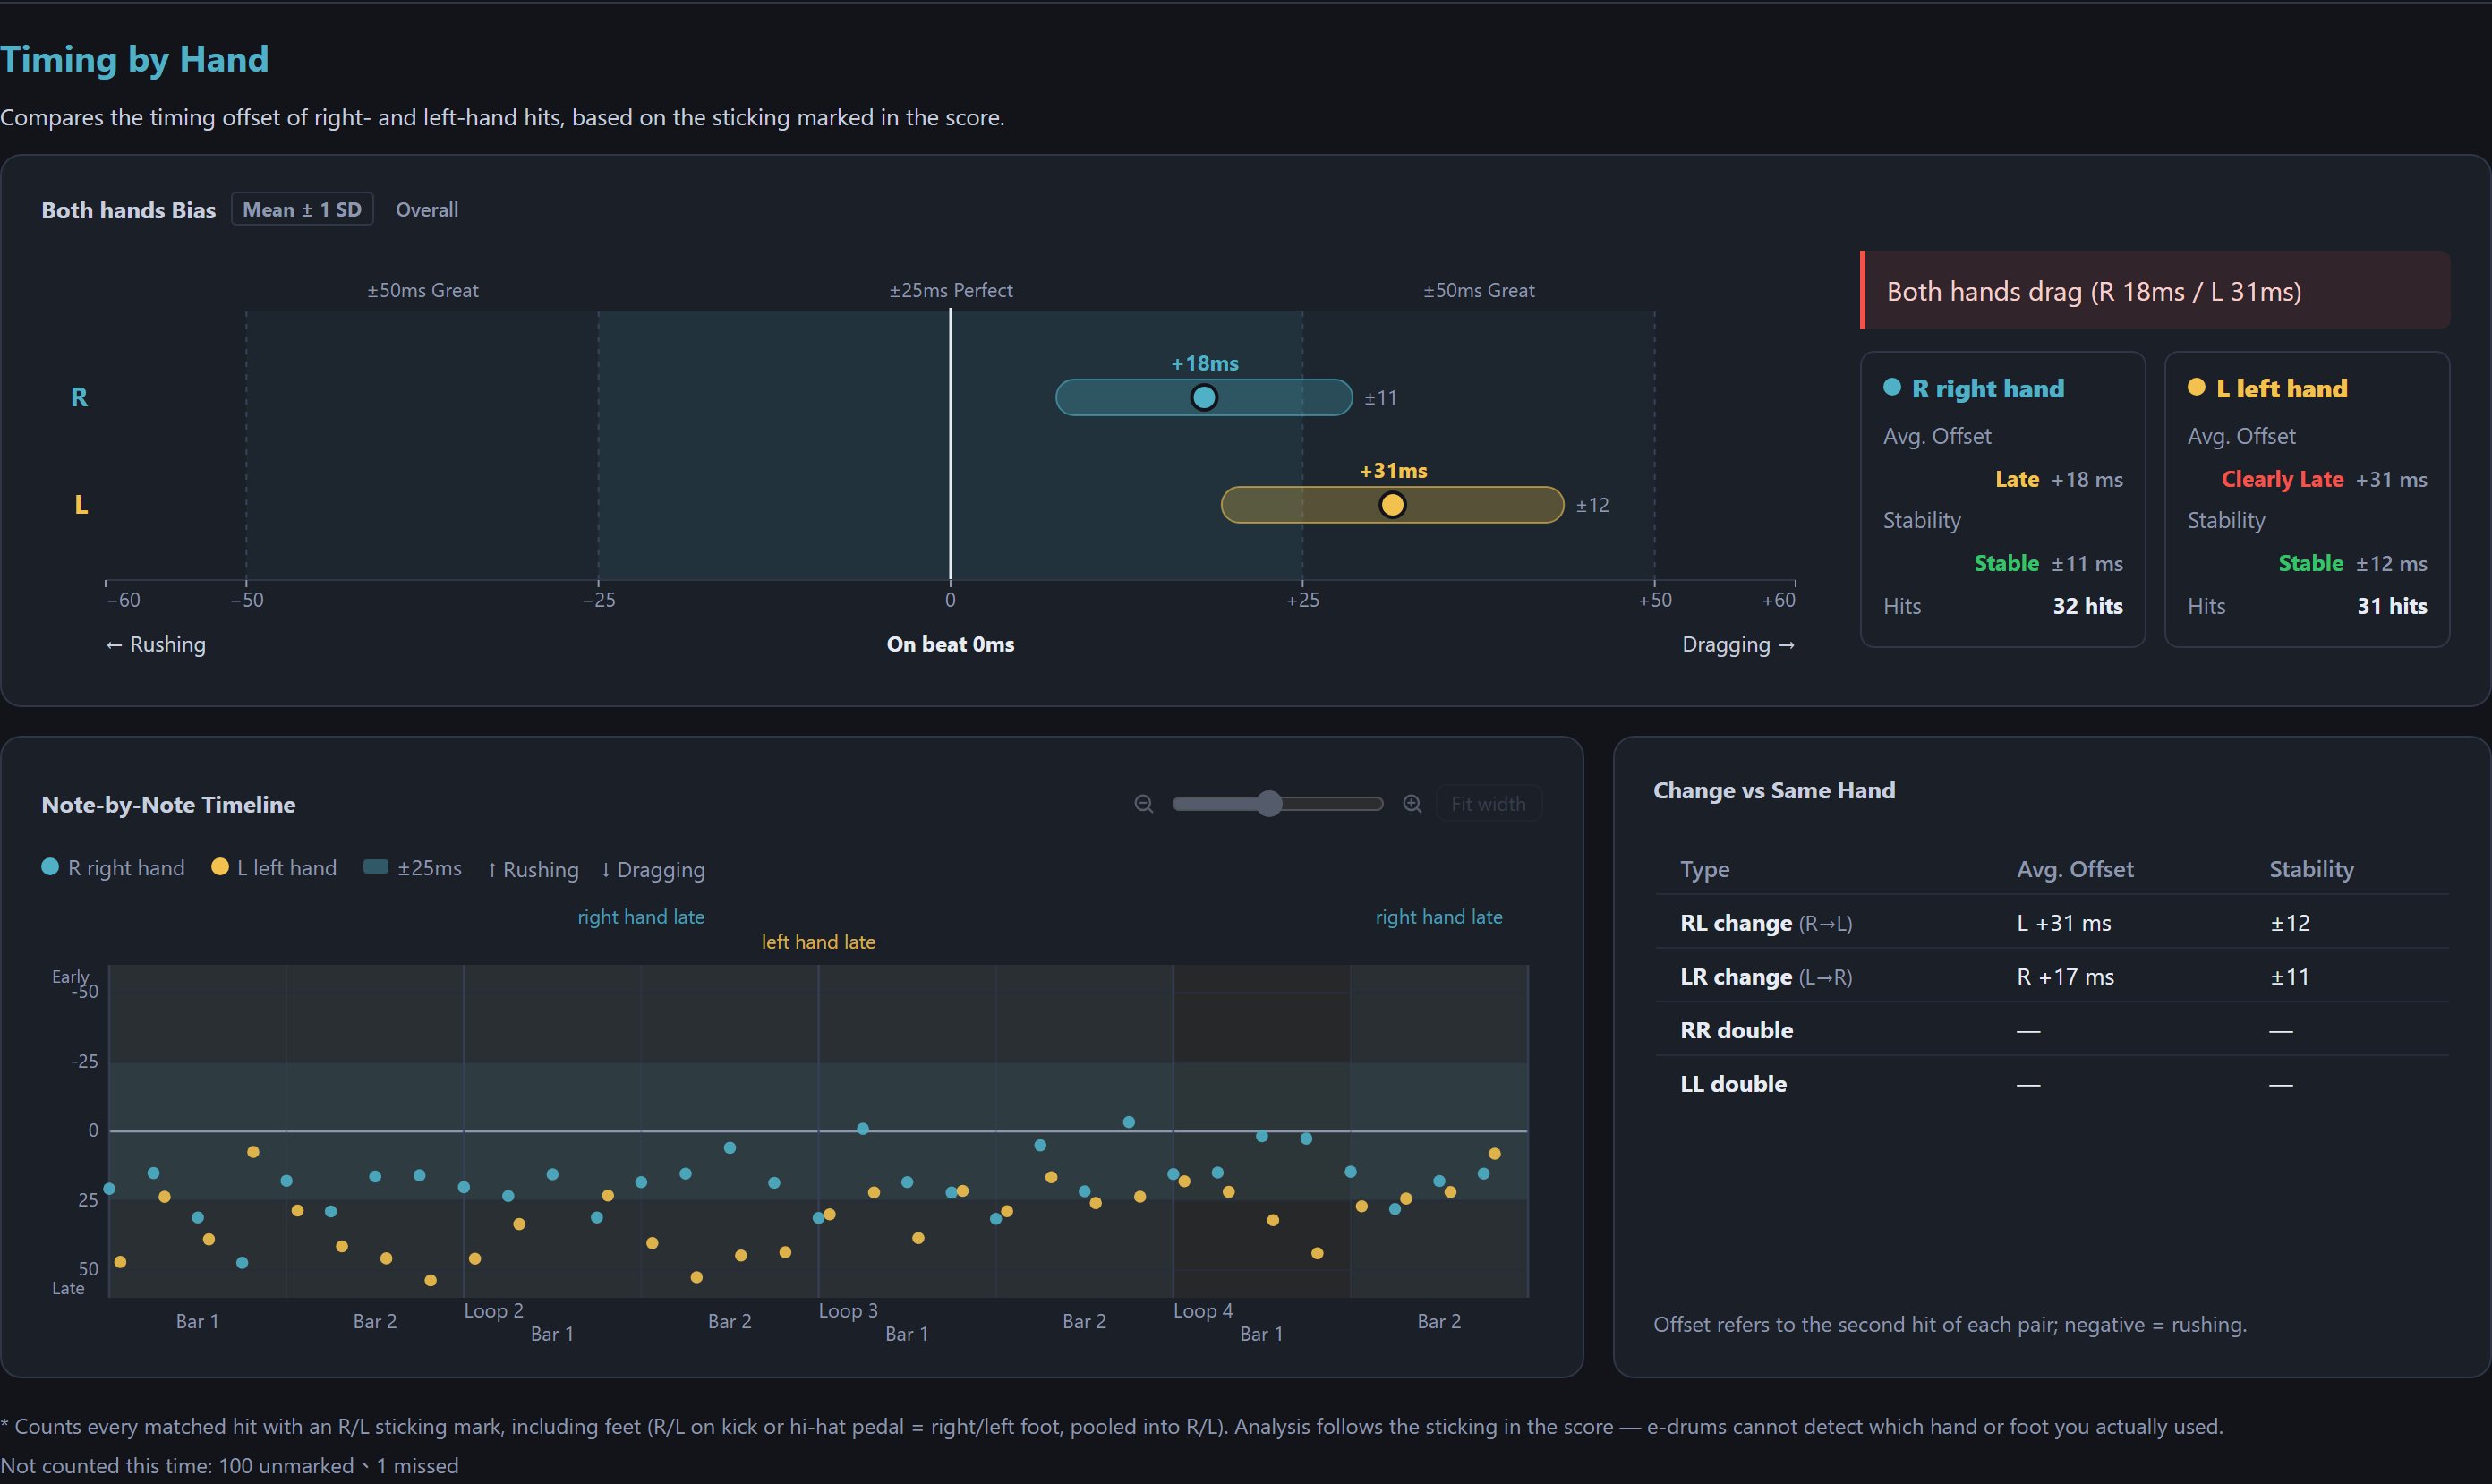
- Both hands bias: the dot is the offset (mean or median, per the setting above) and the bar is ±1 standard deviation (shorter is steadier). The conclusion box on the right says which hand is late and which is less steady — in the example both hands drag, the left hand clearly more. The stat cards lead with the verdict (Slightly Late, Clearly Late, Stable…) with the number in small type beside it.
- Note-by-Note Timeline: every hit's offset in time order. When a hand has at least 3 hits in a bar and its offset is beyond 10ms (that is, not "on time"), the bar is marked "early/late". Click bars to make the "Both hands bias" chart, conclusion and stats above look only at the selected bars (the title shows "Loop N · Bar M" or "N bars selected"). Multi-select: drag to select a range, Shift+click to select from the last click to here, Ctrl (⌘ on a Mac)+click to add or remove, or long-press on phones and tablets (dragging after a long-press adds too). Click anywhere outside the selection, click a selected bar again, press Esc or the ✕ on the label to go back to the whole run; click another bar to select that one instead.
- Change vs Same Hand: offset and stability for RL changes, LR changes and RR/LL doubles, showing whether switching hands is where things go wrong.
- Feet marked R/L (kick, hi-hat pedal) are counted in the left/right totals too; small samples are marked "indicative only".
Hand–Foot Coordination
"Feet" means the kick and hi-hat pedal; every other drum counts as hands. This analysis needs no sticking marks.
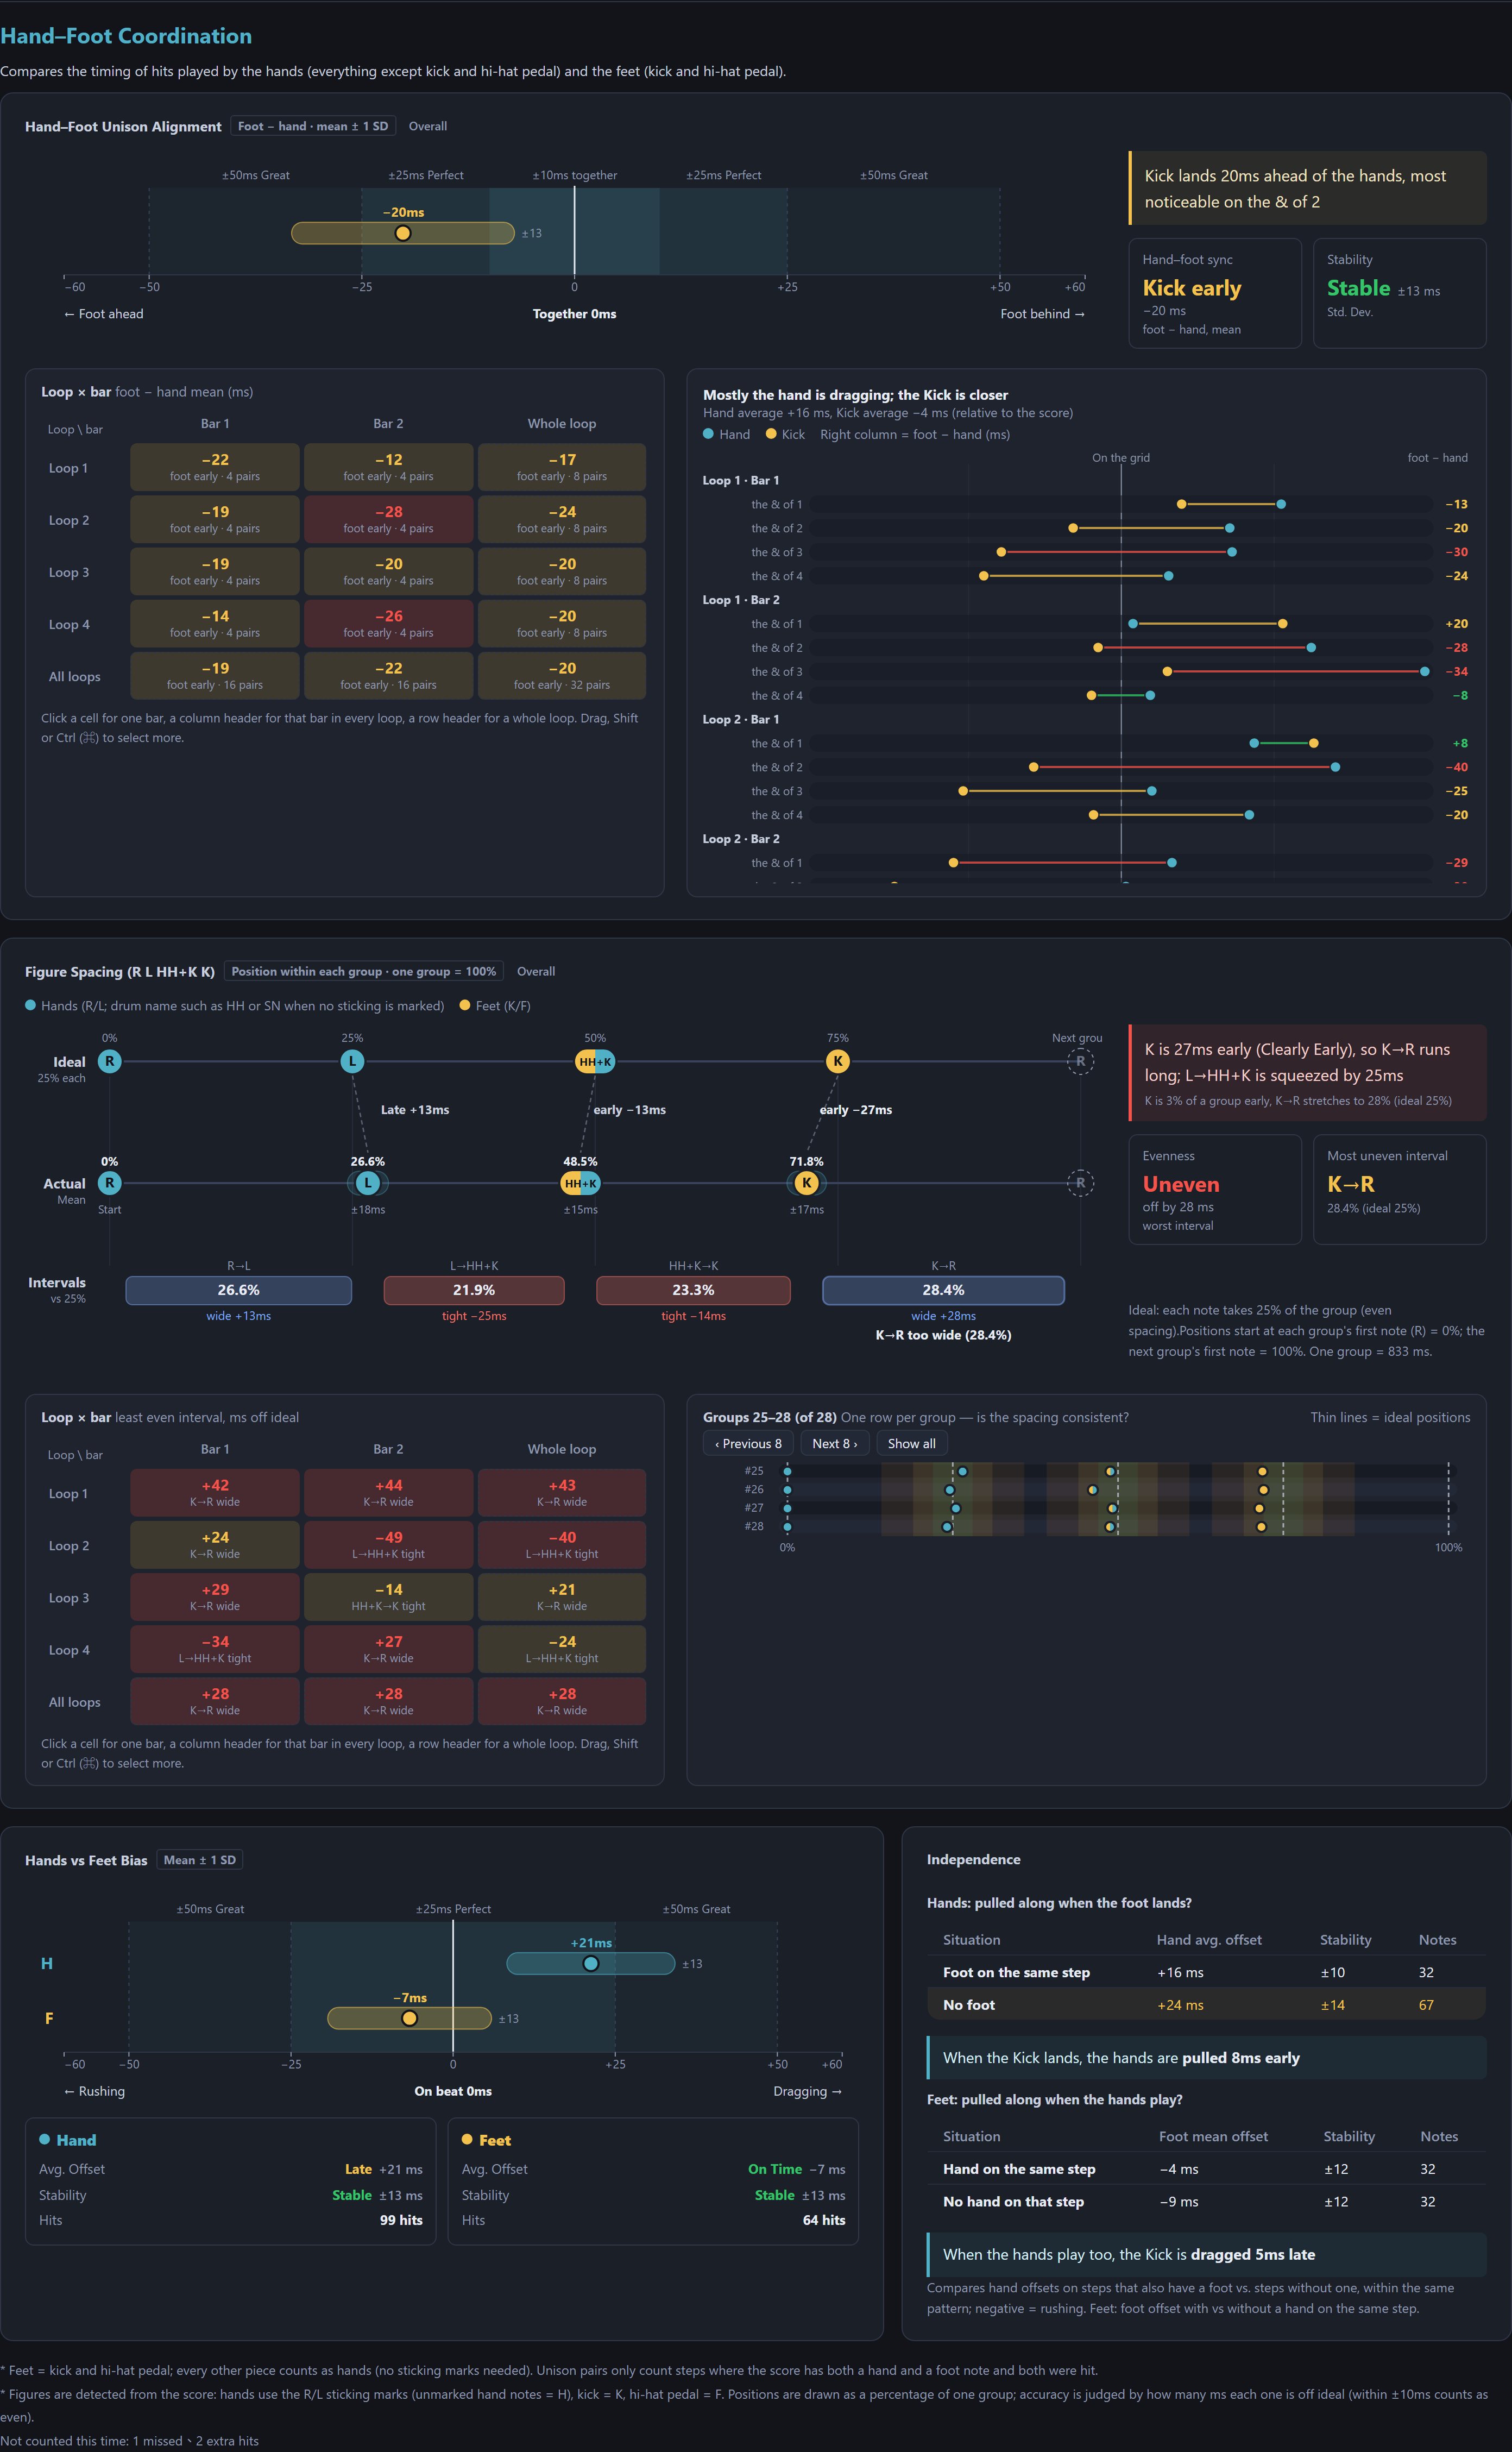
- Hand–Foot Unison Alignment: for notes where a hand and a foot play on the same step, how early or late the foot is compared with the hand. The main chart is drawn like the hand bias chart: the dot is the offset (in the example the kick lands about 20ms ahead of the hands), the capsule is ±1 standard deviation (how steady), and inside the ±10ms band in the middle you can't hear who was first. Click bars in the heatmap below and the chart looks only at those bars, with a dashed circle marking the whole run. The detail panel on the right plots the hand and the foot separately against the score, so you can tell "the foot is late" from "the hands rush".
- Figure Spacing: repeating hand/foot figures (e.g. RLKK, paradiddles) are detected from the score automatically. Each group's length counts as 100%, and every note's actual position is compared with its ideal. The detail panel on the right has one row per group to show whether the spacing is the same every time; it shows the latest 8 groups by default, and you can page back with Previous 8/Next 8 or press Show all. Positions are drawn as percentages (independent of tempo), but accuracy is judged in ms with the same standard as the rest of the report: within 10ms of ideal is even (green), within 25ms a little off (yellow), beyond 25ms clearly off (red). When one note is late, the interval before it naturally grows and the one after it shrinks, and the conclusion names the cause, e.g. "K is 25ms late (Clearly Late), so R→K runs long and K→R runs short". In the example the last kick (K) is clearly early, so the intervals around it are one too tight and one too wide. The two cards on the right: Evenness is how many ms the most uneven interval is off ideal — within 10ms "Even", within 25ms "Slightly uneven", beyond that "Uneven" (the same as the conclusion box and heatmap) — and Most uneven interval says which one, and what share of a group it actually takes. This card is about whether the spacing is even, not whether each group is played the same: squeezing the same spot every time is still uneven. The "±N ms" under each note is how much the groups differ from one another (standard deviation). Heatmap cells show how many ms the most uneven interval is off.
- Hands vs Feet Bias: the offset and stability of hands and feet separately; in the example the hands drag and the feet are on time.
- Hand Independence: compares hand offsets on steps that also have a foot with steps that don't, to see whether the feet throw the hands off.
- Foot independence: the other way round — whether the kick gets pulled early or pushed late when the hands play on the same step. In most grooves the kick lines up with the hi-hat, so kicks without hands are rare; this only appears with at least 8 hits on each side (common with 16th-note kicks and double bass).
- Left vs right foot (double bass): mark the kick with R/L and you get each foot's offset and stability; a foot that's later (by 6ms or more) or less steady is named outright. It appears with at least 8 hits per foot. If only the feet are marked R/L and the hands aren't, "Timing by Hand" above already becomes "timing by foot", so it isn't repeated here; when both hands and feet are marked, that section pools right hand with right foot, so the two feet are split out here.
- Foot beat positions: when the feet play off-beats and those are clearly earlier or later than the on-beats (6ms or more), or one position is 6ms further off than the feet overall, a line is added under "Hands vs Feet Bias", e.g. "Foot beat positions: off-beats generally later than on-beats". If there's no difference, nothing is said.
Per-bar analysis: "Hand–Foot Unison Alignment" and "Figure Spacing" each have a loop × bar heatmap below them. Each row is a loop and each column a bar of the module; the colour says how on time that bar was (green = on time, yellow = a little off, red = clearly off). The right-hand column is the whole loop, and the bottom row "All loops" pools the same bar from every loop (it isn't an average of the loop numbers). A whole column in red means that bar is hard in itself — go back and practise it alone; getting redder towards the bottom means you're tiring. Click a cell to select one bar, a column header to select that bar in every loop, a row header to select a whole loop; you can also drag, Shift- or Ctrl (⌘)-click to select more. With bars selected, both cards' charts, conclusions and numbers count only those bars, a dashed line marks the whole run for comparison, and the detail panel lists only the selected bars. The selection is shared with the report's other charts and Bar replay, so you can play those bars straight away; click outside the selection or press Esc to go back to the whole run.
Velocity analysis
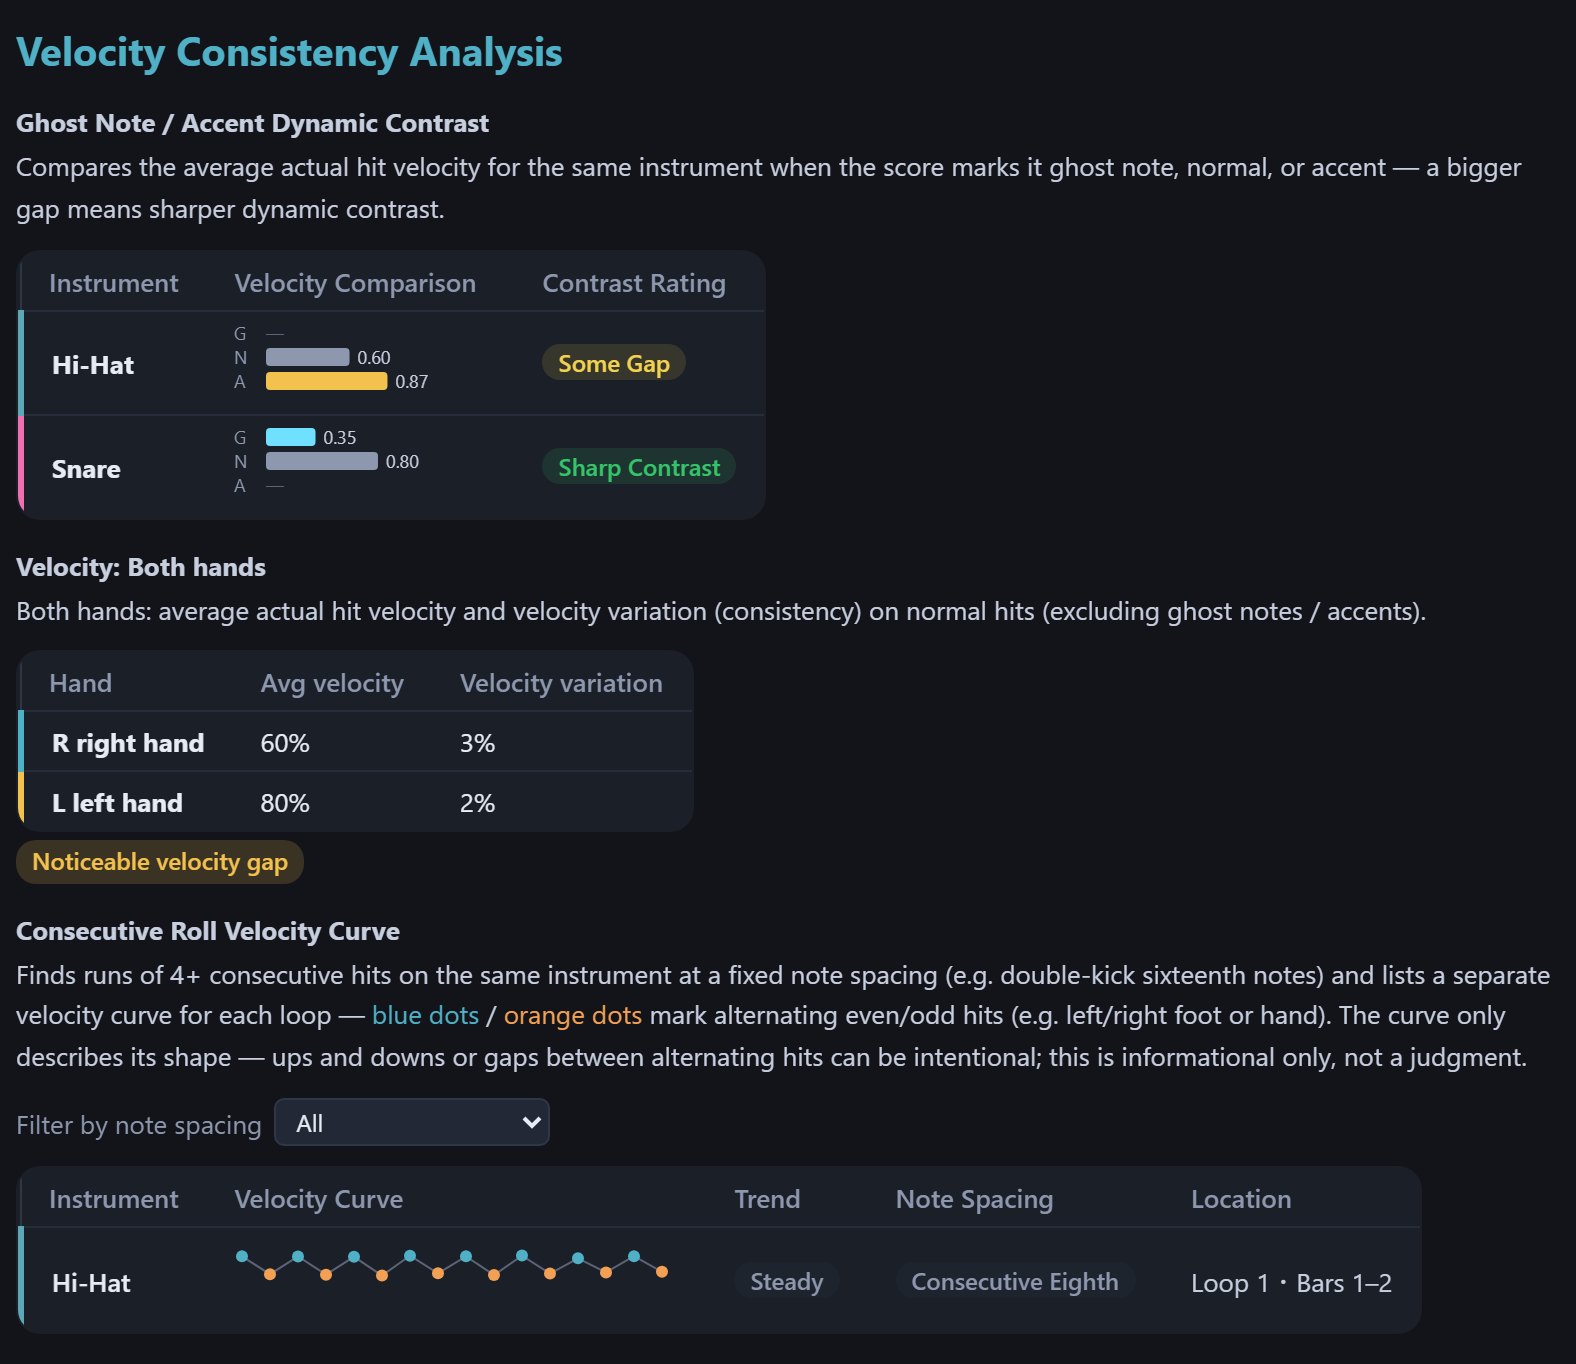
- Velocity Consistency Analysis: each drum's average velocity and variation — are the same notes played equally loud?
- If every hit has exactly the same velocity (keyboard and touch simulators usually don't send velocity), the top of this section says velocity changes couldn't be detected and your simulator may not support velocity, and the velocity line in the overall summary says just that.
- Ghost Note / Accent Dynamic Contrast: with accents or ghost notes marked, compares their velocity with normal notes. Too little contrast means accents aren't strong enough or ghost notes aren't soft enough.
- Velocity by hand: with sticking marked, compares the two hands' velocity.
- Consecutive Roll Velocity Curve: the velocity trend through fast runs of notes (e.g. getting quieter); filter by note spacing (quarter to thirty-second notes, sextuplets).
The Keyboard Simulator only has three velocity levels and the touch simulator is mostly a fixed velocity, so velocity analysis is only meaningful with a real e-drum kit.
Track Record and playback
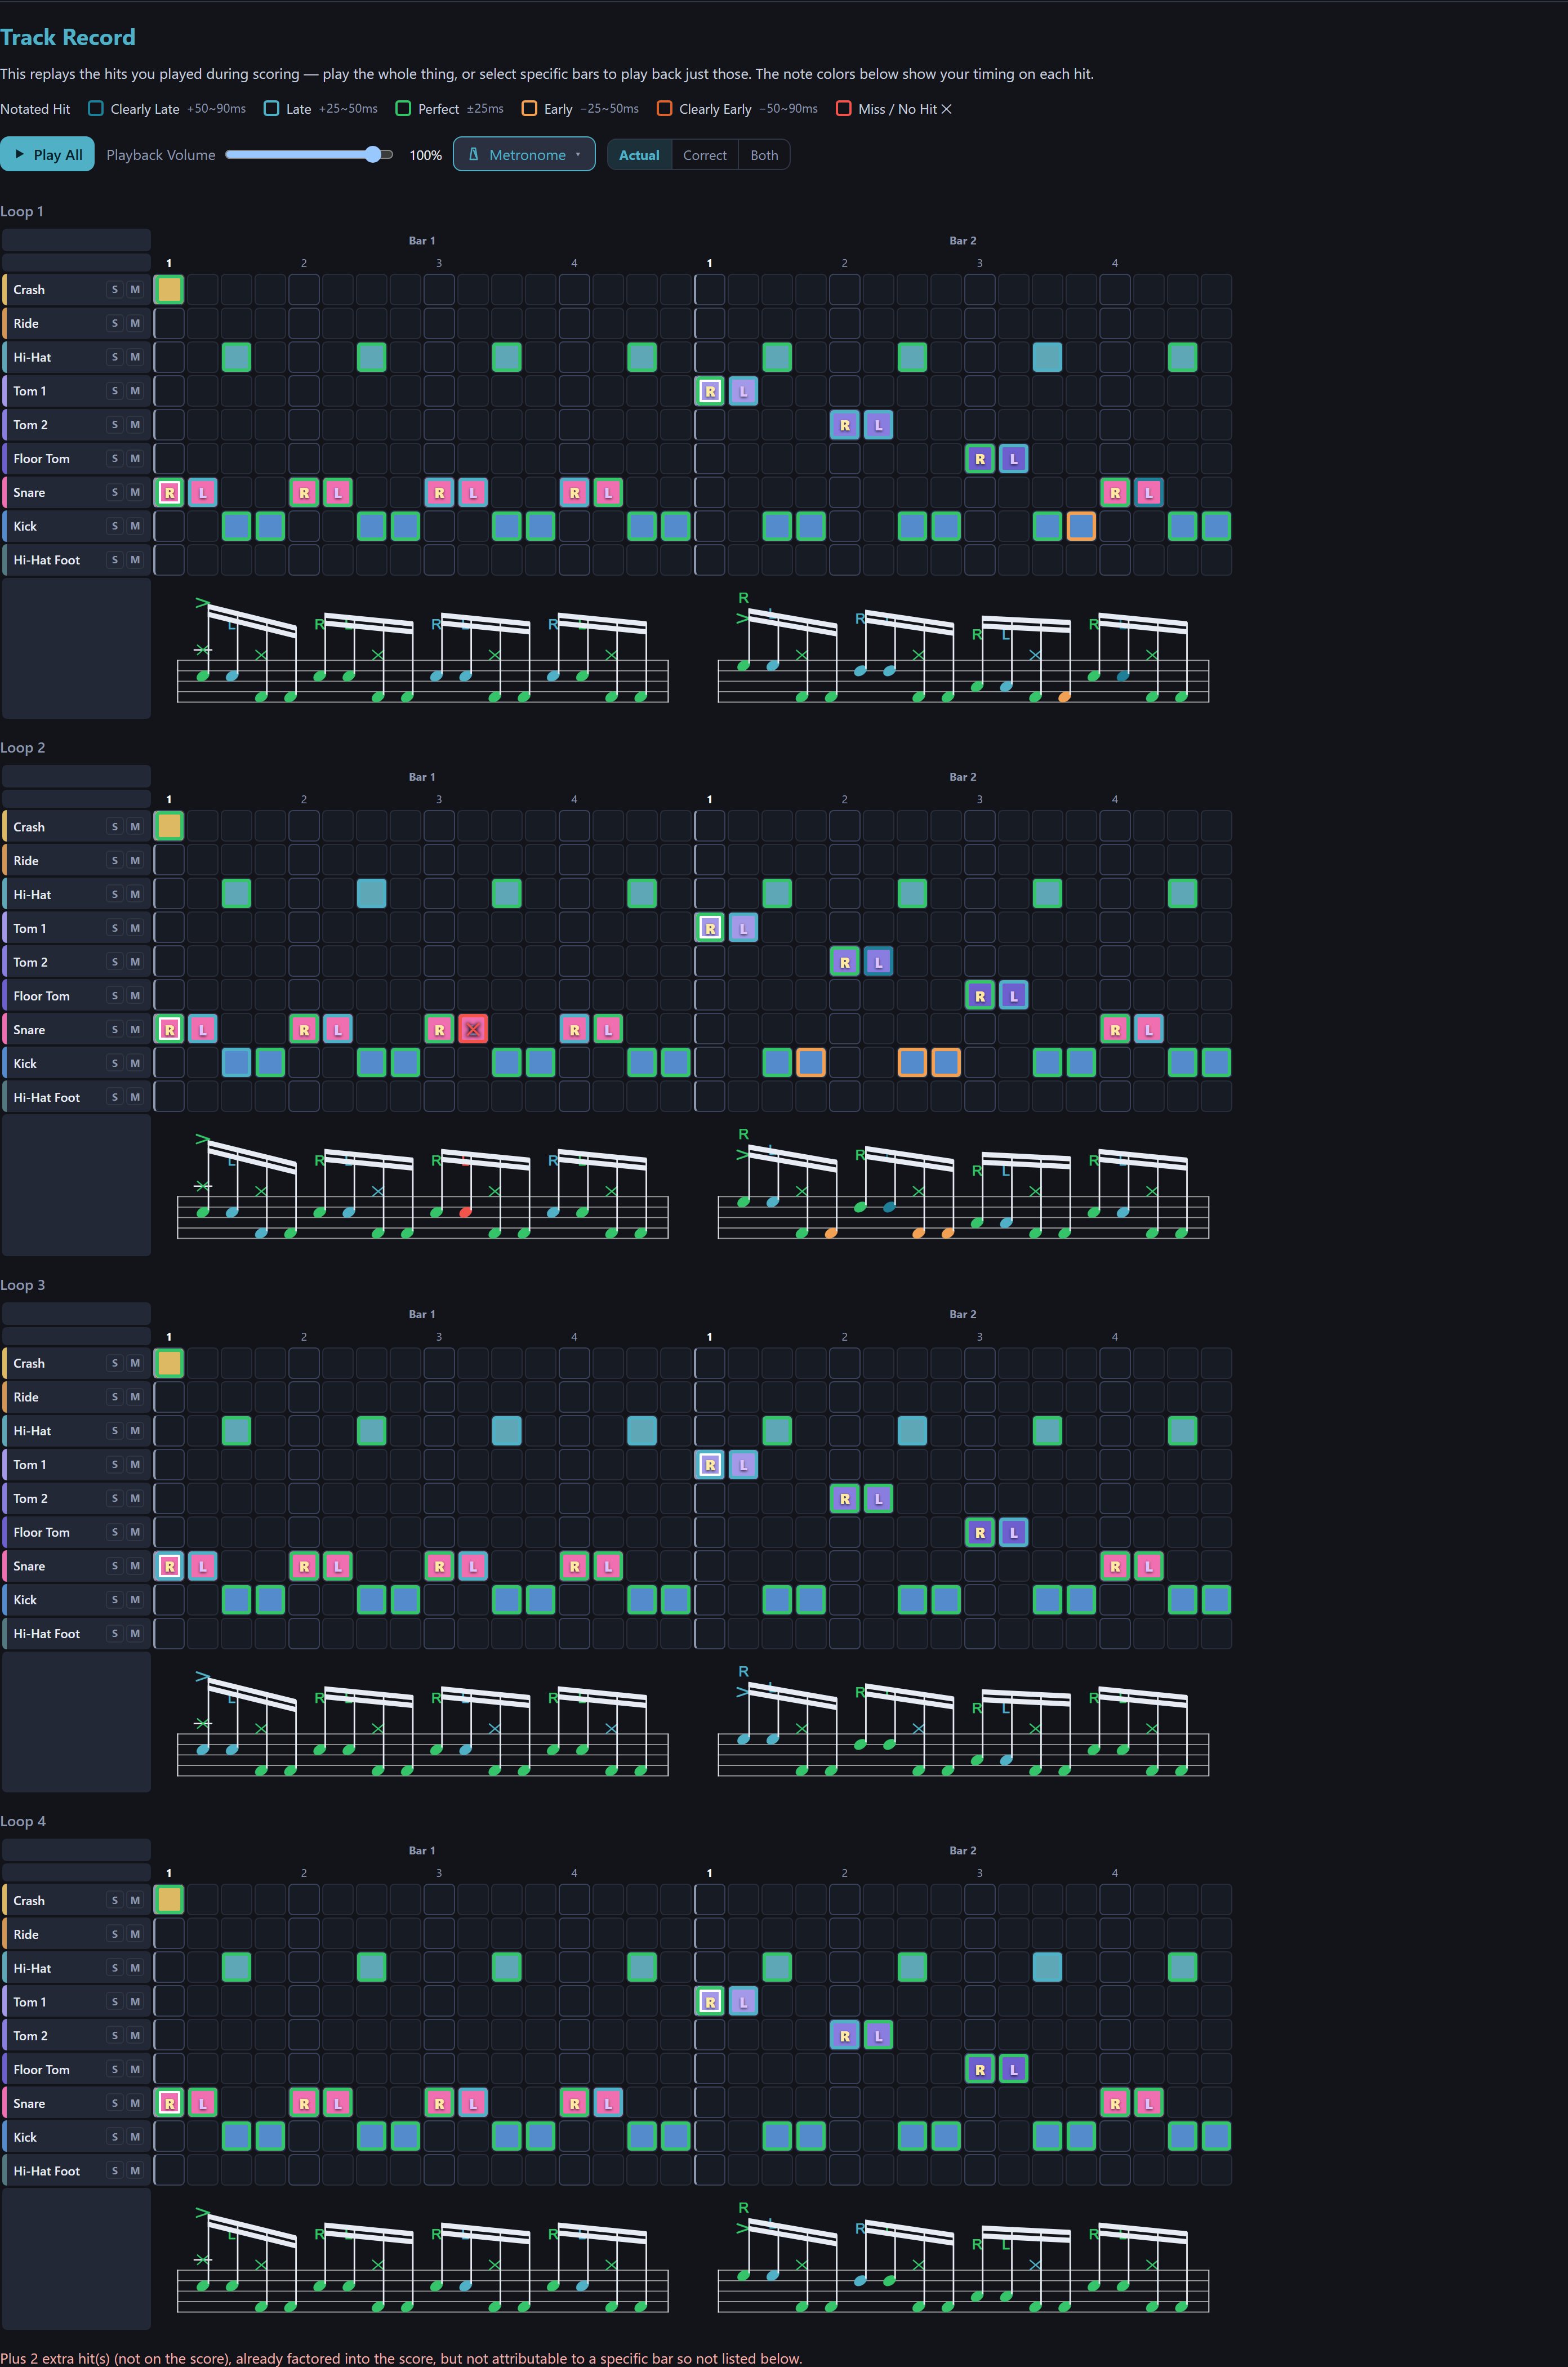
Every loop is drawn as a grid plus score, coloured by each hit's judgement (with many bars, scroll sideways within that loop's block; instrument names stay fixed on the left):
| Colour | Meaning | Offset |
|---|---|---|
| Dark teal | Clearly Late | +50 to 90ms |
| Teal | Late | +25 to 50ms |
| Green | Perfect | ±25ms |
| Orange | Early | −25 to −50ms |
| Dark orange | Clearly Early | −50 to −90ms |
| Red + ✕ | Miss / No Hit | — |
- Play All: hear what you actually played (replayed with your timing and velocity). After selecting bars you can Play Selected Bars.
- Playback volume and the metronome (on/off, subdivision, volume, downbeat accent) can be adjusted.
- The S on the left of each track is solo and M is mute — for example to hear only the snare your left hand played.
- Extra hits that aren't near any cell in the score are noted separately rather than shown in the grid.
Bar replay panel
The Bar replay switch in the report toolbar is on by default: the panel sits collapsed at the top right, and opens automatically as soon as you select bars on any chart, with the selected bars pasted into it so you can play them without scrolling down to the track record; clearing the selection tucks it away again. Turn the switch off if you don't need it (it's back on next time you open a report).
- The panel shows the selected bars' grid and score (split by loop, only tracks with notes), the judgement colour legend, Play Selected Bars, playback volume, the metronome and each track's S/M.
- What to play: Actual is what you played (timing and velocity reproduced faithfully), Correct is the score's ideal version (every note on time, with the score's accent/ghost velocities), and Both plays them together — the bigger the offset, the more it sounds like two hits. Play All in the track record below has the same choice.
- Single notes: click a cell with a note in the panel, or a note in its score, to hear just that hit (no metronome), following Actual/Correct/Both; with "Both", the correct hit is on time and yours is offset by your timing error.
- Drag the title bar to move the panel (it returns to the top right each time you open a report) and drag the handle at the bottom left to enlarge it (the minimum is the default size, which it returns to next time); — at the top right collapses it to the top right of the screen, click to expand; ✕ closes the panel (and turns the switch off).
- Using the panel doesn't clear the selection, and playing from the panel doesn't scroll the report.
7Sign up and sign in
Every practice and scoring feature works without signing in, with data stored on this device. Signing in stores data in the cloud, so it's there on other devices too, and lets you create share links.
What syncs once you're signed in
Modules and groups, score history, kit settings (sounds, volumes, which drums are shown, custom pieces, MIDI mappings and brand), latency compensation and saved devices, keyboard keys, preferences and the app language.
Signing in and registering
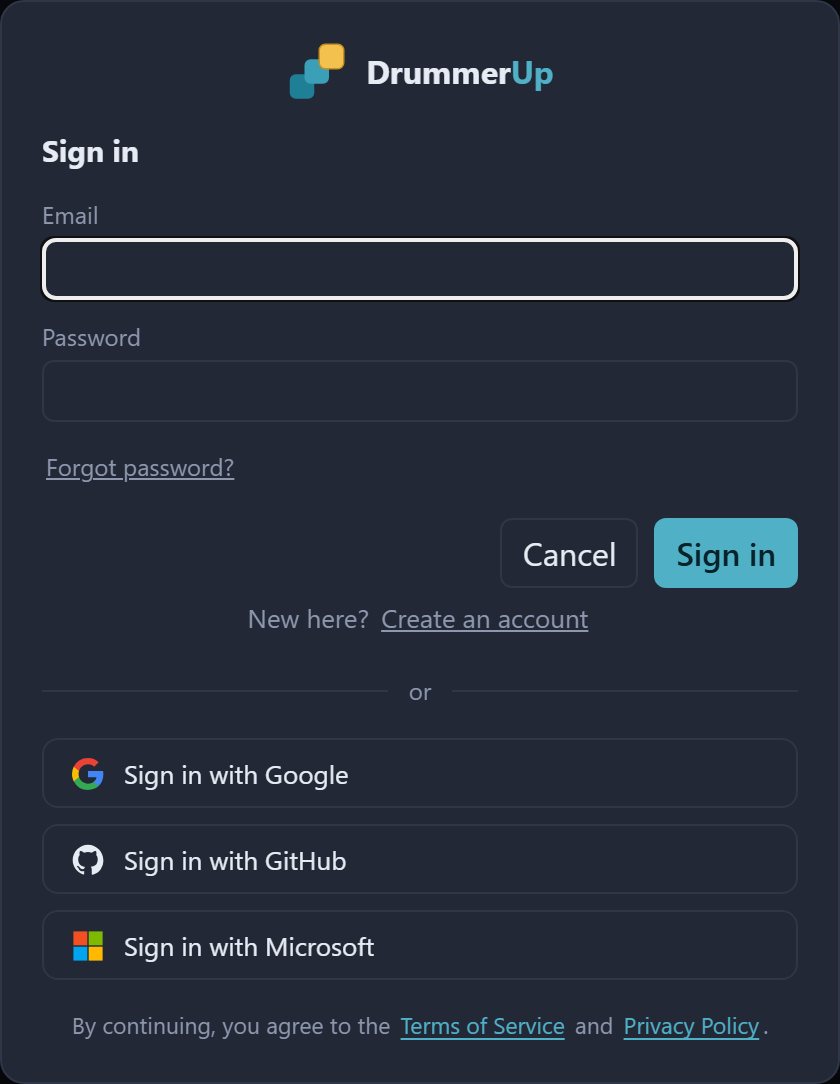
- Press Sign in at the top right.
- With email: enter your email and password and press "Sign in".
- First time: press "New here? Create an account" at the bottom, fill in a display name (optional), email and password (twice), and press "Register". Passwords need at least 8 characters with letters and numbers, can't be a common password (such as password1 or abcd1234), and can't contain the part of your email before the @; the checklist below ticks off each rule as you type. A verification email is sent to the address after registering (see "Verify your email" below).
- Other accounts: below the divider you can sign in with Google, GitHub or Microsoft.
- Forgot your password: enter your email above, then click "Forgot password?" and check your inbox for the reset email.
Verify your email (email accounts)
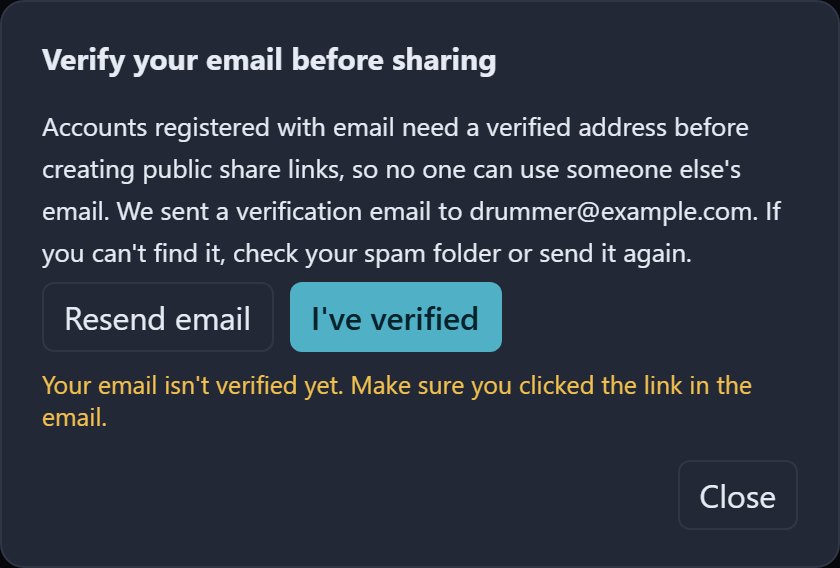
Accounts registered with email need you to click the link in the verification email to confirm the address is yours. Until then practice, scoring, saving and cloud sync all work as usual; only creating share links waits for verification. Accounts signed in with Google, GitHub or Microsoft don't need to verify.

- Find the verification email from DrummerUp in the inbox you registered with and click the link. Can't find it? Check your spam folder.
- Back in DrummerUp, it's checked automatically when you return to the tab; you can also press I've verified in the banner. The banner disappears once you're verified.
- Didn't get the email? Press Resend email (once every 60 seconds).
- Pressing share before verifying opens the window on the right first; verify in that window and the share settings open straight after.
- You can close the banner with ✕; it comes back after a reload. The verification status also shows under your email in Account Settings → Profile, with an option to resend.
- Share links you've already created are unaffected and can still be updated or revoked.
Profile and signing out
Once signed in, click your avatar at the top right to see the account you're signed in with, and choose Account Settings or Sign out.
- Account Settings → Profile: Upload new avatar (after picking an image, the circle shows how it will look: drag to move, zoom with the mouse wheel, two fingers or the slider below, then press "Apply") or remove it; see your registered email (email accounts show whether it's verified); change your Display name (press "Save display name"). When you share "publicly", people see your name and avatar.
- Account Settings → Change password (email accounts only): enter your current password, then the new one twice (same rules as registering). Accounts registered with an older, shorter password get a suggestion to update after signing in; you can choose "Later".
- Account Settings → Local Data: modules, groups and reports saved on this device while signed out don't show in the library and score history once you sign in. Upload to account copies them to your account (clashing names get a number added) and keeps the originals on this device. If such data is found the first time you sign in, you're asked whether to upload it.
- After signing out you're back in local mode, seeing this device's own data.
Deleting your account
Account Settings → Delete Account. This permanently deletes everything under the account: modules, score history, preferences, and the module and group links you've shared. It can't be undone. Email accounts that signed in a while ago are asked to enter their password again to confirm.
8Account and preferences
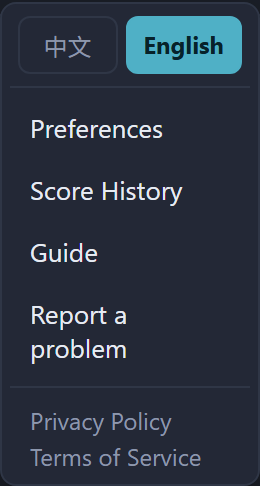
Gear menu
The gear at the top right:
- 中文 / English: the interface language, switched instantly.
- Preferences: see below.
- Score History: the list of every scored run.
- Privacy & Analytics: analytics is not enabled at the moment, so this item isn't in the menu. When it is, this is where you'll choose whether Google Analytics may collect anonymous usage statistics; DrummerUp shows no ads and sells no data, and nothing is enabled before you agree. See the privacy policy.
- Guide: opens this guide.
- Report a problem: fill in a title and details, optionally leave a contact email and attach a screenshot (you can paste one directly); it's sent to support@drummerup.com. The app version, browser, screen size, current module and similar details are included to help reproduce the problem.
- Privacy Policy and Terms of Service: the two links at the bottom of the menu, opened in a new tab.
Preferences
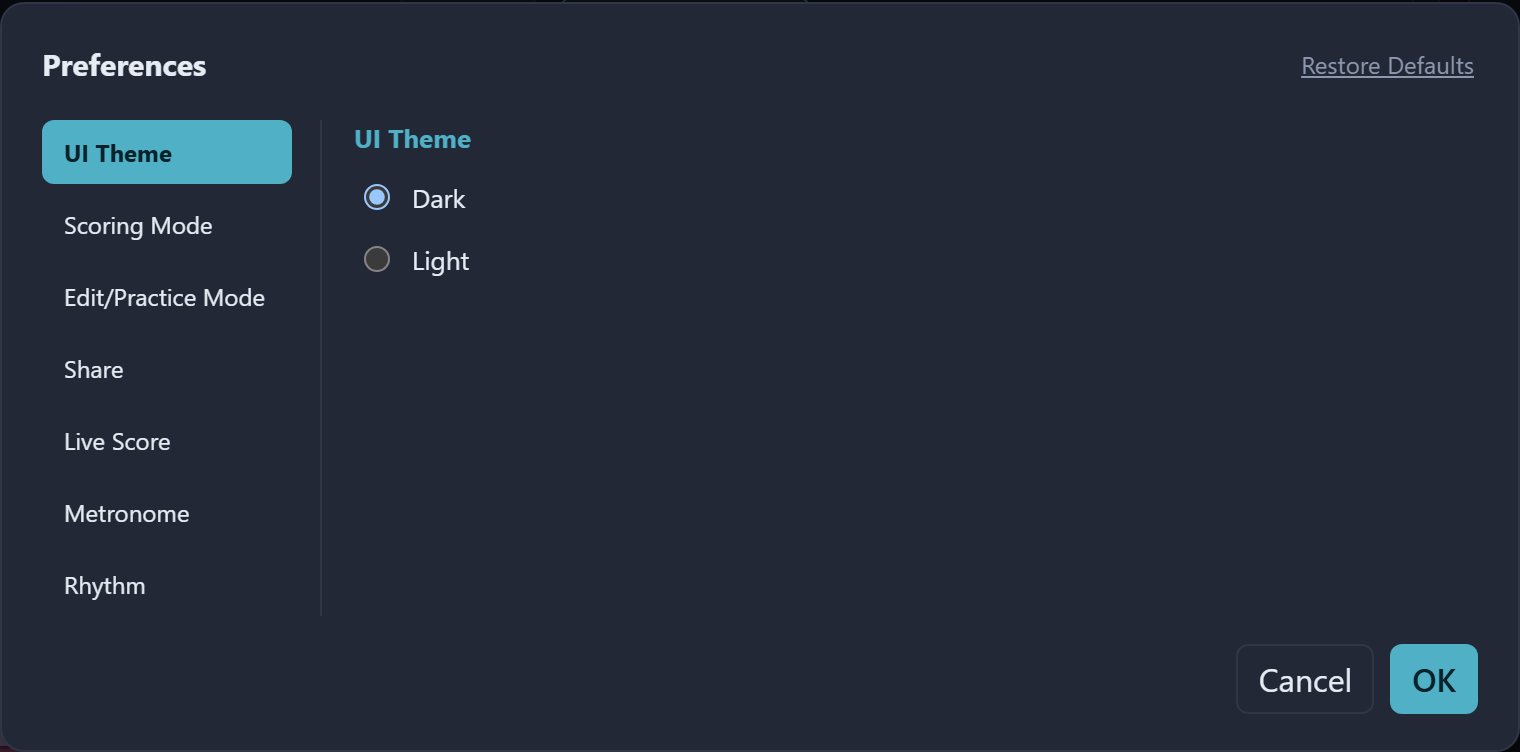
Pick a category on the left and change settings on the right; nothing applies until you press OK. Restore Defaults puts every item back to its default (you still need to press OK).
| Category | Setting | Default |
|---|---|---|
| UI Theme | Dark / Light | Dark |
| Scoring Mode | Default count-in | 4 beats |
| Hide the step grid and centre the staff when switching to Scoring Mode | On | |
| Edit/Practice Mode | Default Loop Count (or infinite) | Infinite |
| Default count-in | 0 beats | |
| Share (when signed in) | Default sharing mode: public (shows your account name and avatar) or anonymous | Anonymous |
| Anonymous share name | Anonymous Drummer | |
| Default link expiry | 90 days | |
| Default share message (up to 200 characters) | A built-in invitation | |
| Live Score | Staff layout: single / double staff | Single staff |
| Score colour: dark / light | Dark | |
| Dynamic score: no dynamic effect / note color highlight / playback cursor / both | Note color + playback cursor | |
| Metronome | Default subdivision: quarter / eighth / triplet / sixteenth | Quarter |
| Accent first beat of each bar | On | |
| Rhythm | Grid subdivision (quarter / eighth / sixteenth notes) and time signature for new empty modules (only affects modules created with "+ New Module" afterwards) | Eighth notes, 4/4 |
When signed in, preferences are stored in the cloud and follow you to other devices; signed out, they're stored on this device. The touch simulator's panel position, size and drum layout, and the iPad notice's "Don't show again", are stored on this device only.
QFAQ
Do I need a microphone?
No. DrummerUp reads the MIDI signal your e-drum kit sends over USB (or input from a computer keyboard or touch screen) to score you. It never uses a microphone, so it can't score an acoustic kit.
Which e-drum kits are supported?
In principle any USB-MIDI e-drum kit. Built-in mappings cover Roland, Alesis, Yamaha, EFNOTE and General MIDI, and any pad that doesn't line up can be reassigned with MIDI Learn. So far only the Roland TD-17 has been tested in practice.
Can I use it without an e-drum kit?
Yes. On a computer choose "Keyboard Simulator" and play on the keyboard; on a phone or tablet choose "Touch simulator" and play on the screen. Both are scored the same way.
Does it cost anything?
No. DrummerUp is free, needs no installation, and you can start without signing up.
My iPhone or iPad doesn't receive anything from the kit?
No browser on iOS supports Web MIDI, so open DrummerUp in MIDIWeb Browser instead. Any browser is fine for editing or reading scores, and you can play with the touch simulator.
I can't sign in with Google in MIDIWeb Browser?
That browser doesn't support third-party sign-in such as Google, GitHub or Microsoft for now, so register with an email account. Sign in with the same email on your computer and your data stays in sync.
Can I lose my data?
When you're not signed in, data is stored in this browser and is gone if you clear browsing data or switch browsers, so export backups regularly. Once you sign in, modules and score history are stored in the cloud.
?Still have questions?
If something isn't covered here, doesn't work as described, or you'd like a new feature, write to support@drummerup.com.